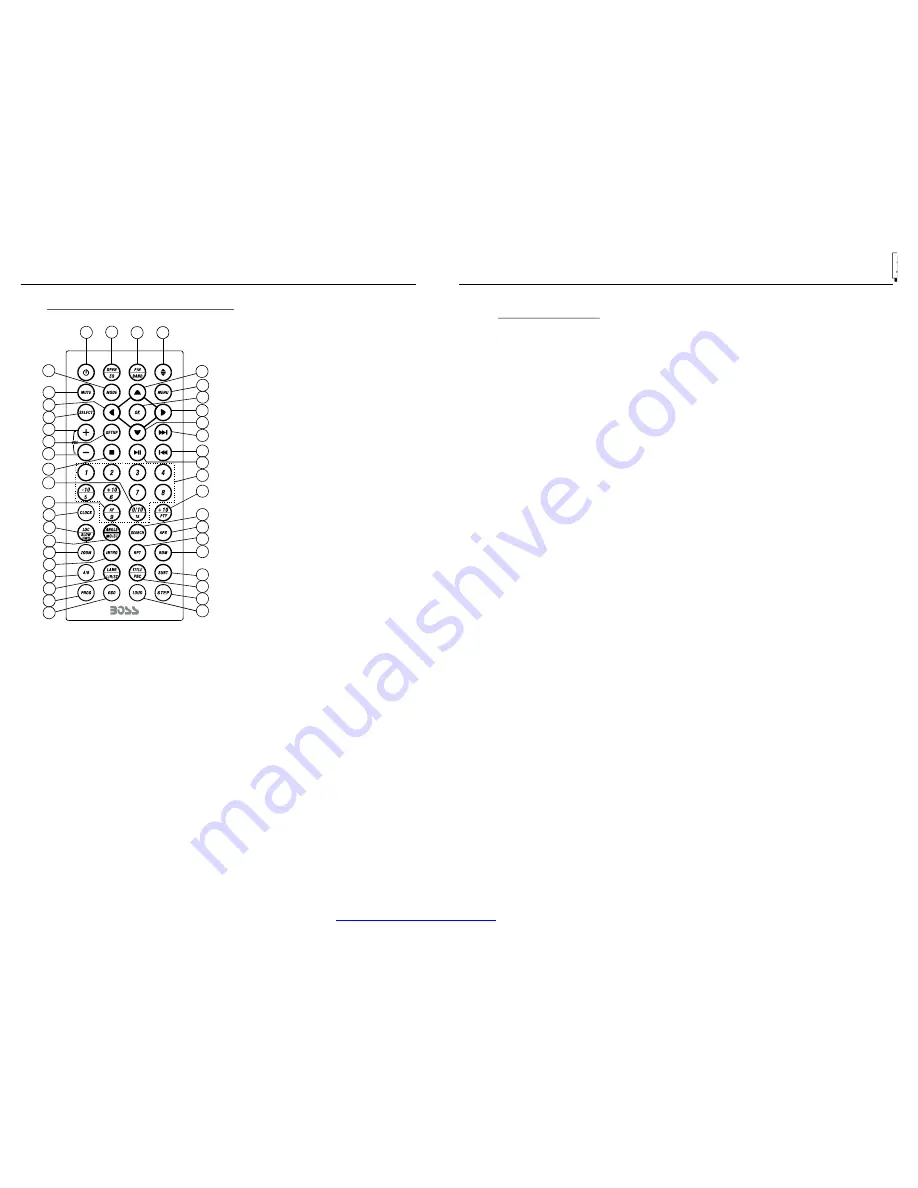
1.5 The Remote Control Description
16. SEARCH BUTTON
17. RDM BU TTO N
18. RPT BUTTO N
19. SUBTITLE BUTTON
20. TITLE/PBC BUT TON
21. ANG LE/ST BUTTON
22. ZOOM BUTTON
23. AUDIO BUT TON
24. CLK BUTTON
25. A-B BUT TO N
26. INT BUT TON
27. EQ/OPEN BUTTON
28. LOC/SLOW-FWD BUTTON
29. MUTE BUTTON
30. STOP BUTTON
31. VOLUME- BUTTON
32. < BUTTON
33. OK BUTTON
34. BUTTON
35. BAND and P/N BUTTON
36. PROG BUTTO N
37. OSD BUTTON
38. LOUD BUTTON
39. STEP BUTTON
40. TA BUTTON
41. AF BUTTO N
1 . TILT BU TTON
2. MENU BUTTON
3. PO WER BU TTON
4. ^ BUTTON
5. >>| BUTTON
6. > BUTTON
7. |<< BUTTON
8. v BUTTON
9. SEL BUTTO N
1 2. 10+/PTY BUTTON
13. SETU P BUTTON
14. MODE BUTTO N
1 5. APS BUTTON
10. PLAY/PAUSE BUT TON
11. NUMBER(0~10,+10
-10) BUTTONS
1
2
3
4
5
6
7
9
8
10
11
12
13
14
15
16
17
18
19
20
21
2 2
23
24
25
26
27
28
29
3 0
31
3 2
33
3 4
35
40
4 1
39
36
37
3 8
5. Trouble Shooting
Please read the use r
’
s manual ca refully before using the DVD player. If you have any troubles
in using this p layer, try to solve the prob lems by the sugge stions mentioned b elow. If you can
not remove th e trouble after using all th e sugg estions, ple ase contact the com pany or the
te chnical service ce nter authoriz ed by us. For the sake of your safety, please do not open the
cover and rep air the player by yourself, if that , it may cause electric shock.
NO PICTURE, SOUND AND INDICATION
* Ensure that the po wer switch is on.
* Ensure that the po wer cord is n ot damaged or the fuse i s not blown.
* Ensure that the power plug is connec ted to the inlet tigh tly.
NO SOUND BUT HAVE PICTURE
* Ensure that the player
’
s audio output has a good connection with am plifier
’
s audio inpu t.
* Check whether th e audio conn ector is damaged.
* Check whether yo u have turned dow n the volume.
* Ensure that you have se t the right AUDIO setup o f the p layer.
* Ensure that the au dio is not un der muted.
NO PICTURE BUT HAVE SOUND
* Ensure that the player
’
s video output has a good conne ction with monitor
’
s video input.
* Ensure that you have tu rned your monitor t o the AV inpu t chan nel connecti ng to your player.
* Check whether th e video conn ector is damaged.
* Ensure that you have se t the right VIDEO settings of the playe r.
BLACK AND WHITE PICTURE OR SCREEN ROLLING
* Ensure that you have se t the right TV SYST EM (e.g. PAL, NTSC) setting.
F LAWS OF PI CTURE OR SOUND
* Check whether th e setting of AUDIO is righ t.
* Check whether th e disc is scra tched or stained.
* Check whether th e AV connector and the output terminal is stained.
* Check whether th ere is condensation insid e the L ens. If so, leave the player off for an hour
or so, then try aga in.
* Check whether th e insta llation angle is less than 30
.
DISPLAY NO DISC OR BAD DISC
* Ensure that you have put the d isc in the unit.
* Check whether th e disc is put in the r everse side.
* Check whether th e disc is distorted.
* Check whether th e disc is stained or scratched badly.
* Ensure that the disc format is c ompa tible to the player.
* Ensure that the tempera ture inside the car is not too high. If so, cool off till the am bient
temperature retur ns to n ormal.
* Replace another disc to insert it into the dis c com partment.
REMOT E CONTROL IS INSENSITIVE OR DOES NO T WORK
* Check the batteries of re mote contro l and m ake sure that they are po werfu l and have
good conductivity.
* Direct the remote control to the IR sensor of the player.
* Check whether th ere are some obstacles b etwee n the r emote control and IR sensor.
SOME FUNCTION BUTTONS DO NOT WORK
* Turn off the power, then turn on again.
* Reset the unit to zero, then tur n on again.
* Remove the front panel from th e unit , then install it again and then turn on again.
T HE RADIO DOES N OT WORK
* Check whether th e antenna cable is connected firmly. Or man ually t une for a station.
°
PDF created with FinePrint pdfFactory trial version
http://www.pdffactory.com
Содержание BV9970
Страница 1: ......


