background image

INSTRUCTIONS

INSTRUCTIONS

05

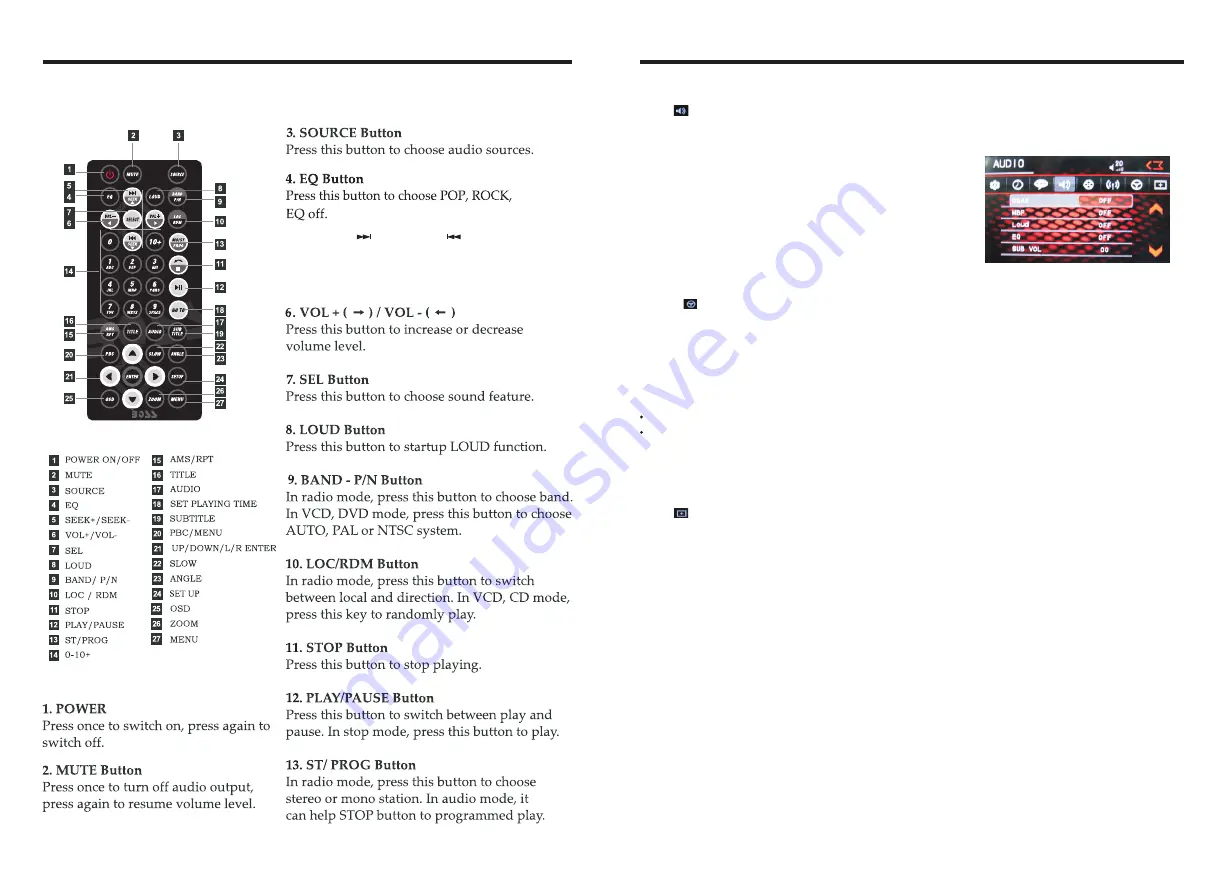
REMOTE CONTROL FUNCTION

1

4

Click      icon on setup interface to access audio setting interface, as shown in 
diagram:

right(PIC 1)

Audio setting

You can turn on or turn off the existing functions on audio setting interface.

Steering wheel setting 

II.Connect anode and cathode of direction control wire of the car with anode and cathode of
    direction control wire of this device, and press the buttons on steering wheel one by one
    and record the corresponding sequence and functions.
III. Click the button of steering wheel needs to be allotted so as to select the corresponding
     setting function, such as . 
      

I. Click      icon on setup interface so as to access steering wheel setting interface.

IIII. Buttons on steering wheel shall display the corresponding functions, such as .

To reset functions, click [Reset] icon, all the settings set before shall be cleared, repeat 
procedures 3~4 for resetting.

To modify function settings, repeat procedures 3~4. 

Touch calibration

If touch calibration error occurs, you can adjust the touch coordinate by “Touch calibration”.
Click       icon on setup interface, input password [888888] to confirm to access touch 
calibration interface, as shown in below diagram:

Touching methods

Use touch pen to click the center of “+” icon, and move along with center of “+” icon so as 
to calibrate the screen. It shall automatically save data and exit after screen calibration.
Please accurately click all positions on screen, or the accuracy of touch calibration shall be
affected.

PIC 1

CLASSIC

5.SEEK+ (      )/ SEEK- (       )button

In normal playback MP3, USB, SD songs, 
press this button to previous song or next
song.

Содержание BV9561B

Страница 1: ...WITH DUAL FRONT AND REAR USB AND SD MEMORY CARD PORTS AND SIDE PANEL AUX INPUT WITH DUAL FRONT AND REAR USB AND SD MEMORY CARD PORTS AND SIDE PANEL AUX INPUT BV9561B BV9561B...

Страница 2: ...shooting 16 Accessory Specifications 18 17 18 Time setting 13 External input operation 12 Other Function Operations 12 Rear view function 12 DVD Parental control function ACCESSORY DVD Parental contro...

Страница 3: ...menu press setup icon to enter the setup interface Step2 Press the Radio icon and insert password 123456 then press OK the menu from which you can select the radio frequency will show Step3 Press Radi...

Страница 4: ...erting another one Weak signal Move the car to another place then research Cannot play disc Disc is scratched Change new disc Put wrong side of disc into the unit Insert in the disk with sign side up...

Страница 5: ...14 12 13 12 13 14 INSTRUCTIONS 04 INSTRUCTIONS 15...

Страница 6: ...ce IIII Buttons on steering wheel shall display the corresponding functions such as volume To reset functions click Reset icon all the settings set before shall be cleared repeat procedures 3 4 for re...

Страница 7: ...splay as shown in below PIC 3 diagram Click icon beside hour and minute to separately set hour and minute Video setting Click PIC 5 diagram icon on setup interface to access video setting interface as...

Страница 8: ...disk operation methods When the ignition switch is put in ACC or ON position Press button on the front panel to turn on the unit After the host starts hold button for 3 seconds the host will turn off...

Страница 9: ...ough the number buttons on the screen click to delete if there is input error After input the phone number click to make a call and click to hang up the phone Click during a call so as to switch the v...

Страница 10: ...o eject the disc 2 If a disc has not been took away 15 seconds after it is ejected system will automatically take in the disc but not play Play eject disc Play disc Insert the disc into the disc slot...

Отзывы: