background image

SetUp Menu Operations

E - 2

 1

3

4

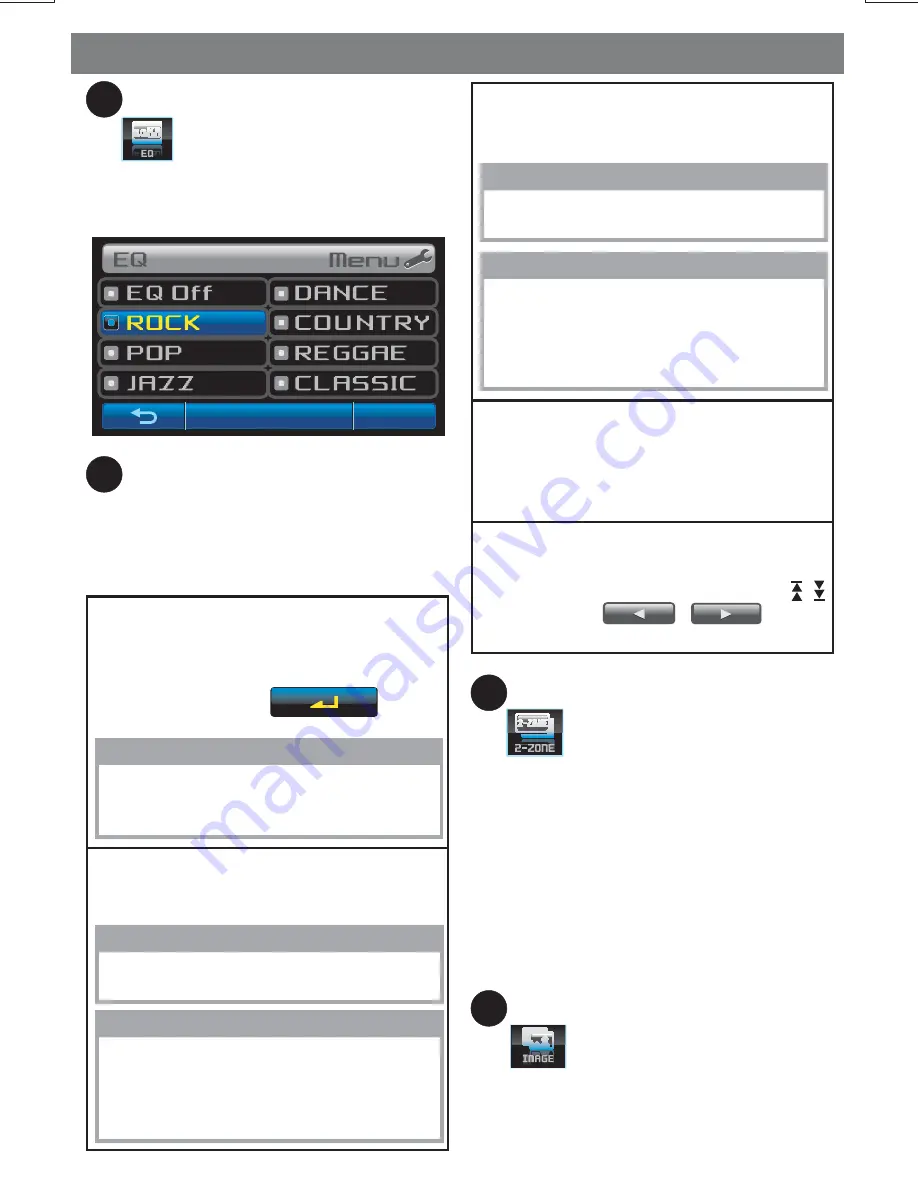
PRESET EQ SETTING

Bluetooth Setting Menu

Tap

button to access into the EQ Menu.

Under the Preset EQ Setting, there are the
below 8 different types of preset equalizer
available for user selection.

Tap BT logo button on display to access into

the Bluetooth Menu.

The below Bluetooth

Setting can be select:

Pairing

Paired (handfree)

This feature is used for the pairing of this
unit's Bluetooth system to mobile phone or
other Bluetooth device. Under the “Pairing”
mode, touch screen

button

to activate the Pairing.

In this Menu will displayed the list of Paired
Mobile Phone with this unit.

TIPS

TIPS

Please refer to 

“Pairing, Connecting And 

Deleting With A Bluetooth Device”

for

the details operation of “Pairing”

User can select the paired Mobile Phone 
from the list for dis-connect or delete it
from the list, please refer to page of

“Pairing, Connecting And Deleting
With A Bluetooth Device”.

NOTE

This unit can paired up to 8 devices with 
Handsfree and / or Audio Device.

Paired (audio)

Auto Answer

Phone Vol

In this Menu will displayed the list of Paired
Audio Device with this unit.

This unit is default in “Off” mode. If “On” is
selected, the unit will automatically answer
any incoming call without the need of
pressing the PHONE button.

This unit can preset the ringing volume level
for any incoming call. User can press the
or touch screen

buttons

to adjust from Min 00 to Max 46.

TIPS

User can select the paired Audio Device 
from the list for dis-connect or delete it
from the list, please refer to page of

“Pairing, Connecting And Deleting
With A Bluetooth Device”. 

NOTE

This unit can paired up to 8 devices with 
Handsfree and / or Audio Device.

&

&

5

6

2-Zone

Image Setting

Tap

button to access into the 2-Zone

menu.

Tap

button to access into the Image

Setting Menu. In this menu user can select
his/her favor image use as wallpaper on the
playback mode. There is two sources of image
for selection:

1. If Front Zone is selected, press the volume

Up / Down

to navigate through different

modes: Tunner > BT are available for
selection of the Front Zone or AV output.

2. If Rear Zone is selected, press the volume

Up / Down to navigate through different
modes: Tunner > Disc > Card > BT > AV-1
> AV-2 are available for selection of the Rear
Zone or AV output.

Содержание BV9350

Страница 1: ...4 10 R 02 1011...

Страница 2: ...LEASE REFER S E R V I C I N G T O A Q U A L I F I E D TECHNICIAN This product incorporates copyright protection technology that is protected by method claims of certain U S Patents and other intellect...

Страница 3: ...ould be subject to dust dirt or excessive vibration 7 Be sure to remove the front panel before installing the unit Installation with the half sleeve After inserting the half sleeve into the dashboard...

Страница 4: ...PRE AMPLIFIER LINE OUT LEFT REAR PRE AMPLIFIER LINE OUT LEFT FRONT SPEAKER POWER ANTENNA BATTERY RIGHT FRONT PRE AMPLIFIER LINE OUT FRONT PRE AMPLIFIER LINE OUT COMMON RIGHT FRONT SPEAKER RIGHT REAR S...

Страница 5: ...ume Play the music under Media player mode 1 2 3 4 5 Press this button to select different source playback mode TUNER DISC USB SD CARD BT AUDIO AV IN MODE SOURCE CAPTURE CLOCK During video image playb...

Страница 6: ...this button to decrease the volume Insert the disc into CD slot The CD will begin to play This unit can support playback MP3 WMA JPEG MPEG4 DIVX format which are stored on the SD Card VOLUME VOLUME D...

Страница 7: ...n press this button to change Front zone or Rear zone Press this button to increase the volume Press this button to decrease the volume Press this button to enter into the AUDIO mode Under the tuner m...

Страница 8: ...as wallpaper FUNCTION LIST GOTO ZOOM ANGLE DIMMER INFO DISC AUDIO SUBTITLE TITLE Press this button to enter into the function mode UndertheDVDmode pressthisbuttontopopupthesearchMenu When playback the...

Страница 9: ...ure is available with each unit Tap button to power off the unit and the below display will be shown on TFT Under the SOURCE menu the below options are available for selection POWER OFF See You The un...

Страница 10: ...touch anywhere on the display or press any button on the front panel NOTE Tapping button switches thru each of the three different Motion Picture modes The TFT screen will have around 1 2 seconds BLAN...

Страница 11: ...6 2 C Freq adjust the Middle Range center frequency as 500Hz 1KHz 1 5KHz or 2 5KHz 3 Mid q adjust the desired Middle Quality Factor to 1N 2N 1W or 2W To adjust the Balance between the right and left s...

Страница 12: ...Vol In this Menu will displayed the list of Paired Audio Device with this unit This unit is default in Off mode If On is selected the unit will automatically answer any incoming call without the need...

Страница 13: ...s button to select Erase Current or Erase All TIPS This unit max can capture 10 images and pre store into My Image 7 Display Setting Tap button to access into the Display Setting menu and there are ha...

Страница 14: ...This option allows the selection of the frequency spacing which is most appropriate for the status the unit is in U S A EUROPE Tap bar to change AF in On or Off mode BAND Auto Store Local Seek Tuner A...

Страница 15: ...Supported Bit Rates 64 256 kbps variable bit rate Playback IMAGE JPEG DVD Video MPEG4 on CD ROM or DVD ROM or USB or Memory Card Noted of MPEG4 Supported decoding MPEG 4 video defined by ISO 14496 2...

Страница 16: ...eased ONE play the current track repeatedly During the disc playback select Random On to play all tracks on a Disc in Random order select Random Off will stop the Random play Repeat Random FOLDER play...

Страница 17: ...Cl c Cli k c Mode Change to SD Card After a SD Card was inserted into the main unit card slot The unit will automatically start playing the files contained on the SD Card NOTE If no SD Card is insert...

Страница 18: ...playing a scene recorded with multiple angles to change the angle Touch button to bring up the Top Menu on the DVD Touch button to bring up the Menu on the Disc ANGLE TOP MENU MENU Touch button to tu...

Страница 19: ...on Setting the Default on will reset all options of Media function setting to factory defaults setting DVD Setup Default Aspect Ratio Selecting the TV Aspect setting allows the user to select the aspe...

Страница 20: ...etails operation is exactly the same as Media Playback operation The following are special functions pertaining to the playback of File Cyrillic Include Bulgarian Belorussian English Macedonian Moldav...

Страница 21: ...OFF Audio Output for all 4 speakers becomes DVD mode The Default Setting When Dual Zone is On To Switch Off Dual Zone Mode The Default Setting When Dual Zone Is In off Mode 3 The TFT screen will disp...

Страница 22: ...ing Diagram Tips Be sure to connect Reverse wire properly please see more details on Wiring Diagram If user connected a back up camera system to this unit the vehicle is in reverse Gear Back Up mode t...

Страница 23: ...ages to set as wallpaper User also can capture an image from an Auxiliary video device if connected 1 Start playing the disc USB stick SD card or auxiliary video device 2 Hold press the CAPTURE button...

Страница 24: ...e the mobile phone s Bluetooth function is switched ON 10 To ensure the best conversation quality performance keep talking within 1 meter of the Head Unit 11 If user want to Dis connect the Head unit...

Страница 25: ...OTE Please make sure to check the pairing Bluetooth device make sure the Bluetooth mode is turned ON and the VISIBILITY is set to SHOW Storedimagemaydifferfromtheoriginal aspect ratio due to compressi...

Страница 26: ...lashing on the TFT for 3 seconds And the unit will switch back to the previous mode automatically If the pairing failed the below display will be show on TFT Disconnecting of the Bluetooth System Dele...

Страница 27: ...vel 4 To end the conversation tap button The unit will switch back to the previous mode automatically and release the mute of the previous mode at the same time NOTE An Incoming call under stand by mo...

Страница 28: ...ds To Audio Transfer From Head Unit Back To The Mobile Phone CALL TRANSFER NOTE After the tapped button the present mode will be muted at the same time user can press the button to release the Mute De...

Страница 29: ...unit will automatically pair these two profiles at the same time For example if a mobile phone has both HFP A2DP profile and this mobile phone is already HFP paired with this unit A2DP audio device p...

Страница 30: ...g the Mute button on this unit 2 Track up down by pressing the Track up down buttons on this unit 3 Pause Play by pressing the Pause Play button on this unit 4 Volume up down by pressing the volume up...

Страница 31: ...tio AM or MW Frequency Range Usable Sensitivity S N Ratio 522 1620 Khz 9 kHz Space 530 1720 10 kHz Space 40dB at S N 20dB 40 dB See Disc Note for more details description 0 dB 20Hz to 20Khz 3dB 2 Chan...

Страница 32: ...vel Wiring is not properly connected Check wiring connection The operation keys do not work No sound The built in microcomputer is not operating properly due to noise Press the RESET button Front pane...

Отзывы: