English
Installation and Safety Guidelines
Page 9
pro.Bose.com
Installation
Array Rigging
Each RoomMatch™ full-range module includes integrated side-plate array rigging hardware. The rigging system is designed to
allow fast construction of typical fixed-installation arrays of up to 8 modules, while maintaining a 10:1 Safety Factor. Additionally, the
RoomMatch™ RMS215 subwoofer is designed to integrate with full-range modules in arrays when the optional RMSFLY accessory part
is installed on the subwoofer. To connect RoomMatch™ modules for suspended arrays, the following steps are recommended:
Note:
Prior installation of field wiring and a safety-rated suspension system, e.g. chain-hoist motors or wire-rope slings, is assumed.
Motors may be used as a permanent suspension method or to temporarily elevate an array to final position for attachment to conven-
tional rigging hardware.
Note: All lifting operations require two individuals positioned on each side of the loudspeaker.
Before You Begin – Recommended Tools
(2) 15 mm sockets and socket wrenches
(module to module bolts: M10 x 30 mm)
(2) 17 mm sockets and socket wrenches
(if using frame extender bars)
(2) 17 mm combination wrenches
(for extender bar bolts)
(2) 5/16-inch Aligning Punch
(optional; to aid bolt alignment)
Preparing Modules for Installation
Step 1
Retain orange-color Temporary Installation Handles included in package. Remove the RoomMatch™ modules from the shipping
cartons, remove packing materials, and place the loudspeakers on the floor beneath planned suspension point.
CAUTION:
Do not place loudspeakers resting on grills.
CAUTION:
Place loudspeakers on a flat surface; verify loudspeaker weight is not supported by driver adapters.
Step 2
Locate the temporary installation handles and thread onto each module (see module instruction sheet).
Step 3
Remove four (4) M10 bolts from top of rigging side plates for each module (2 per side).
Section A: Small or Large Array Frame (without Extender Bars)
1.
Use
RoomMatch
™
Array Suspension Angle Calculator
software to determine the hole positions on the array frames for required
aiming angles and confirm array does not exceed load limits of frame.
(You may also contact your local Bose Technical Support or Field Engineer for this information.)
2.
Place array frame directly under the chain motors positioned for intended array location.
3.
Attach 5/8 –inch forged steel frame shackles to array frame in hole positions determined by aiming software.
4.
Lower chain motors and attach to shackles installed on array frame.
5.
Raise array frame to height slightly greater than that of the 1st module (upper most) to be installed.
Note: subwoofer modules should always be placed in the upper-most array positions.
6.
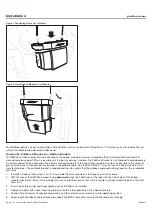
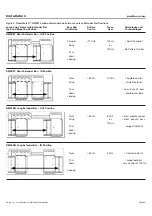
With 1 person per side, place the 1st module directly under the suspended array frame. See Figure 1.
7.
Lower the array frame onto the 1st module, guiding the pins of the temporary handles into the slots of the frame.
8.
Using handles, pull the module forward to align the bolt holes of the module and frame. (Note: it may be helpful to use an alignment
punch tool in the rear holes and then thread the bolts in the front holes first.)
9.
Insert 4 bolts (2 per side) and finger tighten each until all bolts are installed.
10. Tighten all 4 bolts with socket tool using torque of 35 to 40 foot-pounds (47 to 54 Newton-meters).
11. Raise array frame to height slightly above that of 2nd module.
12. Position 2nd module directly under array.
13. With 1 person per side, lift the 2nd module and guide the temporary handle pins into the alignment slots of the 1st (top) module
side plates. See Figure 2.
14. Holding the handles of the 1st (top) module stationary, pull forward on the handles of the 2nd (bottom) module to align the bolt
holes of both modules.
15. Insert 4 bolts (2 per side) and finger tighten each until all bolts are installed.
16. Tighten all 4 bolts with socket tool using torque of 35 to 40 foot-pounds (47 to 54 Newton-meters).
17. Remove temporary installation handles from top module. Handles in module just installed should remain for now.
18. Repeat steps 11 – 16 for to install additional modules in the array. Do not exceed load limits of frame.
19. Remove any remaining temporary installation handles before elevating array to final height.
20. Connect field wiring, test loudspeaker operation, and then elevate array assembly to final operating position.


