background image

Videojet connect 7000

Product Overview | en

13

Bosch Security Systems

Installation Manual

2019-08 | 1.7 | F.01U.291.524

7 External washer pump (user-supplied)

8 Washer output, 2-conductor (user-supplied)

3.2

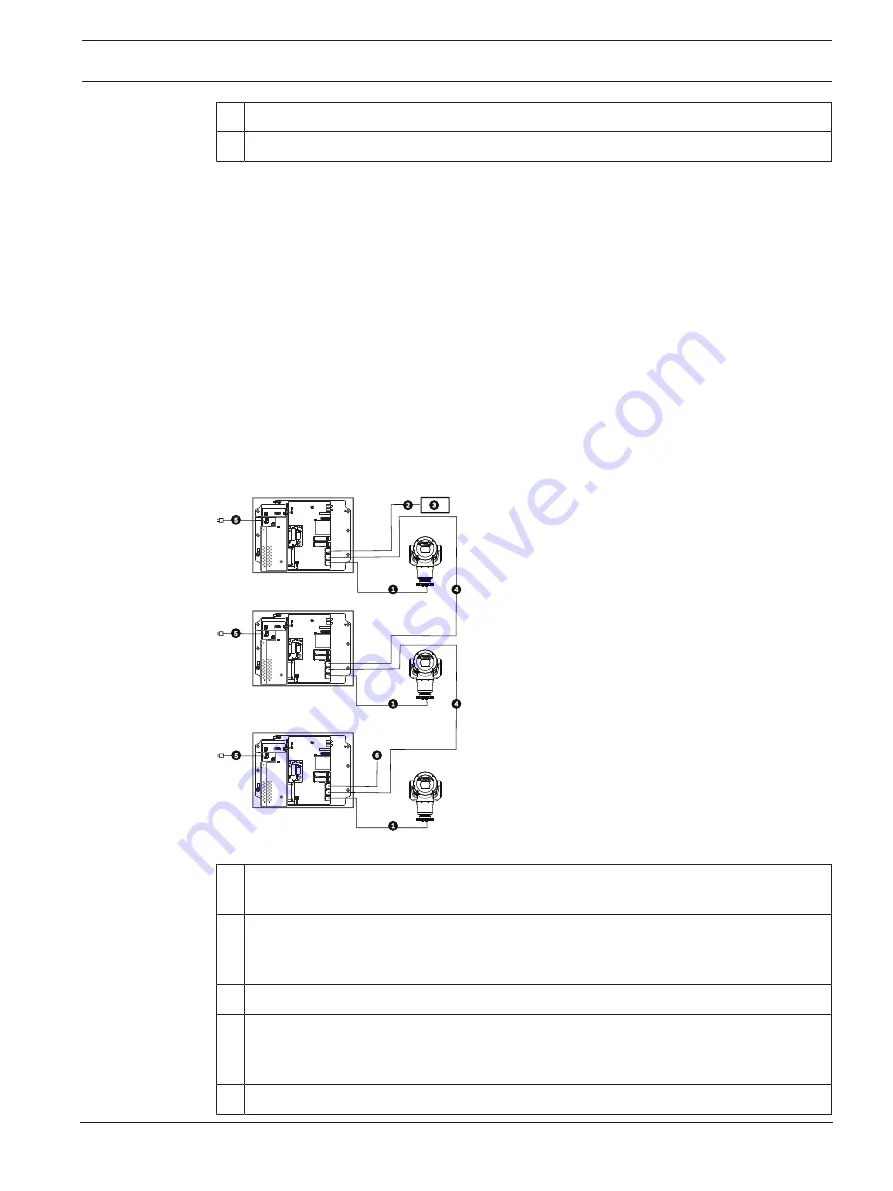
Typical Configuration - Daisy Chain

The VIDEOJET connect 7000 is able to operate in a ‘daisy chain’ type network configuration as
shown in the figure below. The number of units that can be connected to a single network link
depends upon many factors. For example, a maximum of 50 units can be connected when a
single MIC7000 camera is attached to each VIDEOJET connect 7000 that is set to stream a
single live video at 15 fps and a single recording stream at 15 fps, and encoding bit rates to 7
Mbs maximum.
Attaching multiple cameras and increasing bit rate significantly impacts the maximum number
of units that can be connected in a daisy chain network configuration. Regardless of individual
device settings, it is important to keep the overall network bandwidth to less than 700 Mhz.
Reliability of the network communication can be increased by connecting both ends of the
daisy chain network to the head-end switch. Because sophisticated programming (such as
RSTP) must be set up in the head-end switch, this configuration is recommended for
advanced network users only. By default, flow control of the VIDEOJET connect 7000 is
enabled. Only advanced users should consider disabling flow control.

 Cat5e/Cat6e = 100 m max.

1

1

 Cat5e/Cat6e = 100 m max.

1

1

 Cat5e/Cat6e = 100 m max.

1

1

Figure


3.2: Typical daisy chain configuration for VIDEOJET connect 7000

1

Ethernet (network) cable (Cat5e/Cat6e) (user-supplied) between a Bosch camera and
the port labeled 

PoE

 on VIDEOJET connect 7000

2

Data-only IP cable (Cat5e/Cat6e) to the head-end network

Note:

 The cable to the head-end also can be fiber optic cable from one of the two SFP

slots.

3

Head-end network

4

“Daisy chain” Data-only IP cable

Note:

 The cable to the head-end also can be fiber optic cable from one of the two SFP

slots.

5

120 / 230 VAC, 50/60 Hz

Содержание VJC-7000-90

Страница 1: ...Videojet connect 7000 VJC 7000 90 en Installation Manual ...

Страница 2: ......

Страница 3: ...ead end Network 14 3 4 Typical Configuration Mobile Viewing 15 4 Technical Data 16 4 1 Specifications 16 4 2 Dimensional Drawing 17 5 Installation 18 5 1 Mounting 19 5 2 Conduit Installation 20 5 3 PCBA Connections 21 5 4 Power Cable Installation 22 5 5 Ethernet Cables Installation 22 5 6 Fiber Installation 22 5 7 Alarm Inputs 22 5 8 Alarm Outputs 23 5 9 Washer Pump 23 5 10 Audio In and Out 24 5 1...

Страница 4: ...CABAC 35 9 3 Audio 35 10 Recording 36 10 1 Introduction to Recording 36 10 2 Storage Management 36 10 3 Remote Video Device 37 10 3 1 Status 38 10 3 2 Last error 38 10 3 3 Recording target 38 10 3 4 Bit rate 38 10 3 5 Initialize Recording 38 10 3 6 Start Stop Recording 38 11 Alarm 39 11 1 Alarm Task Editor 39 12 Network 40 12 1 Network Access 40 12 2 DynDNS 42 12 3 Advanced 43 12 3 1 Cloud based S...

Страница 5: ...CPU and network status 48 14 1 6 Status icons 49 14 1 7 IP Address of Connected Devices 49 14 2 Playback 49 14 2 1 Selecting recordings for playback 50 14 2 2 Exporting tracks 50 14 2 3 Searching for tracks 50 14 2 4 Controlling playback 50 15 Configure VIDEOJET connect 7000 to Operate with a MIC7000 Camera 52 15 1 Configure Alarm Inputs and Outputs 52 15 2 Configure Audio 52 15 3 Configure Video ...

Страница 6: ...ht All rights reserved Trademarks All hardware and software product names used in this document are likely to be registered trademarks and must be treated accordingly 1 3 Safety Precautions In this manual the following symbols and notations are used to draw attention to special situations Danger High risk This symbol indicates an imminently hazardous situation such as Dangerous Voltage inside the ...

Страница 7: ...quirements for the grounding electrode Installation location The unit is intended only for installation in a Restricted Access Location Outdoor signals The installation for outdoor signals especially regarding clearance from power and lightning conductors and transient protection must be in accordance with NEC725 and NEC800 CEC Rule 16 224 and CEC Section 60 Overvoltage Installation category also ...

Страница 8: ...any interference received including interference that may cause undesired operation NOTE This equipment has been tested and found to comply with the limits for a Class A digital device pursuant to Part 15 of the FCC Rules and ICES 003 of Industry Canada These limits are designed to provide reasonable protection against harmful interference when the equipment is operated in a commercial environment...

Страница 9: ...ort Telephone 800 326 1450 Fax 585 223 3508 or 717 735 6560 Email technical support us bosch com Repair Center Telephone 585 421 4220 Fax 585 223 9180 or 717 735 6561 Email security repair us bosch com Canada Telephone 514 738 2434 Fax 514 738 8480 Europe Middle East Africa Region Please contact your local distributor or Bosch sales office Use this link http www boschsecurity com startpage html eu...

Страница 10: ...lled Parts bag with one 1 terminal plug connector 2 pin for connections to optional washer one 1 terminal plug connector 3 pin for AC mains power input one 1 terminal plug connector 6 pin for alarm inputs one 1 terminal plug connector 7 pin for alarm outputs and for the supervised alarm input three 3 watertight M16 cable glands with O rings Installation Manual 2 2 Additional Tools Required Install...

Страница 11: ...k signal line in 9 kohm typical 5 5 Vpp max 25 signal line out 3 0 Vpp at 10 kohm typical 2 3 Vpp at 32 ohm typical 1 7 Vpp at 16 ohm typical Washer driver output Dry contact relay 250 V 5 A Washer switch Push button to activate test the washer relay momentarily Communication Three 3 10BASE T 100BASE TX 1000Base TX If SFP fiber optic modules installed two 2 1000 BASE FX Local storage One 1 slot fo...

Страница 12: ...vice Note To achieve a distance of 100 m 328 ft using Cat5e Cat6e cable Bosch recommends using cable with a minimum rating of 350 MHz 3 1 Typical Configuration Basic Cat5e Cat6e 100 m max 1 1 Figure 3 1 Basic configuration with VIDEOJET connect 7000 1 Ethernet network cable Cat5e Cat6e user supplied between a Bosch camera and the port labeled PoE on VIDEOJET connect 7000 2 Data only IP cable Cat5e...

Страница 13: ... device settings it is important to keep the overall network bandwidth to less than 700 Mhz Reliability of the network communication can be increased by connecting both ends of the daisy chain network to the head end switch Because sophisticated programming such as RSTP must be set up in the head end switch this configuration is recommended for advanced network users only By default flow control o...

Страница 14: ...meras to VIDEOJET connect 7000 1 Ethernet network cable Cat5e Cat6e user supplied between a Bosch camera and the port labeled PoE on VIDEOJET connect 7000 2 Data only IP cable Cat5e Cat6e between a Bosch IP camera and the port labeled ETH 2 on VIDEOJET connect 7000 3 Head end network 4 Data only IP cable Cat5e Cat6e between a Bosch camera and the port labeled ETH 1 on VIDEOJET connect 7000 5 Fiber...

Страница 15: ...e integrated Transcoder of VIDEOJET connect 7000 1 Ethernet network cable Cat5e Cat6e user supplied between a Bosch camera and the port labeled PoE on VIDEOJET connect 7000 2 Network switch user supplied 3 Head end network 4 Internet the cloud 5 Mobile device with Bosch video security app 6 Data only IP cable to the next VIDEOJET connect 7000 unit Note The cable also can be fiber optic cable from ...

Страница 16: ... at 16 ohm typical Washer driver output Dry contact relay 250 V 5 A Washer switch Push button to activate test the washer relay momentarily Communication Three 3 10BASE T 100BASE TX 1000Base TX If SFP fiber optic modules installed two 2 1000 BASE FX Local storage One 1 slot for an optional CompactFlash CF memory card Type I Type II True IDE Mode 1 TB max user supplied SFP small form factor pluggab...

Страница 17: ...Videojet connect 7000 Technical Data en 17 Bosch Security Systems Installation Manual 2019 08 1 7 F 01U 291 524 4 2 Dimensional Drawing 13 in 330 mm 9 84 in 250 mm 3 57 in 90 75 mm ...

Страница 18: ... accepts no liability for any damages or losses caused by incorrect or improper installation Warning Overvoltage hazard This product requires a surge protector device SPD or surge arrester as part of the installation to address overvoltages exceeding Overvoltage Category II 2500 Vpk Note In these steps the item numbers in parentheses refer to the numbers in the figure in PCBA Connections page 21 B...

Страница 19: ...using the figure below as reference Secure the enclosure to the mounting surface using four 4 M6 stainless steel screws and washers not supplied which fit through the large holes in the enclosure Figure 5 1 Dimensions mounting holes VIDEOJET connect 7000 Notice If you are securing the enclosure in a vertical position for example on a wall one person should hold the enclosure lid while another pers...

Страница 20: ...er supplied for audio and or for alarm inputs outputs or for fiber optic cable user supplied 5 Optional hole size M16 plugged for conduit user supplied for audio and or for alarm inputs outputs or for fiber optic cable user supplied 6 Cable gland size M16 for data only IP cable Cat5e Cat6e user supplied or for fiber optic cable user supplied 7 Optional hole size M16 plugged for conduit user suppli...

Страница 21: ...h button to activate test the washer relay momentarily 5 Audio OUT 6 Audio IN 7 Terminal plug connector 7 pin for alarm outputs and for the supervised alarm input 8 Terminal plug connector 6 pin for alarm inputs 9 One 1 slot for optional CompactFlash CF memory card Type I Type II True IDE Mode 1 TB max user supplied 10 Two 2 slots for use with SFP based fiber optic modules 1 GB only user supplied ...

Страница 22: ...s nut 5 5 Ethernet Cables Installation 6 Connect the HPoE Ethernet cable Feed an Ethernet cable from the IP camera through an appropriate cable gland or conduit hole near the port labeled PoE on the PCBA item 12 Connect the cable to the port on the PCBA 7 Connect network Ethernet cable s if applicable Feed an Ethernet cable Cat5e Cat6e rated to 350 MHz from the head end network through an appropri...

Страница 23: ...priate location on the PCBA 5 8 Alarm Outputs Note This feature is valid only for a MIC7000 camera bound to Camera 1 10 Connect Alarm outputs if applicable Prepare the cable as needed Feed the cable through an appropriate cable gland or conduit hole near where the 7 pin terminal plug connector for alarm outputs will be installed on the PCBA item 7 Make the connections for relay outputs for switchi...

Страница 24: ... a CF card to save recordings locally if applicable Caution Bosch recommends disconnecting power to the unit whenever inserting or removing a CF card Carefully slide a Type I Type II True IDE Mode 1 TB max CF card into the card slot item 9 as far as it will go until it locks into place Caution If the card is formatted already all existing data will be deleted from the card Before inserting the car...

Страница 25: ...g Microsoft Internet Explorer in the online Help in Internet Explorer In Windows Vista deactivate protected mode on the Security tab under Internet Options You can find notes on using Microsoft Internet Explorer in the online Help in Internet Explorer If you choose to use a computer running Microsoft Internet Explorer or any of the Bosch software the computer must conform to the following minimum ...

Страница 26: ...s a new page with the configuration menu Navigation 1 Click one of the menu items in the left window margin The corresponding submenu is displayed 2 Click one of the entries in the submenu The web browser opens the corresponding page Making Changes Each configuration screen shows the current settings You can change the settings by entering new values or by selecting a predefined value from a list ...

Страница 27: ...nitiator name to make identification easier in large iSCSI systems This text is added to the initiator name separated from it by a full stop You can see the initiator name in the System Overview page 7 2 Password The camera is generally protected by a password to prevent unauthorized access to the unit You can use different authorization levels to limit access Notice Proper password protection is ...

Страница 28: ...time setting could prevent correct recording Device time zone Select the time zone in which your system is located Daylight saving time The internal clock can switch automatically between normal and daylight saving time DST The unit already contains the data for DST switch overs up to the year 2018 You can use these data or create alternative time saving data if required Notice If you do not creat...

Страница 29: ... camera can receive the time signal from a time server using various time server protocols and then use it to set the internal clock The unit polls the time signal automatically once every minute Enter the IP address of a time server here Time server type Select the protocol that is supported by the selected time server Preferably you should select the SNTP server as the protocol This supports a h...

Страница 30: ...vice logo Enter the path to a suitable graphic if you want to replace the product name The image file can be stored on a local computer in the local network or at an Internet address Notice If you want to use the original graphics again simply delete the entries in the Company logo and Device logo fields Show VCA metadata When video content analysis VCA is activated additional information is displ...

Страница 31: ...nding icon changes color Show alarm outputs Alarm outputs are shown next to the video image as icons along with their assigned names If the alarm output is active the corresponding icon changes color Show event log The event messages are displayed along with the date and time in a field next to the video image Show system log The system messages are displayed along with the date and time in a fiel...

Страница 32: ... name Special characters are not supported by the system s internal management Note that the name here is only used for the transcoder operation Changes here will not overwrite the name assigned to the camera or to the encoder on the corresponding SETTINGS page of the respective unit The name that you enter here will be displayed in the title bar of the transcoder Web pages and in the list of avai...

Страница 33: ... setting outside the permitted range for a parameter is entered the nearest valid value is substituted when the settings are saved 9 2 1 Profile Name Profile name You can enter a new name for the profile here The name is then displayed in the list of available profiles Caution Do not use any special characters for example in the name Special characters are not supported by the system s internal ma...

Страница 34: ...uantization value results in low image quality and lower network load Typical QP values are between 18 and 30 The basic setting Auto automatically adjusts the quality to the settings for the P frame video quality 9 2 7 I P frame delta QP I P frame delta QP This parameter sets the ratio of the I frame quantization QP to the P frame quantization QP For example you can set a lower value for I frames ...

Страница 35: ...he data rate is reduced This compression necessitates high computing power 9 3 Audio This is the volume control for the Audio Input and Output Line In 1 You can set the input volume with the slider from 0 to 31 with 0 as the default Line In 2 Ignore this parameter Note The current GUI shows 2 Line Inputs but only 1 is supported Note Audio OUT is not available in initial production units A firmware...

Страница 36: ...tion Activating or deactivating VRM causes the current settings to be lost they can only be restored through reconfiguration Recording media Select the required recording media here so that you can then activate them and configure the recording parameters iSCSI Media If you want to use an iSCSI system as a recording medium you must set up a connection to the required iSCSI system and set the confi...

Страница 37: ...cordings option to specify which older recordings can be overwritten once the available memory capacity has been used Recording 1 corresponds to Stream 1 Recording 2 corresponds to Stream 2 Caution If older recordings are not allowed to be overwritten when the available memory capacity has been used the recording in question will be stopped You can specify limitations for overwriting old recording...

Страница 38: ...ideo device that you want to configure with the recording defaults of VIDEOJET connect 7000 Generally this means that a simple basic configuration is set which grants you most effective recording that also supports forensic search Recording Profiles Select the desired Recording Profiles Recording mode as it affects the defaults to be set Note that only the Day tab on the Recording Profiles page is...

Страница 39: ...s on the various alarm pages you can enter your desired alarm functions in script form here This will overwrite all settings and entries on the other alarm pages 1 Click the Examples link under the Alarm Task Editor field to see some script examples A new window will open 2 Enter new scripts in the Alarm Task Editor field or change existing scripts in line with your requirements 3 When you are fin...

Страница 40: ...ve Player Configuration Manager use the IP address for the unique assignment of the unit If you use these applications the DHCP server must support the fixed assignment between IP address and MAC address and must be appropriately set up so that once an IP address is assigned it is retained each time the system is rebooted IPv4 Fill in the 3 fields in this section of the screen IP address Enter the...

Страница 41: ... access on the network via a secure connection select an HTTPS browser port from the list if necessary The default HTTPS port is 443 Select the Off option to deactivate HTTPS ports only unsecured connections will now be possible The camera uses the TLS 1 0 encryption protocol You may have to activate this protocol via your browser configuration You must also activate the protocol for the Java appl...

Страница 42: ... it may be necessary to select a special operation type Options are Auto 10 Mbps HD half duplex 10 Mbps FD full duplex 100 Mbps HD half duplex 100 Mbps FD full duplex Note Do not select a baud rate for this port unless a device is connected to this port on VIDEOJET connect 7000 Network MSS Byte You can set the maximum segment size for the IP packet s user data This gives you the option to adjust t...

Страница 43: ...status of the DynDNS function is displayed here for information purposes You cannot change any of these settings 12 3 Advanced 12 3 1 Cloud based Services The operation mode determines how the camera communicates with Bosch Cloud based Security and Services For more information about these services and their availability visit http cloud boschsecurity com Select Auto to allow the camera to poll th...

Страница 44: ...h the Universal Plug and Play Device Host and the SSDP Discovery Service must be activated 12 4 3 Quality of Service The priority of the different data channels can be set by defining the DiffServ Code Point DSCP Enter a number between 0 and 252 as a multiple of four For alarm video you can set a higher priority than for regular video and you can define a Post Alarm Time over which this priority i...

Страница 45: ...uired path Maximum bit rate Enter the maximum bit rate in kbps that will be allowed when communicating with the account 12 7 IPv4 Filter To restrict the range of IP addresses within which you can actively connect to the device fill in an IP address and mask Two ranges can be defined 4 Click Set and confirm to restrict access If either of these ranges are set no IP V6 addresses are allowed to activ...

Страница 46: ...net Update server Enter the path of the server on which to perform the update Click Check to verify the path Firmware The camera is designed in such a way that its functions and parameters can be updated with firmware To do this transfer the current firmware package to the unit via the selected network It will then be automatically installed there In this way a camera can be serviced and updated r...

Страница 47: ...ave the current settings Configuration You can save configuration data for the camera on a computer and then load saved configuration data from a computer to the unit Maintenance log You can download an internal maintenance log from the unit to send it to Customer Service for support purposes Click Download and select a storage location for the file 13 3 Licenses You can enter the activation key t...

Страница 48: ...mple a light or a door opener 4 To operate click the relay symbol The symbol is red when the output is activated 14 1 3 System Log Event Log The System Log field contains information about the operating status of the camera and the connection Events such as the triggering or the end of alarms are shown in the Event Log field 1 To view filter and save these messages to a file click in the top right...

Страница 49: ... protocol violation or a timeout is indicated by this icon Gap Indicates a gap in the recorded video Watermark valid The watermark set on the media item is valid The color of the check mark changes according to the video authentication method that has been selected Watermark invalid Indicates that the watermark is not valid Motion alarm Indicates that a motion alarm has occurred Storage discovery ...

Страница 50: ...nge the times 4 Select a target 5 Select the original or a condensed speed 6 Click the save icon Note The target server address is set on the Network Accounts page 14 2 3 Searching for tracks 1 Click the search tab 2 Click one of the Search mode options to define the search parameters 3 To limit the search to a particular time range enter the start and stop times 4 Click Start Search 5 The results...

Страница 51: ...ause playback Select the playback speed using the speed regulator Jump to start of active sequence or to previous sequence Jump to start of the next video sequence in the list Bookmarks You can set markers in a sequence and jump to these directly These bookmarks are indicated as small yellow arrows above the time interval Use the bookmarks as follows Jump to the previous bookmark Set bookmark Jump...

Страница 52: ...ace LIVE Functions Note The Interfaces menu which displays alarm inputs and outputs alarm I O appears only in the configuration menu of the camera bound to VIDEOJET connect 7000 the camera for which the value in the field Application variant is set to camera name VJC 7000 15 2 Configure Audio To configure audio for a camera bound to Camera 1 follow these steps 4 On the camera verify that the value...

Страница 53: ... 5 D403 D404 SFP1 SFP2 Off SFP not installed or not connected to a network Green SFP installed and connected to a network Green flashing Network traffic 6 8 D400 D402 D405 ETH1 ETH2 POE Off Not connected to a network faulty cable Green Connected to a network Green flashing Network traffic 16 2 Maintenance Damage requiring service Unplug the devices from the main AC power source and refer servicing...

Страница 54: ...4 en Technical data Videojet connect 7000 2019 08 1 7 F 01U 291 524 Installation Manual Bosch Security Systems 17 Technical data For more specific product details see the VIDEOJET connect 7000 datasheet ...

Страница 55: ...Videojet connect 7000 Technical data 55 Bosch Security Systems Installation Manual 2019 08 1 7 F 01U 291 524 ...

Страница 56: ...56 Technical data Videojet connect 7000 2019 08 1 7 F 01U 291 524 Installation Manual Bosch Security Systems ...

Страница 57: ......

Страница 58: ...Bosch Sicherheitssysteme GmbH Robert Bosch Ring 5 85630 Grasbrunn Germany www boschsecurity com Bosch Sicherheitssysteme GmbH 2019 Bosch Security Systems Inc 1706 Hempstead Road Lancaster PA 17601 USA ...

Отзывы: