background image


SAIC GRADE-X


17 

,as show below: 


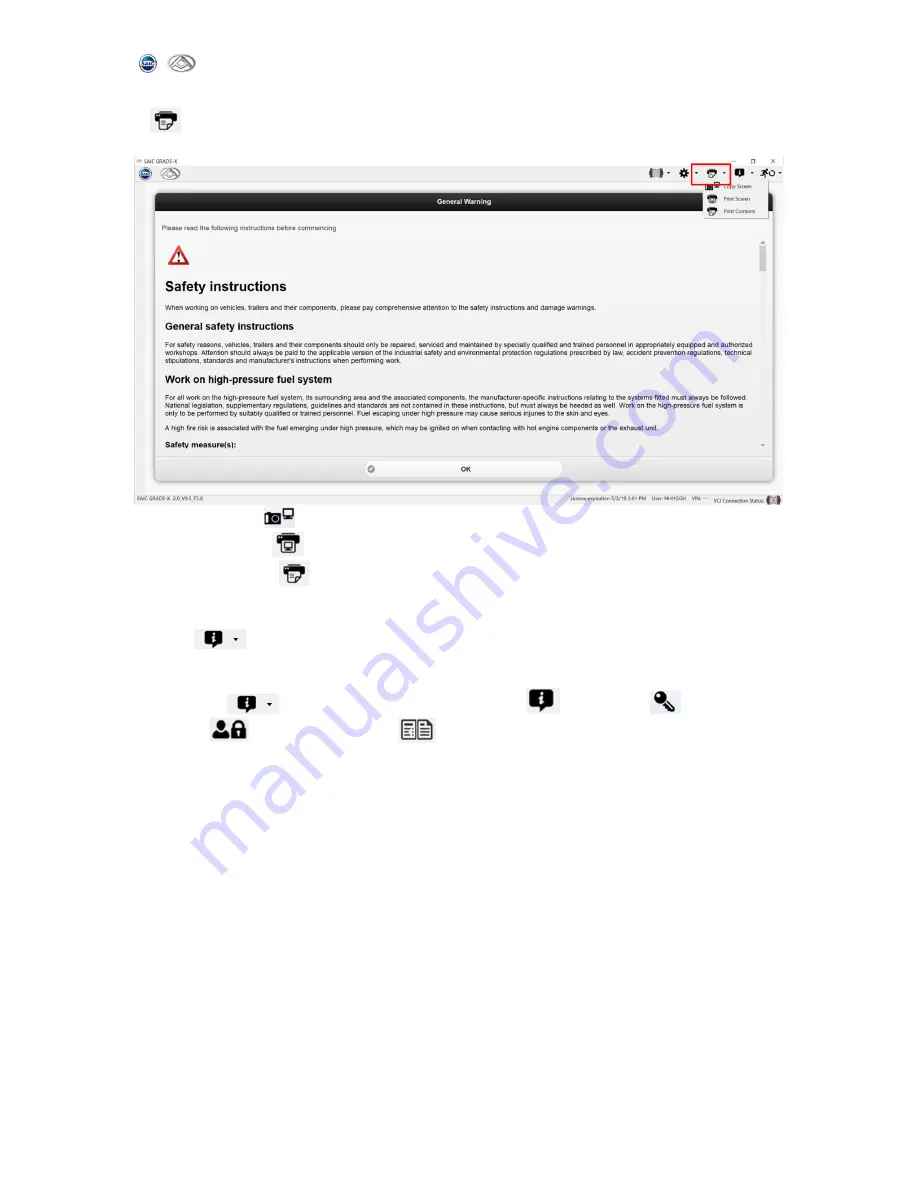
Copy screen【

:You can copy the whole screen to the Clipboard 


Print screen【

:The screen can be Print directly. 


Print content【

:print data 


  5.2.4

About   

   Click【

】about, you could see version 【

、license【

、privacy 

policy【

】 and user manual【

,as shown below:


Содержание SAIC GRADE-X

Страница 1: ...SAIC GRADE X SAIC GRADE X Automotive Diagnostic System USER MANUAL Version 2 3 Copyright 2016 by Bosch Automotive Service Solutions ...

Страница 2: ...and service technology Trademark BOSCH is a registered trademark of Bosch Automotive Service Solutions short for BOSCH in China and other countries All other BOSCH trademarks service marks domain names logos and company names referred to in this manual are either trademarks registered trademarks service marks domain names logos company names of or are otherwise the property of BOSCH or its affilia...

Страница 3: ... test Exhaust gas of vehicle contains harmful chemicals please ensure adequate ventilation Do not touch the cooling system components or exhaust manifolds when engine is running to high temperature Make sure the car is securely parked and the selector is at P or N position to prevent the vehicle from moving when engine starts Make sure the diagnostic link connector is OK before starting the test o...

Страница 4: ... 4 VCI connector 13 5 UI Description 14 5 1 Startup interface 14 5 2 System Settings 14 5 2 1 VCI settings 14 5 2 2 Settings 15 5 2 3 Print Content 16 5 2 4 About 17 5 2 5 Exit 18 6 Test Steps 18 6 1 Vehicle Selection 19 6 2 Choose ECUs manually or check ECUs automatically 19 6 3 Vehicle Information 22 6 3 1 Vehicle Information 22 6 3 2 ECU Information 23 6 4 DTC 26 6 5 Data List 34 6 6 Actuator T...

Страница 5: ...SAIC GRADE X 3 6 9 Reflash 63 6 10 Test Report 70 ...

Страница 6: ... requirement WinXP can t meet the new technical interface but Microsoft will not update WinXP to support this 0 2 GRADE X supported OS Currently SAIC GRADE X can run on Win7 and Win8 Win10 will be supported by the end of this year But the OS supported may change because of Microsoft s strategy 0 3 How to get OS Version Take WinXP as an example Step 1 Right click My Computer on the desktop Step 2 C...

Страница 7: ...https obd maxuscloud com download 2 Double click downloaded SAIC GRADE X package in the previous step and click Next Shown as below 3 In SAIC GRADE X installation page please read license agreement carefully and you need to click I accept the agreement to continue And then click Next to continue Shown as below ...

Страница 8: ...7 the default path is C Program Files X86 Bosch SAIC GRADE X And then click Next to continue Shown as below 5 In the SAIC GRADE X data path page click Browse to choose the path to install the data Or else the data will be installed into the default path For Win7 the default path is C Program Data Bosch SAIC GRADE X And then click Next to continue Shown as below ...

Страница 9: ... can change the menu name manually Or else the default value SAIC GRADE X will be used And then click Next to continue Shown as below 7 Select the additional tasks and click Next to continue shown as below 8 Ready to install click Install to continue shown as below ...

Страница 10: ... GRADE X it will pop up computer hardware information this page for the user run SAIC GRADE X the first time Users don t need to register SAIC GRADE_X again after registered successfully in the future Shown as below 3 Please send computer hardware information red info box above copy this identification to Maxus administrator by mail or phone Maxus administrator will register your computer and info...

Страница 11: ...n your computer is registered successfully But you have to ensure your computer works connected to network every 30 days Or else you have to register your computer again following step 1 to 5 NOTE When you want to change your computer After you install SAIC GRADE X on the new computer the new hardware information will display on the machine Please send it to Maxus administrator to activate it You ...

Страница 12: ...mputer is not installed the latest version of the software you will automatically receive software updates notice as shown below 2 Click on the icon then the following page will appear Click Install Update to start the upgrade As shown below 3 SAIC GRADE X Update information you will get the upgraded content from this page And then click update to get the latest software as shown below ...

Страница 13: ... X is running on your computer you will be asked to close the software and then update as shown below 6 When update is complete click Finish to exit as shown below 7 Start SAIC GRADE X Diagnostic and check whether the version of the software has been updated ...

Страница 14: ...eps 1 Open SAIC GRADE X installation path you can right click the SAIC GRADE X icon on the desktop click open file location in properties as shown below 2 start wyUpdate exe update software as shown below 3 SAIC GRADE X Update information you will get the upgraded content from this page And then click update to get the latest software as shown below ...

Страница 15: ...f the vehicle and the diagnostic socket Master test cord to connect the host and tighten Diagnostic test line will connect the main connector into the diagnostic socket of the vehicle Check whether VCI power indicator is on If the power indicator light is off please make sure the car seat is powered or not When VCI power indicator is on VCI connected successfully ...

Страница 16: ...E X diagnostics software the first page is as below and also the process bar is added 5 2 System Settings 5 2 1 VCI settings 1 User select the appropriate VCI host connection For SAIC GRADE X please select D_PDU_API_Bosch_6520 SAIC LDV currently VCI Connection status is added ...

Страница 17: ...se install VCI Manager or CVDS as shown below 5 2 2 Settings 1 Click the Settings button the user can change the language and unit and Appearance Setting as shown below 2 Click on the language settings select the language you want click Save Settings ...

Страница 18: ... 16 to save the setting as shown below 3 Click quantity and unit settings Select the unit you want click Save Settings to finish 5 2 3 Print Content Click to print you can copy the screen print screen print content ...

Страница 19: ... Copy screen You can copy the whole screen to the Clipboard Print screen The screen can be Print directly Print content print data 5 2 4 About Click about you could see version license privacy policy and user manual as shown below ...

Страница 20: ...18 5 2 5 Exit You can click exit the system you can click back to main page exit SAIC GRADE X as shown below 6 Test Steps NOTE The test process is based on EG10 as an example Please refer to this for other vehicles ...

Страница 21: ...below 6 2 Choose ECUs manually or check ECUs automatically You can select to choose ECUs manually or check ECUs automatically Please choose Choose ECU manually or Check existing ECUs automatically as shown below 6 2 1 Choose ECU manually 1 Choose Choose ECU manually click OK as shown below ...

Страница 22: ...ent vehicle You can choose the ECUs you want to diagnostic or Select All to diagnostic all ECUs and then please click OK to enter diagnose interface as shown below NOTE After this only the selected ECUs can be diagnostic You need to click to diagnostic other ECUs as shown below ...

Страница 23: ...checks the connected ECU 1 Choose Check existing ECUs automatically to check the existing ECUs automatically as shown below 2 The system will go into the main diagnostic page directly after finishing checking existing ECUs as shown below ...

Страница 24: ...rmation Enter vehicle information page click Vehicle Information you cloud see two tabs vehicle Information and ECU Information as shown below Selected product You can see the vehicle model vehicle type VIN Vehicle Information You can see the year if existing ...

Страница 25: ...ECU Information can get all the version information as shown below 1 Click ECU to view software and hardware version as shown below 2 Click to choose Refresh the system will talk to the current ECU again to re read the information as shown below ...

Страница 26: ...SAIC GRADE X 24 3 Click Refresh All to refresh all ECUs information as shown below ...

Страница 27: ...SAIC GRADE X 25 ...

Страница 28: ...SAIC GRADE X 26 6 4 DTC 1 Click DTC to view DTC of ECU as shown below ECU has DTC read DTC failed or ECU not exists no DTC Number of DTC ...

Страница 29: ...o view DTC as shown below Status DTC status has freeze frame data or not to show freeze frame data 3 Choose DTC Status display mode Click to choose DTC Status display mode as shown below Click Status Icon Status text as shown below ...

Страница 30: ...28 DTC status icon and text as shown below Current DTC Lamp on History DTC Lamp on Current DTC Lamp off History DTC Lamp off No DTC Lamp off NOTE You can choose to show only status icon only status text or show both ...

Страница 31: ...SAIC GRADE X 29 4 Freeze Frame Data Click left side to show freeze frame data as shown below Click Freeze Frame Data as shown below Click Close to exit as shown below ...

Страница 32: ...l ECUs Click Refresh All The system will talk to all ECUs to get fault code for all ECUs as shown below Re read DTC for one ECU Click of the ECU and then enter sub menu as shown below Click Refresh The diagnostic software will re read as shown below ...

Страница 33: ...All diagnostic software will talk to all ECUs to clear DTC as shown below Clear All DTC and Re read Click Clear Refresh All ECU diagnostic software will talk to all ECUs to clear all fault codes and re read as shown below Clear DTC for one ECU Click as shown below ...

Страница 34: ...SAIC GRADE X 32 Click Clear to clear DTC of the current ECU as shown below Clear DTC and re read for one ECU Click as shown below Click Clear Refresh to clear DTC and re read of the ECU as shown below ...

Страница 35: ...SAIC GRADE X 33 ...

Страница 36: ...signals of selected ECU as shown below 2 Choose Data List NOTE You can choose to monitor more than one signals for more than one Ecus Click data list as shown below Search signals You can search signals by inputing the key words of the signal name as shown below ...

Страница 37: ...IC GRADE X 35 3 Monitor signals Select items and click Start monitoring to show signal list as shown below Waveform data flow diagram Support 8 signals in waveform diagram at the same time as shown below ...

Страница 38: ...SAIC GRADE X 36 4 Freeze View Click Freeze View to freeze current signals as shown below Click Unfreeze View to unfreeze current signals as shown below ...

Страница 39: ...SAIC GRADE X 37 5 Recording signals Click Start recording as shown below Input description and click Start to start recording the data as shown below ...

Страница 40: ...SAIC GRADE X 38 Click Stop recording to stop recording as shown below 6 Playback Click Monitoring Playback to playback the recorded signals as shown below ...

Страница 41: ...SAIC GRADE X 39 Choose the record data to playback as shown below Click timeline to show the value as shown below ...

Страница 42: ...SAIC GRADE X 40 Click choose Close to exit as shown below ...

Страница 43: ...SAIC GRADE X 41 7 Exit Click choose Close to exit as shown below ...

Страница 44: ...SAIC GRADE X 42 ...

Страница 45: ...ata stream and exit the SAIC GRADE X diagnostic software you can find record file under the folder C temp as shown below 2 Submit data stream recording file When you want to provide the file to SAIC you need to submit the following two files 1 VIN session file in C temp as shown below ...

Страница 46: ...orage as shown below Note the file names of the above two files must be the same 9 Signal group 1 Create your own signal group You can choose more than one items for more than one ECUs and then click Create group to create your own signal group as shown below ...

Страница 47: ...SAIC GRADE X 45 Input group name click OK as shown below 2 View your own signal groups Click Signal group selection to view your own signal groups as shown below ...

Страница 48: ...SAIC GRADE X 46 Select the items you wants to monitor or click Select all to monitor all signals in the current group as shown below Click Start monitoring as shown below ...

Страница 49: ...SAIC GRADE X 47 3 Delete group Click as shown below Click Remove to delete the current group as shown below ...

Страница 50: ...mental Restraint crash recorder data section 1 Click SV61 EV80 SRS Supplemental Restraint Data List Signal group selection as shown below 2 Click crash recorder data section 1 Click to select the data steam or click on the Select all data flow as shown below ...

Страница 51: ...SAIC GRADE X 49 3 Click Start monitoring as shown below 4 Show crash recorder data as shown below ...

Страница 52: ...SAIC GRADE X 50 ...

Страница 53: ... 6 Actuator Test 1 Click Actuator Test to show all available tests as shown below 2 Example Click Roof Lamp Read as shown below 3 Read conditions and steps and set the value click Yes to perform the test as shown below ...

Страница 54: ...ish as shown below Note If the test is executed successful the system will return to the first page and you can test again if the test fails the system will exit the current page 5 Test feedback The system will show the test result as shown below ...

Страница 55: ...SAIC GRADE X 53 Successful Not perform Interrupt or failed ...

Страница 56: ... write installation date configuration Improper operation will cause unexcepted result So please follow the safety directions This function requires secure access 1 Click Configuration to show available functions as shown below 2 Example Click Write BCM Configuration Information as shown below 3 Detail as shown below ...

Страница 57: ...ent Value Current value from ECU for the current item Unit Unit for the current item Configurable Value Allowed values for the current item 4 Finished execute result click OK to exit as shown below 5 Example Click Write VIN as shown below ...

Страница 58: ...lease kindly read conditions and steps The default value is read out from ECU And you can change the data using the keyboard and Click Yes to perform as shown below 7 Finish and view result click OK to exit as shown below ...

Страница 59: ...SAIC GRADE X 57 8 Test Feedback The system will show the test result as shown below Success Not perform Interrupt or failed ...

Страница 60: ... a complicated configuration process among different ECUs especially for IMMO Check and calibration The following case is Add PEPs fob 1 Click Special Function to show available items as shown below 2 Click IMMO PEPS Passive Entry Passive Start Add Fob as shown below ...

Страница 61: ...ndly read instruction before start and click Yes to continue and No to exit as shown below 4 Enter correct PIN and click Yes to continue or Cancel to exit as shown below 5 PEPS status checking click OK to continue as shown below ...

Страница 62: ...SAIC GRADE X 60 6 Follow the instruction to put key and click OK to continue as shown below 7 Show result and check status click OK to exit as shown below ...

Страница 63: ...SAIC GRADE X 61 8 Test Feedback The system will show the test result as shown below Success Not perform Interrupt or failed ...

Страница 64: ...SAIC GRADE X 62 9 Not match condition When one of the condition is not satisfied the system will show the causes and suggest another operation as shown below ...

Страница 65: ... 9 Reflash ECU flashing is to rewrite the data into the ECUs NOTE The following ECU flashing process is based on VMS Vehicle Management Controller Flashing 1 Click Reflash to show available flash for ECUs as shown below ...

Страница 66: ...SAIC GRADE X 64 2 Click VMS Vehicle Management Controller as shown below 3 Click to choose one flash file Currently there are three flash files can be selected to flash into VMS as shown below ...

Страница 67: ...SAIC GRADE X 65 4 Please read instruction and make sure all the conditions are satisfied click OK to continue as shown below 5 Start flashing please wait as shown below ...

Страница 68: ... if needed the default value is current value from ECU you could re enter new value click OK to next step as shown below 7 Input Tester Reference Number the default value is current value from ECU you could re enter new value click OK to next step as shown below ...

Страница 69: ...67 8 Input Odometer the default value is current value from ECU you could re enter new value click OK to next step as shown below 9 Flash complete please check whether ECU works click OK to next step as shown below ...

Страница 70: ...SAIC GRADE X 68 10 Back to the flash file choice page as shown below Successful Not perform Interrupt or failed ...

Страница 71: ...SAIC GRADE X 69 Not flash 11 You could select back to main page as shown below ...

Страница 72: ...SAIC GRADE X 70 6 10 Test Report Test Report will summarize all operations and results which user have operated you could print it as shown below ...

Отзывы: