


Bosch Rexroth AG, RE 92110-01-B/2022-03-22
36
/64
A4VSH series 1x and 30
| Assembly
6�
Fasten the axial piston unit at the installation location.
7�
Align the drive shaft of the axial piston unit and the output shaft of the drive
motor so there is no angular deviation.
Make sure no excessive axial and radial forces are acting on the drive shaft.
8�
Details on the required tools and tightening torques for the mounting bolts are
available from the machine/system manufacturer.
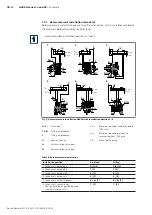
7�4�5 Installation on a gearbox
The following describes how to install the axial piston unit on a gearbox.
After installing on a gearbox, the axial piston unit is covered and is difficult to
access:
▶ Before installing, make sure that the spigot diameter centers the axial piston
unit (observe tolerances) and that no excessive axial or radial forces are acting
on the drive shaft of the axial piston unit (installation length).
▶ Protect the drive shaft against frictional corrosion by ensuring permanent
lubrication.
▶ Fasten the axial piston unit at the installation location.
No spline forces higher than the permissible axial and radial forces should act on
the shaft; if necessary, support the gear wheel at the gearbox output separately.
7�4�6 Installation with cardan shaft
Bring the axial piston unit to the installation position and fasten it. Details of the
required tools and tightening torque for the mounting bolts can be obtained from
the machine/system manufacturer.
NOTICE!
Damage to the axial piston unit and leaks at the shaft seal due to
incorrectly installed cardan shaft!
Improperly installed cardan shafts generate unbalances. This results in vibrations
and inadmissible axial and radial forces on the drive shaft.
▶ Observe the cardan shaft manufacturer's assembly instructions.
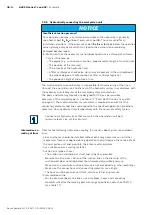
7�4�7 Completion of assembly
1�
Remove any installed transport screws.
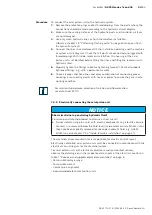
CAUTION!
Operation with protective plugs!
Operating the axial piston unit with protective plugs may result in injury or damage
to the axial piston unit.
▶ Before commissioning, remove all protective plugs and replace them with suitable,
pressure-resistant, metal threaded plugs or connect the appropriate lines.
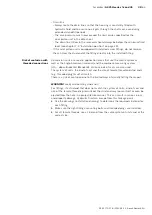
2�
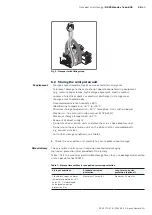
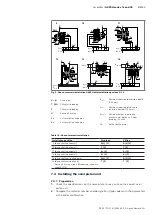
Remove the transport protection.
The axial piston unit comes with protective covers (
1
and
3
) and protective
plugs (
2
). (
1
and
3
) and (
2
) are not pressure-resistant and have to be removed
prior to connection. Use a suitable tool for this to prevent damage to the
sealing and functional surfaces. If sealing or functional surfaces are damaged,
contact your Bosch Rexroth Service partner or the service department of the
manufacturer's plant of the axial piston unit.
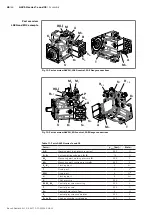
For attachment via gear
wheel or helical gear shaft


