background image

Operating the hotplate

 en

17

Burner/hotplate

Maximum dia-
meter of the
base of the
cookware

Minimum dia-
meter of the
base of the
cookware

Economy burner

180 mm

120 mm

9  Operating the hotplate

You can find out everything you need to know about
operating your hotplate here.

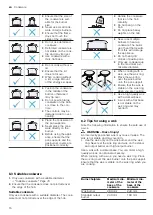
9.1 Fitting burner parts

You can find out how to correctly position the burner
parts here.

Requirement:

 Ensure that the burner parts are clean

and dry.

1.

Ensure that the individual parts of the burners are fit-
ted in their exact position and are straight; other-
wise, this may result in ignition problems or prob-
lems during operation.

2.

Position the burner lid precisely on the burner head.

9.2 Important information about the gas hob

Follow these instructions when using your gas hob.

¡

A slight whistling when operating the burner is nor-
mal.

¡

Odour formation during the first uses is normal. This
does not indicate a risk or malfunction. It will stop
after a while.

¡

An orange flame is normal. This is caused by dust
in the air, overflowing liquids, etc.

¡

If the burner's flame accidentally goes out, switch off
the burner's selector and wait at least 1 minute be-
fore igniting the burner again.

¡

A few seconds after switching off the hob, you may
hear noises, such as a slight clicking, from the
burner. This is not unusual, but shows that the pilot
is deactivated.

¡

Keep the ignition plugs clean. If the ignition plugs
are dirty, the igniter is damaged. Clean the ignition
plugs regularly with a small, metal-free brush. En-
sure that the ignition plugs are not exposed to any
heavy knocks.

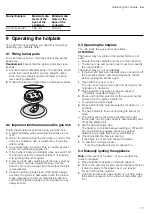
9.3 Operating the hotplate

You can ignite the gas burner as follows.

ATTENTION!

The burner may not ignite or the burner flame is not
even.

Ensure that the hotplate burners are clean and dry.

The burner cup and burner cover must be in exactly
the right position.

The burner may go out accidentally.

If the burner's flame accidentally goes out, switch off
the burner's selector and wait at least one minute
before igniting the burner again.

1.

Open the top cooker cover.
The top cover must remain open for as long as the
hotplate is in operation.

2.

Place suitable cookware on the pan support.
→ 

"Suitable cookware", Page 16

3.

Press and hold the selector for the required burner
and set it to the ignition position  ​⁠.

a

The ignition process starts.

4.

Press and hold the hotplate selector for approx. 1–3
seconds.

a

The gas begins to flow out and the gas burner ig-
nites.

a

The safety pilot is therefore activated. If the gas
flame goes out, the gas supply is automatically shut
off by the safety pilot.

5.

Set the desired flame size.
The flame is not stable between settings  ​⁠ Off and  ​⁠.
You must therefore always choose a position
between the  ​⁠ large flame and  ​⁠ small flame.

6.

Check whether the flame is burning.
If the flame is not burning, repeat the steps.

7.

To end the cooking process:

Turn the hotplate selector clockwise to  ​⁠.

9.4 Manually igniting the appliance

Note: 

In the event of a power cut, you can light the

burners manually.

1.

Place suitable cookware on the pan support.

2.

Push in the selector for your chosen burner and turn
it anti-clockwise to the power level you require.
Press and hold the selector.

3.

Light the burner with a gas lighter or a match. Keep
the selector pressed in for a few seconds after igni-
tion.

Содержание HXN391H20N

Страница 1: ...Register your new device on MyBosch now and get free benefits bosch home com welcome Free standing cooker HXN391H20N en User manual and installation instructions ...

Страница 2: ...onal to connect the appliance and to convert the appliance to a different type of gas The appliance must be installed and the elec tric and gas connections must be implemen ted in accordance with the instruction and in stallation manual An incorrect connection or incorrect settings may lead to serious accidents and damage to the appliance The appliance manufacturer accepts no liabil ity for damage...

Страница 3: ...rnor If you do not know what the gas pressure in your gas distributing pipes is please ask your local gas company Connection maintenance and setting of the gas governor must be carried out by an au thorised installation specialist WARNING Risk of suffocation Using the gas cooking appliance leads to a build up of heat moisture and combustion products in the room where the appliance is installed Ens...

Страница 4: ...comes hot during operation Allow the appliance to cool down before cleaning When the cooking compartment is hot any al coholic vapours inside may catch fire Only use small quantities of drinks with a high alcohol content in food Open the appliance door carefully The appliance and its parts that can be touched become hot during use Caution should be exercised here in order to avoid touching heating...

Страница 5: ...n people may bump into it resulting in injury Always keep the appliance door closed during and after operation WARNING Risk of scalding The accessible parts of the appliance become hot during operation Never touch these hot parts Keep children at a safe distance Hot steam may escape when you open the appliance door Steam may not be visible de pending on the temperature Open the appliance door care...

Страница 6: ...n Allow the cooking compartment to dry after use Do not keep moist food in the cooking compartment for a long time with the door closed Do not store food in the cooking compartment Leaving the appliance to cool down with the door open will damage the front of neighbouring kitchen units over time Always allow the cooking compartment to cool down with the door closed after cooking at high temperatur...

Страница 7: ...nteed The base of the pot or pan may be damaged Cookware that is used on the hotplate must be se curely in place Only use pots and pans with an even base Do not heat up empty pots or pans Damage may occur if hard or pointed objects fall on the hob Do not let hard or pointed objects fall onto the hob Do not hold and move the appliance at the gas pipe collector Damage to the gas pipe may lead to gas...

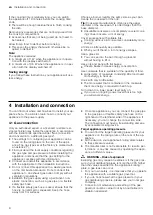
Страница 8: ...an may install the appliance in accordance with the instructions specified under Gas connection and conversion to a different gas type The settings for configuring your appliance can be found on the rating plate on the rear of the appli ance The gas type set at the factory is marked with an asterisk Find out about the local supply conditions regarding the gas type and gas pressure before installin...

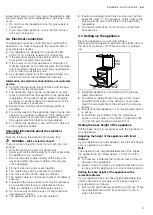
Страница 9: ...e as this may be come damaged Fit the mains plug and socket together The mains plug can be accessed at all times The cross section of the cable is sufficient The mains cable is not kinked crushed modified or severed If required the mains cable must only be replaced by a qualified electrician A replacement mains cable is available from the after sales service Do not use any multiple plugs or multi ...

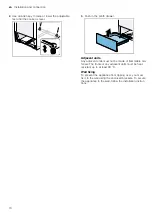
Страница 10: ...rawer Adjacent units Any adjacent units must not be made of flammable ma terials The fronts of any adjacent units must be heat resistant up to at least 90 C Wall fixing To prevent the appliance from tipping over you must fix it to the wall using the enclosed brackets To secure the appliance to the wall follow the installation instruc tions ...

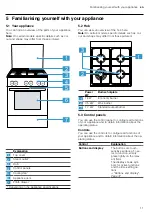
Страница 11: ...s specific details such as col our and shape may differ from those pictured 1 2 3 Power kW Burner hotplate 1 1 kW Economy burner 2 3 5 kW Wok burner 3 1 7 kW Standard output burner 5 3 Control panels You can use the control panel to configure all functions of your appliance and to obtain information about the operating status Controls You can use the controls to configure all functions of your app...

Страница 12: ...and display You can use the buttons to set various functions for your appliance The display shows the settings If a function is active the corresponding symbol lights up on the display only lights up when you change the time Symbol Function Use Childproof lock Activate or deactivate the childproof lock Time setting options Select the time timer cooking time and the end time To select the individua...

Страница 13: ...levels There are different settings for the types of heating and functions Note For temperature settings above 250 C the appliance reduces the temperature to approx 240 C after ap prox 10 minutes If your appliance has the top bottom heating or bottom heating types this temperature reduction does not take place Symbol Function Use Zero setting The appliance does not heat up 50 275 Temperature range...

Страница 14: ...operation continues Condensation Condensation can occur in the cooking compartment and on the appliance door when cooking Condensa tion is normal and does not adversely affect appliance operation Wipe away the condensation after cooking 6 Accessories Use original accessories These have been made espe cially for your appliance Note Heat may deform the accessory This deforma tion has no effect on th...

Страница 15: ...he current time Requirement The function selector must be set to the off position 1 Use or to set the time 2 Press a The time that is set appears in the display 7 2 Cleaning the appliance before using it for the first time Clean the cooking compartment and accessories be fore using the appliance to prepare food for the first time 1 Remove the accessory and the leftover packaging such as polystyren...

Страница 16: ...r missible diameter When cooking with a wok use the wok ring Place the wok ring over the wok burner onto the pan support Ensure that the wok is stable on the wok ring when you are cooking Use a high quality wok with a domed base A wok with a flat base is not stable on the wok ring and may overturn 8 2 Tips for using a wok Note the following information to ensure the safe use of a wok WARNING Risk ...

Страница 17: ...xposed to any heavy knocks 9 3 Operating the hotplate You can ignite the gas burner as follows ATTENTION The burner may not ignite or the burner flame is not even Ensure that the hotplate burners are clean and dry The burner cup and burner cover must be in exactly the right position The burner may go out accidentally If the burner s flame accidentally goes out switch off the burner s selector and ...

Страница 18: ... using a pan with a lid turn the flame down as soon as the food starts to boil Optional Available for some appliances Depend ing on the appliance type For frying on the wok burner we recommend that you use a wok 10 Basic operation 10 1 Switching on the appliance Turn the function selector to any position other than the Off position a The appliance is switched on 10 2 Switching off the appliance Tu...

Страница 19: ...value 5 minutes 10 minutes Up to 10 minutes the timer duration can be set in 30 second increments The time increments be come bigger as the value increases a The timer starts and the timer duration begins to count down after a few seconds a An audible signal sounds and the timer duration is zero in the display when the timer duration has elapsed 3 Once the timer duration has elapsed Press any butt...

Страница 20: ... change after a few seconds Cancelling the end time You can delete the set end time at any time Requirement is highlighted in the display Reset the end time to the current time plus the set cooking time using the button a After a few seconds the appliance applies the change and starts heating up The cooking time counts down 12 5 Setting the time Once the appliance has been connected to the mains o...

Страница 21: ...panel Hot soapy water Do not use glass cleaner or a glass scraper Knobs Hot soapy water Clean with a dish cloth and dry with a soft cloth Do not remove or scrub Gas hotplate burners and pan supports Hot soapy water Clean the burner parts and pan support with a dish cloth Only use a little water Water must not be allowed to enter the inside of the appliance through the burner compartments Do not cl...

Страница 22: ...cified and using suitable clean ing products WARNING Risk of burns The appliance and its parts that can be touched be come hot during use Caution should be exercised here in order to avoid touching heating elements Young children under 8 years of age must be kept away from the appliance WARNING Risk of fire Loose food remnants fat and meat juices may catch fire Before using the appliance remove th...

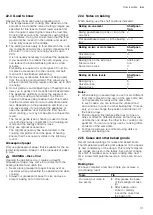
Страница 23: ...ell The cloth must not be too wet Wash new sponge cloths thoroughly before use 2 Dry with a soft cloth 15 Cleaning aid The cleaning aid is a fast alternative for occasionally cleaning the cooking compartment The cleaning aid evaporates soapy water and therefore softens dirt This means that dirt can be removed more easily 15 1 Setting the cleaning aid WARNING Risk of scalding If there is water in t...

Страница 24: ...hing the rails 1 First insert the rail into the rear socket press it to the back slightly 2 and insert it into the socket at the front The rails fit both on the left and right sides Shelf po sitions 1 and 2 are located at the bottom and shelf positions 3 4 and 5 are located at the top Pull out the telescopic rail towards the front 17 Appliance door It is normally sufficient if you clean the outsid...

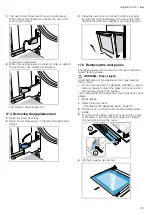
Страница 25: ...se the door slightly more and remove it 17 3 Removing the door panes The glass panes of the oven door can be removed to make cleaning easier WARNING Risk of injury Scratched glass in the appliance door may develop into a crack Do not use any harsh or abrasive cleaners or sharp metal scrapers to clean the glass on the oven door as they may scratch the surface The components in the appliance door ma...

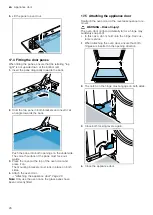
Страница 26: ...press it on The mounting brackets must lock in place on both sides 4 Attach the oven door Attaching the appliance door Page 26 Note Only use the oven once the glass panes have been correctly fitted 17 5 Attaching the appliance door Reattach the oven door in the reverse sequence to re moval WARNING Risk of injury The oven door might accidentally fall or a hinge may suddenly snap shut In this case d...

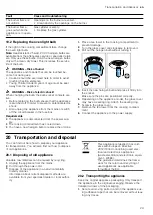
Страница 27: ...ted on the left 18 2 Installing the top cover After cleaning install the top cover following the same procedure in reverse order Note Only close the top cover once the hotplates have cooled down 19 Troubleshooting You can rectify minor faults on your appliance yourself Read the troubleshooting information before contacting after sales service This will avoid unnecessary costs WARNING Risk of injur...

Страница 28: ... Customer Service Page 30 There is a smell of gas in the kitchen The gas cylinder connection is leaking 1 Ventilate the room 2 Check the gas cylinder connection The gas pipe to the appliance is leaking 1 Ventilate the room 2 Call the gas supplier Burner does not ig nite There has been a power cut Light the burner with a gas lighter or a match The burner parts are positioned incorrectly 1 Position ...

Страница 29: ... in the cooking compartment to prevent damage 2 Turn the glass cover anti clockwise to remove it 3 Pull out the halogen bulb without turning it 4 Insert the new halogen bulb and press it firmly into the socket Make sure the pins are positioned correctly 5 Depending on the appliance model the glass cover may have a sealing ring Attach the sealing ring 6 Screw in the glass cover 7 Remove the tea tow...

Страница 30: ...hese numbers if you open the appliance door Make a note of your appliance s details and the Cus tomer Service telephone number to find them again quickly 22 How it works Here you can find the ideal settings for various types of food as well as the best accessories and cookware These recommendations are perfectly tailored to your appliance 22 1 Proceed as follows Note If you are using the appliance...

Страница 31: ...greaseproof paper that is suitable for the se lected temperature Always cut the greaseproof paper to size WARNING Risk of fire Opening the appliance door creates a draught Greaseproof paper may come into contact with the heating element and catch fire Never place greaseproof paper loosely over ac cessories when preheating the appliance and while cooking Always cut greaseproof paper to size and use...

Страница 32: ...delicate Vienna ring tin loaf tin 2 150 170 60 80 Sponge flan base Flan base tin 3 160 180 30 40 Fruit tart or cheesecake with shortcrust pastry base Springform cake tin diameter 26 cm 2 160 180 70 90 Strudel Tart dish or tin 1 200 240 25 50 Pie Springform cake tin Ø 28 cm 2 160 180 25 35 Sponge cake Bundt cake tin 2 150 170 60 80 Sponge flan 3 eggs Springform cake tin diameter 26 cm 2 160 170 30 ...

Страница 33: ... Universal pan Baking tray 3 1 150 170 25 40 Puff pastry Universal pan 3 180 200 20 30 Puff pastry 2 levels Universal pan Baking tray 3 1 180 200 25 35 Puff pastry 3 levels 2x Baking tray Universal pan 5 3 1 170 190 30 45 Choux pastry e g profiteroles eclairs Universal pan 3 190 210 35 50 Choux pastry 2 levels e g profiteroles eclairs Universal pan Baking tray 3 1 190 210 35 45 Biscuits Meal Acces...

Страница 34: ...lly too light in colour Check the shelf posi tion and accessory Increase the baking temperature by 10 C Or Increase the baking time Your cake is too light on top and too dark under neath Place the cake one level higher in the cooking compartment Your cake is too dark on top and too light under neath Place the cake one level lower in the cook ing compartment Reduce the baking temperature and in cre...

Страница 35: ...latbread Universal pan 3 240 250 25 30 Flatbread frozen1 Universal pan 2 200 2202 10 25 Bread rolls sweet fresh Universal pan 3 170 1802 20 30 Bread rolls sweet fresh 2 levels Universal pan Baking tray 3 1 160 1802 15 25 Bread rolls fresh Universal pan 3 200 220 20 30 Toast with topping x 4 Wire rack 3 200 220 15 20 Toast with topping x 12 Wire rack 3 220 240 15 25 1 The cooking process must take ...

Страница 36: ...es and gratins Meal Accessory cookware Shelf posi tion Type of heating Temperature in C Cooking time minutes Bake savoury fresh cooked ingredi ents Ovenproof dish 2 200 220 30 60 Bake sweet Ovenproof dish 2 180 200 50 60 Potato gratin raw ingredients 4 cm deep Ovenproof dish 2 150 170 60 80 Potato gratin raw ingredients 4 cm deep on 2 levels Ovenproof dish 3 1 150 160 70 80 22 9 Poultry meat and f...

Страница 37: ... become dry Only add salt to steaks once they have been grilled Salt draws water from the meat Tips for poultry meat and fish Observe the instructions when preparing poultry meat and fish Poultry For duck or goose pierce the skin on the underside of the wings This allows the fat to drain out If using duck breast score the skin Do not turn duck breasts Poultry will turn out particularly crispy and ...

Страница 38: ...e without lid 2 200 220 60 70 Small chicken portions 250 g each Cookware without lid 3 220 230 30 35 Chicken goujons nuggets frozen Universal pan 3 190 210 20 25 Duck unstuffed 2 kg Cookware without lid 2 190 210 100 110 Duck breast 300 g each medium Cookware without lid 3 240 260 30 40 Goose unstuffed 3 kg Cookware without lid 2 170 190 120 140 Goose legs 350 g each Cookware without lid 3 220 240...

Страница 39: ...osi tion Type of heating Temperature in C grill setting Cooking time in mins Fish grilled whole 300 g e g trout Wire rack 2 2 20 251 Fish grilled whole 1 kg e g gilthead Wire rack 2 180 200 45 501 Fish grilled whole 1 5 kg e g salmon Wire rack 2 170 190 50 601 Fish fillet fish cutlet 2 3 cm thick grilled Wire rack 3 2 20 251 1 Slide the universal pan underneath the wire rack Tips for next time you...

Страница 40: ...ring the appliance settings 8 After making the yoghurt leave it to cool in the refri gerator Recommended settings Yoghurt Meal Accessory cookware Shelf position Type of heating function Temperature in C Cooking time minutes Yoghurt Cup jar Cooking compartment floor 4 5 hours 22 12 Tips for keeping acrylamide levels to a minimum when cooking Acrylamide is harmful to your health and is produced when...

Страница 41: ...0 5 8 hours Herbs stalks removed Wire rack 3 3 1 60 2 5 hours 22 14 Preserving food You can preserve fruit and vegetables by heating them and sealing them in air tight jars Only use heat resistant clean undamaged pre serving jars rubber seals and clips Only use fruit and vegetables which are in perfect condition Only use jars that are the same size and contain the same food WARNING Risk of injury ...

Страница 42: ...les e g beans kohlrabi red cabbage 1 litre pre serving jars 2 1 170 180 2 120 140 3 1 Until bubbling starts 2 Once it starts bubbling 60 3 Residual heat 30 Vegetables e g peas 1 litre pre serving jars 2 1 170 180 2 120 140 3 1 Until bubbling starts 2 Once it starts bubbling 70 3 Residual heat 30 Stone fruit e g cherries apricot peach grapes gooseberries damsons 1 litre pre serving jars 2 1 170 180...

Страница 43: ...est for another 10 to 30 minutes in the appliance after switching it off Recommended settings Defrosting Meal Accessory cookware Shelf position Type of heating Temperature in C Cooking time minutes Baked items cake and bread fruit veget ables meat products Wire rack 2 3 1 22 17 Test dishes These overviews have been produced for test institutes to facilitate appliance testing in accordance with EN ...

Страница 44: ...sal pan 3 1501 25 35 Small cakes Universal pan 3 1501 25 35 Small cakes 2 levels Universal pan Baking tray 3 1 1501 25 35 Small cakes 3 levels 2x Baking tray Universal pan 5 3 1 1401 35 45 Hot water sponge cake Springform cake tin diameter 26 cm 2 160 1702 30 40 Hot water sponge cake Springform cake tin diameter 26 cm 2 170 30 40 Hot water sponge cake 2 levels Springform cake tin diameter 26 cm 3 ...

Страница 45: ...he gas type set at the factory is marked with an asterisk After converting the appliance from one gas type to another the new gas type must be labelled on the rating plate Use the gas conversion label to do this is used to indicate the gas type on the label Stick the label on which the gas conversion is marked with a star in the designated location on the rating plate The changes made to the appli...

Страница 46: ...l gas connection NG If you are using natural has NG the gas supply should be connected via a gas pipe or a safety gas hose with threaded fittings at both ends Connection types G EN ISO 228 G TS EN ISO 228 G R EN 10226 R TS 61 210 EN 10226 R WARNING Risk of explosion A gas leak may occur due to a damaged connection nozzle When connecting the gas pipe or safety gas hose never tighten the gas connect...

Страница 47: ...e Note You can find more information about which gas types can be used with the appliance and the appropri ate gas nozzles in the section entitled Technical data Gas Page 51 The numbers on the burners refer to their diameter Converting the gas type Replacing the gas connection part Replace the burner nozzles Depending on the gas setting that is configured at the factory replace or tighten the bypa...

Страница 48: ...nch 7 to remove the cooker burner nozzles 5 If your appliance features a wok burner with side ac cess remove the burner nozzle as shown below 7 7 6 Look up the burner nozzles in the table You can find additional information about this in the section entitled Technical data Gas Page 51 Fit the new nozzles into the appropriate burners 7 After replacing the nozzles check that there are no leaks You c...

Страница 49: ...this in the section entitled Removing the control panel Page 49 2 Then carry out the steps in the section entitled Re placing the bypass nozzles Page 50 3 Then carry out the steps described in the section entitled Installing the control panel Page 50 Removing the control panel 1 If the appliance has an upper cover remove this To do this open the hob cover grip the sides with both hands and pull it...

Страница 50: ... section entitled Technical data Gas Page 51 3 Check that the seals on the bypass nozzles are seated correctly and work properly Only use by pass nozzles with absolutely faultless seals 4 Insert the new bypass nozzles and tighten them se curely Ensure that all bypass nozzles have been fastened to the correct taps 5 At this stage it is important to test for leaks You can find additional information...

Страница 51: ...re comes to the nozzle a If dispersions and bubbles occur on the foamy sur face and these indicate that gas is escaping follow the instructions in the section entitled What to do if there is a gas leak Page 51 Checking the bypass nozzles Check the leak tightness of each bypass nozzle 1 Open the gas connection shut off 2 To check carefully cover the hole in the burner nozzle with your finger or a s...

Страница 52: ... 0 6 0 58 0 4 0 38 0 4 0 38 0 4 0 38 0 6 0 58 0 6 0 58 Max input power kW 1 75 1 75 1 75 1 75 1 75 1 75 1 75 1 75 1 75 1 75 1 75 Min input power kW 0 9 0 9 0 9 0 9 0 9 0 9 0 9 0 9 0 9 0 9 0 9 Gas flow at 15 C and 1013 mbar m3 h 0 167 0 194 0 167 0 167 0 194 0 194 0 190 0 203 0 225 Gas flow at 15 C and 1013 mbar g h 127 125 127 127 1 Use the bypass nozzle with the appropriate diameter that is inclu...

Страница 53: ...94 0 88 0 94 0 88 0 94 0 88 0 94 0 88 0 94 0 88 0 94 0 88 0 59 0 55 0 59 0 55 0 59 0 55 Max input power kW 3 5 3 5 3 5 3 5 3 5 3 5 3 3 3 3 3 3 Min input power kW 1 7 1 7 1 7 1 7 1 7 1 7 1 7 1 7 1 7 Gas flow at 15 C and 1013 mbar m3 h 0 333 0 388 0 333 0 333 0 388 0 388 0 379 Gas flow at 15 C and 1013 mbar g h 240 236 240 240 1 Use the bypass nozzle with the appropriate diameter that is included in...

Страница 54: ......

Страница 55: ......

Страница 56: ...ing for help You ll find it here Expert advice for your Bosch home appliances help with problems or a repair from Bosch experts Find out everything about the many ways Bosch can support you www bosch home com service Contact data of all countries are listed in the attached service directory 9001685516 9001685516 020205 en BSH Hausgeräte GmbH Carl Wery Straße 34 81739 München GERMANY www bosch home...

Отзывы: