


MY22B0a - 62_1.0_15.09.2021
181
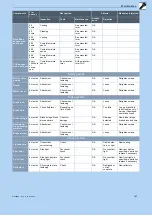
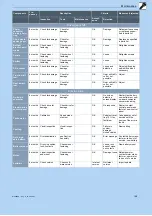
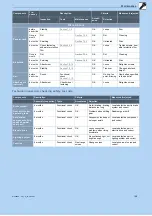
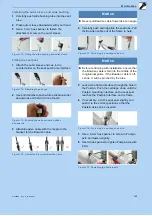
Maintenance
9
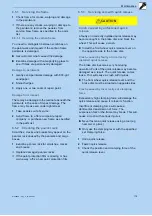
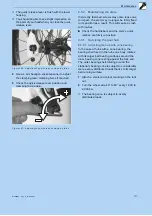
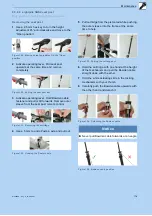
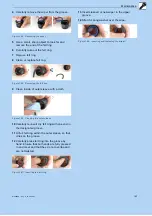
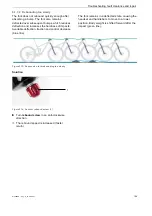
Carefully insert slide bushing tube into the seat
tube.
Figure 180: Inserting the slide bushing tube into the seat
tube
10
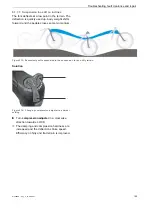
Place outer sleeve on the seat tube and push
downwards firmly.
Figure 181: Attaching the outer sleeve
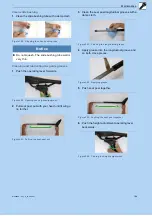
11
Turn the outer sleeve so that the outer sleeve
mounting hole is aligned with the fastening
hole in the frame.
12
Use a 3 mm hex spanner to fasten the M5
attachment screw into the outer sleeve.
13
Tighten screw gently with a maximum torque of
0.5 Nm.
The screw must easily screw into the outer
sleeve without any resistance. If this is not the
case, the hole in the frame is not aligned with
the mounting hole in the outer sleeve. Turn
outer sleeve into the right position.
Figure 182: Fastening the outer sleeve
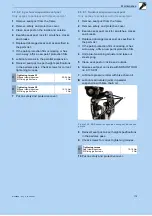
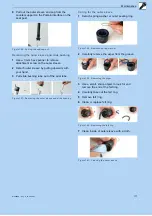
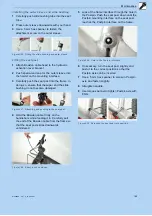
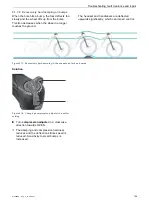
14
Feed height adjustment clamp into the seat
tube.
The two height adjustment clamp guides are in
the longitudinal grooves inside the seat post.
Figure 183: Feeding the height adjustment clamp in
15
Push the seat post carefully downwards and
feed into the wiper.
Figure 184: Pushing the seat post downwards
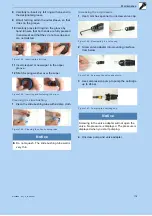
16
Move operating lever and press seat post
downwards to the required height as per the
values in the pedelec pass.
Figure 185: Setting the seat post height
17
Turn the height adjustment mechanism 45° in
a clockwise direction and place in the “Closed
position”.
Figure 186: Closing the height adjustment
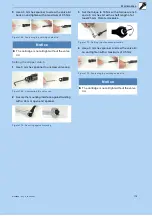
Notice
Never let the seat post tube collide with the
piston rod. There is a risk of scratches and
damage to the piston rod. This will causes loss
of air.
Содержание BULLS KIOX300
Страница 211: ...MY22B0a 62_1 0_15 09 2021 210 Notes ...
Страница 224: ...MY22B0a 62_1 0_15 09 2021 223 Documents 11 4 Charger operating instructions ABCDE ...
Страница 225: ...MY22B0a 62_1 0_15 09 2021 224 Documents F 4A Charger DCG F H A I A J ...
Страница 226: ...MY22B0a 62_1 0_15 09 2021 225 Documents F A I A J DCG F H ...
Страница 227: ...MY22B0a 62_1 0_15 09 2021 226 Documents F DCG F H A I A J ...


