ACS 653, ACS 663 Service Manual
SP00D00624
2021-04-08
Robert Bosch GmbH
75
Electrical
Replacement Control Board
WARNING: Disconnect the unit from the
power source before beginning service
work. Incorrect use or connections can
cause electrical shock.
WARNING: Wear safety goggles
when working with refrigerants.
Refrigerants can cause eye injury.
WARNING: Use extreme caution when
disconnecting hoses. Pressurized
refrigerant may be present in hoses.
Point hoses away from you and
anyone nearby.
Instructions
These instructions outline the basic steps to
replace the control board. Refer to Figure 3-6.
Remove Existing Control Board
1. Disconnect unit from the power source.
2. Remove the cap nearby the usb ports and
remove the screw.
3.
Remove the 8 screws from the front plastic
dashboard and open it in order to access
the control board.
4. Disconnect all wires from control board
including keypad and display ribbon cables.
5. Remove screws securing control board in
place and remove control board.
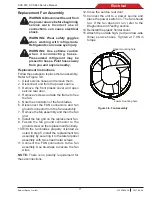
Figure 3-6. Control Board Connector Identification
Install Replacement Control Board
NOTE:
All control boards are shipped from the
factory without
any software on board
. Service
centers must follow these installation procedures
to set the board and get unit ready to use.
1. Attach the display and keypad ribbon cables
to the control board.
2. Connect wires as shown in Figure 3-6.
3.
Close and fix the front plastic dashboard
with 8 screws.
4. Screw back the screw and place the cap
(see Figure 1-15 in the Maintenance section).
5. Keep the original SD card and format as
FAT 32.
6. Download
right service software
(software
releases equal to or higher than 093.001.005)
from EDIS and unzip it into AC/ACS unit
original SD card.
7. Insert original SD card with service software
in new control board.
8. Download the last AC/ACS software release
from EDIS (take care about the model)
and copy and paste in one USB dongle
(previously format as FAT 32).
9. Insert USB dongle in the unit slot
(see Figure 1-1 in the Introduction section).
10. Clear service hose and remove them.
11. Remove the front plastic cover (needed for
tank calibration), then plug in power cord
and switch ON.
P
6
P19
P8
CBJ1
CBP8
CBP19
CBP6
CBP1
CBP2
CBP18
CBP15
CBJ6
CBP17
P
15
P
18
J1
J7
J3
P13
P12
P17
J8
J2
LS1
P3
P2
P9
P10
J6
P1
P11

