background image

6 720 644 942

22

Troubleshooting

the water heater should be cleaned and inspected. See
chapter 5.2.

5.  If  the  water  has  a  high  mineral  content,  the  heat
exchanger  may  be  scaled  internally.  This  restricts  the
water  path,  causing  the  water  to  boil  and  produce
extremely  hot  temperatures.  To  descale  the  heat
exchanger, section  5.6 on page 18.

6.8

Water is not hot enough

1.  Verify  that  gas  type  indicated  in  the  rating  sticker
located  on  the  cover's  right  hand  side  coincides  with
the gas type you are using. NG is a natural gas unit and
LP is for liquid propane (see chapter 2.2).

2. Flow at  one particular  tap is too great or too many
fixtures  are  running  at  one  time.  Lower  flow  to  stay
within the heater's specifications.

3.  Ensure  that  the  gas  control  knob  is  all  the  way
counter-clockwise for highest temperatures. In addition,
the  flow  control  knob  maybe  set  too  high.    Raise  the
setting  by  turning  the  knob  clockwise  for  higher
temperatures.

4. Close installer supplied cold water shut off valve (if
none  installed,  install  before  proceeding).  Open  every
hot  water  tap  supplied  by  the  heater.  Wait  5  minutes
and check all taps. Any water running, even a trickle, is
a sign of a plumbing crossover. Consult local plumber
or  service  person  for  help  correcting  a  plumbing
crossover.

5.  Inspect  the  water  path  outside  the  heater  for
obstructions.  Make  sure  all  showerheads,  faucet
aerators  and  whole  house  filters  are  clear  of  debris.
Also, the water heater's inlet filter should be inspected
and cleaned.  See chapter 5.2.

6. The water valve assembly, which allows gas flow to
the  burners, requires  periodic  maintenance (every  2-5
years  depending  on  water  quality  and  use).  See
section 5.2.

7.  Gas  pressure  is  too  low.  Ensure  that  gas  pressure
meets specifications meets chapter 3.9. A gas pressure
reading  is  needed  to  proceed  further.  Contact  your
original installer or a local gas technician to obtain this
reading.

6.9

Low hot water pressure

1. Confirm  adequate  flow  rate  through  the unit.   With
cold  supply  shut  off  to  the  unit,  disconnect  hot  outlet
side  to  the  unit.    Place  a  gallon  jug  under  hot  water
outlet  to  catch  water.  Open  cold  water  supply  and
measure  flow  rate  out  of  the  unit.    With  temperature
adjustment knob set all the way clockwise, the flow rate
should be close to 2GPM (filling the jug in 30 seconds
or  less).  If  the  flow  rate  is  not  adequate,  inspect  and
clean inlet filter screen. See chapter 5.2.

2. Confirm that the incoming water pressure to the unit
is above the minimum required pressure of 30psi.

3.  Inspect  the  water  path  outside  the  heater  for
obstructions.  Make  sure  all  showerheads,  faucet
aerators and whole house filters are clear of debris.

4. Be sure to run only one major fixture at a time with this
water heater. Opening too many taps at one time can
disperse  water  flow  resulting  in  diminished  flow  or
pressure at all outlets.

6.10 Noise when heater is running

If  the  water  has  a  high  mineral  content,  the  heat
exchanger  may  be  scaled  internally.  This  restricts  the
water path, causing the water to boil resulting in noise
and  overheating.  To  descale  the  heat  exchanger,
consult section  5.6 on page 18.

6.11 Burners do not burn cleanly, yellow 

flames when operating

1.  Verify  that  gas  type  indicated  in  the  rating  sticker
located on the heater's right hand side, coincides with
the gas type you are using.  NG is a natural gas unit and
LP is for liquid propane (see chapter 2.2).

2.  For  proper  combustion  at  high  elevations  the  inlet
gas pressure must be set at installation to the values in
table 3 on page 11 (while operating at maximum BTU).
A gas pressure reading is  needed  to proceed  further.
Contact your original installer or a local gas technician
to obtain this reading.

3. Combustion air is inadequate. Ensure that adequate
combustion  air  is  being  supplied  to  the  unit  in
accordance  with  requirements  in  the  installation
manual. See chapter 3.3.

4. Verify that the water heater is vented properly. Ensure
that the venting meets requirements in chapter 3.6.

5. If the burner flames burn yellow or orange the burners
must be removed from the unit and cleaned. Once the
burners  are  removed,  the  fins  in  the  top  of  the  heat
exchanger can be accessed from below and brushed or
vacuumed  clean.  Consult  service  bulletin  CT-13  on
www.boschpro.com  for  removing  and  cleaning  the
burners.

Содержание 520-HN-L

Страница 1: ... or property damage Refer to this manual For assistance or additional information consult a qualified installer service agency or the gas supplier In the Commonwealth of Massachusetts this product must be installed by a licensed plumber or gas fitter Upon completion of the installation these instructions should be handed to the user of the appliance for future reference What to do if you smell gas...

Страница 2: ...ppears when hot water is turned on but pilot and burners will not ignite 19 6 4 Pilot lights but burners will not come on 20 6 5 Main burners go out during hot water use 20 6 6 Hot water temperature fluctuates at tap 21 6 7 Water is too hot 21 6 8 Water is not hot enough 22 6 9 Low hot water pressure 22 6 10 Noise when heater is running 22 6 11 Burners do not burn cleanly yellow flames when operat...

Страница 3: ...tivate heater 0 5 gallon minute 1 9 l m Minimum recommended water pressure 30 PSI 2 07 bar Connections Bottom of heater Temperature rises 1 45F rise 4 1 gpm 50F rise 3 7 gpm 55F rise 3 4 gpm 65F rise 2 8 gpm 77F rise 2 4 gpm 90F rise 2 0 gpm Dimensions Depth in 8 66 220 mm Width in 16 73 425 mm Height in 25 75 655 mm Weight 35 pounds 16 kg Gas types Natural Gas LP Gas Safety devices Flame failure ...

Страница 4: ... with local codes or in the absence of local codes the National Fuel Gas Code ANSI Z223 1 NFPA 54 In Canada The Installation must conform with CGA B149 1 2 INSTALLATION CODES and or local installation codes 2 Carefully plan where to install the heater Proper clearances must be followed 3 The appliance must be isolated from the gas supply piping system by closing its individual manual gas shutoff v...

Страница 5: ...37 Mounting holes 38 Exhaust pipe union 39 Draft diverter with flue gas sensor 40 Gas valve Fig 4 Minimum clearances 39 38 4 5 23 11 40 H 6720608036 01 2Av 8 66 220 E F G 4 92 125 D 2 50 63 5 1 97 50 3 82 97 A B 37 10 26 35 34 20 36 C Model 520 HN TOP A 12 inches 306 mm FRONT B 4 inches 100 mm BACK 0 inches SIDES 4 inches 100 mm BOTTOM C 12 inches 306 mm Dimensions inches mm 520 HN A 16 73 425 B 2...

Страница 6: ...ntal venting An AQ4 powervent with a proof of draft safety interlock device is required and is available for sidewall venting Contact your dealer In the Commonwealth of Massachusetts power vented applications must utilize proof of draft safety interlock device and comply with regulations established for all side wall horizontally vented gas fueled equipment 3 3 2 Vertical venting B A 5 inch diamet...

Страница 7: ...ance with Fig 7 and table 2 provided they are at least 8 feet 2 4 m from a vertical wall or similar obstruction All other gas vents that are not able to terminate within the minimum specified height allowed must terminate not less than 2 feet 0 6 m above the highest point where it passes through the roof and at least 2 feet 0 6 m higher than any vertical wall or similar obstruction within 10 feet ...

Страница 8: ...k local codes for clarification The lining material must be listed for use only with naturally drafting draft hood equipped gas appliances Follow manufacturer s instructions for installation of listed lining material You may not vent any other fuel burning appliances into any free space remaining in the chimney The minimum vertical gas vent length within the masonry chimney must be no less than 5 ...

Страница 9: ...2 inches of the bottom of the enclosure Each opening must have a minimum free area of one square inch per 1000 Btu hr if all air is taken from inside the building 2000 Btu hr if all air is taken from the outside by horizontal ducts 4000 Btu hr if all air is taken from the outside by direct openings or vertical ducts Or the confined space must be provided with one permanent opening or duct that is ...

Страница 10: ... either 1x4 s or 1 2 minimum plywood first be attached across a pair of studs and then the heater should be attached to the support boards See Fig 11 B Install the two included L shaped hooks to wall studs or support board 13 apart See Fig 11 B Hang heater on two L shaped hooks See Fig 12 Fig 10 Remove front cover Fig 11 Support board Fig 12 Secure heater to wall Warning B Do not install this appl...

Страница 11: ... for leaks HIGH ALTITUDE INSTALLATION The pressure regulator provided with the heater has been adjusted to deliver the proper gas pressure as indicated on the rating plate and in the manual for altitude up to 2000 feet 660 meters above sea level On appliances being installed above 2000 ft 660 meters elevation the inlet gas pressure should be adjusted at installation to the value shown below Note T...

Страница 12: ... Pressure Drop of 0 5 Inch Water Column EHD Equivalent Hydraulic Diameter The greater the value of EHD the greater the gas capacity of the tubing Nominal Iron Pipe Internal Size Diameter inches inches 10 20 30 40 50 60 70 80 90 100 125 150 175 200 3 4 0 824 278 190 152 130 115 105 96 90 84 79 72 64 59 55 1 1 049 520 350 285 245 215 195 180 170 160 150 130 120 110 100 1 1 4 1 380 1050 730 590 500 4...

Страница 13: ...odes if more stringent Never sweat any rigid piping directly to or beneath the water connections or damage can occur to the internal water valve from heating of the pipe Plastics or other PEX type plumbing line materials are not allowed for connecting directly to the water heater Keep water inlet and outlet pipes to no less than 12 7mm diameter to allow the full flow capacity It is recommended tha...

Страница 14: ...on for lighting the pilot and main burners When turning the heater on follow these instructions exactly B Before operating the unit set the On Off button to the On position The On Off button is located on the front panel Smell all around the appliance area for gas Be sure to smell next to the floor because some gas is heavier than air and will settle on the floor WHAT TO DO IF YOU SMELL GAS B Clos...

Страница 15: ...lot flame will extinguish a few seconds after the burners come on The burners will remain on until the hot water tap is turned off Note The 520 HN operates in two modes See SETTING THE WATER TEMPERATURE 4 3 To turn off appliance B Set the ON OFF switch to the position OFF Fig 19 B Close installer supplied manual gas shutoff valve on the supply line to the heater 4 4 Adjusting the water temperature...

Страница 16: ...ob clockwise sup plies less gas to the burners and lowers the water temperature Fig 22 B Turning the power adjustment knob counter clock wise supplies more gas to the burners and raises the water temperature Fig 23 Maximum temperature The maximum temperature is achieved by turning the left power adjustment knob fully counter clockwise and the right flow control knob fully clockwise 4 6 Draining th...

Страница 17: ...by removing the retaining clip on water valve assembly and pulling the pipe free from the water valve Loosen the two set screws underneath the water valve where it connects to the gas valve If the set screws are seized STOP and call Bosch tech support before proceeding Forcing and breaking seized set screws may damage the water valve and gas valve assemblies Remove the water valve by pulling it to...

Страница 18: ...e pressure from the plumbing system 3 Drain water from the unit by disconnecting inlet and outlet water connections 4 Connect the line A from the outlet of the circulating pump installer supplied to the inlet water fitting on the water heater 5 Using another line B connect to the water outlet fitting on the water heater Route the other end of this line into a descaling reservoir 6 Using a 3rd line...

Страница 19: ...lean wire connections in heater a wire from ignition unit to spark electrode b wires to flue gas sensor on draft diverter c wires to overheat sensor on outlet pipe d wires to overheat sensor on heat exchanger e wires to microswitch f ground wire connection between ignition unit and fixing screw 8 If a powervent and spill switch are installed check the reset button on the spill switch installed on ...

Страница 20: ... the pilot orifice may be dirty or clogged See chapter 5 3 on how to clean the pilot and orifice 3 If sparking does not stop when pilot is lit the flame sensor may not be recognizing pilot flame Verify that wire connection clip on wire from the bottom of the flame sensor is secure If flame sensor is fully engulfed by the pilot flame it may be dirty Clean entire surface area of flame sensor with a ...

Страница 21: ...rning the gas control knob clockwise for lower hot water temperatures See chapter 4 5 If the problem persists go to www boschpro com for service bulletin CT 07 4 The water heater is designed to modulate gas flow to the burners when water flow varies If the water pressure in the home is erratic and the water flow is not consistent while a tap is opened then the temperature of the hot water will flu...

Страница 22: ...e unit Place a gallon jug under hot water outlet to catch water Open cold water supply and measure flow rate out of the unit With temperature adjustment knob set all the way clockwise the flow rate should be close to 2GPM filling the jug in 30 seconds or less If the flow rate is not adequate inspect and clean inlet filter screen See chapter 5 2 2 Confirm that the incoming water pressure to the uni...

Страница 23: ...out the disposal of recyclable products Saving water resources B Make sure you close all the taps after any use Avoid leaving the taps dripping Repair any leaking tap B Define the temperature you want This way you have the precise water flow needed mixing cold water to regulate temperature will increase the water flow with consequent waste of water For increased safety shut off the appliance from ...

Страница 24: ...list 8 1 Interior components Fig 27 Functional scheme 4 Heat exchanger 5 Burner 9 Ignition unit 10 Flow control knob 11 Water valve 20 Gas connection 21 Flexible cold inlet 22 Flexible hot outlet 26 Power adjustment knob 30 Pilot burner 51 on off button 4 5 11 20 10 22 26 51 9 30 6720608036 04 3AL 21 ...

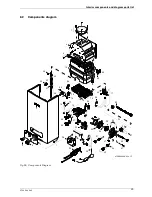
Страница 25: ...agram parts list 25 8 2 Components diagram Fig 28 Components Diagram 12 50 40 10 11 8 6 7 21 22 42 35 31 33 36 39 45 20 19 15 14 13 16 17 18 43 46 47 36 48 49 2 1 3 5 4 28 29 30 6720608036 05 3 JF 53 23 24 38 41 34 32 37 27 25 26 44 51 52 54 ...

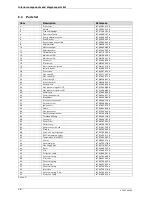
Страница 26: ...ressure regulator NG 8 707 406 084 0 23 Water valve 8 707 006 344 0 24 Watervalve pushrod 8 703 204 051 0 25 Diaphragm 8 700 503 084 0 26 Inlet water connection 8 700 306 110 0 27 Selector screw 8 708 500 304 0 28 Ignition unit 8 707 207 272 0 29 Cable 8 704 404 060 0 30 Flue gas sensor 8 707 206 446 0 31 Heat exchanger washer 8 700 103 658 0 32 Threaded bushing 8 700 306 148 0 33 Connector 8 700 ...

Страница 27: ...upplying the replacement part s Bosch Thermotechnology Corporation will provide ground service delivery for these parts Expedited or upgraded shipping will be charged to the customer Service Labor Costs This warranty does not cover any labor costs associated with service removal or re installation of part s All such costs must be borne by the Purchaser Additionally this warranty does not cover any...

Страница 28: ... side panel Gas Pressure Reading Static__________ Operating__________ Building Water Pressure __________ Range if on Well system __________ Average Winter Temperature __________ Average Summer Temperature __________ Installing Company _____________________________________________ Installer name _____________________________________________ Address _____________________________________________ Phon...

Отзывы: