background image


BKS-ST-220A_Product Manual


BooCax 


8

  / 

30


boocax.com 


3.


Appearance size 

Overall size 


Front                                                        Back 

1

45

m

m


600 mm


Содержание BKS-ST-220A

Страница 1: ...BKS ST 220A Product Manual V 1 0 0 BOOCAX 0086 4001618661 Better Robot Better Life...

Страница 2: ...when the robot is under charge to avoid short circuit or electric shock Do not replace any parts If necessary please do so under the direction of BooCax Robotics PRECAUTIONS FOR THE ROBOT The spray r...

Страница 3: ...ictly prohibited to flush the robot and charging pile directly with tap water which may lead to the accumulation of water vapor or water inside the equipment and cause serious irreparable failure CLEA...

Страница 4: ...zed personnel of BooCax otherwise the warranty will be invalid BooCax will not assume any responsibility for any damage breakdown and property personal injury caused by unauthorized disassembly The id...

Страница 5: ...ion before use 14 6 1 Install the charging pile 14 6 2 Clean up barriers 15 6 3 QR code deployment 15 6 4 Download mobile App 17 6 5 Turn on connect the robot 17 6 6 Build the spraying map 19 6 7 Depl...

Страница 6: ...nsure the uniformity and consistency of disinfection It has functions of the automatic detection to obstacles App and voice reminder Supports automatic charging which can completely eliminate the trou...

Страница 7: ...l library indoor sports hall classroom laboratory toilet cafeteria office area etc Daily scheduled spraying public health security level Office area Office building Office block Administration service...

Страница 8: ...ants Hypochlorous acid hydrogen peroxide peracetic acid etc Spray mode One direction nozzle or Mushroom nozzle Adding liquid way Uncover the lid and pour the liquid into the tank gently Movement mode...

Страница 9: ...BKS ST 220A_Product Manual BooCax 8 30 boocax com 3 Appearance size Overall size Front Back 1450 mm 600 mm...

Страница 10: ...t Manual BooCax 9 30 boocax com 4 Function module Charging connector Liquid level observation hole Spray volume knob Mist tube Tank Vision sensor One way Nozzle Mushroom Nozzle Chassis LIDAR Filling H...

Страница 11: ...BKS ST 220A_Product Manual BooCax 10 30 boocax com Power switch Air inlet Vision sensor Tank lid Emergency Stop button Tank Back...

Страница 12: ...e below for any missing or damage Step 2 Install the sprayer Take out the chassis and place it on the floor stably make sure that the lower charging mouth is facing forward pull out the two connectors...

Страница 13: ...onnectors on the chassis Six dowels are aligned with the Six positioning holes on the chassis note that the lower charging mouth of the chassis is also facing forward so that it falls smoothly and sna...

Страница 14: ...t sink around it can be freely in place from top to bottom under the action of gravity Step 4 Install mist tube and one way nozzle Finally remove the mist tube insert one end into the circular outlet...

Страница 15: ...ll it is better to fix the charging pile to the ground or wall As shown in the following figure Schematic Diagram of Installation and Use of Charging Pile Place the back of the charging pile against t...

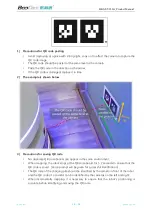
Страница 16: ...height on the working path The surmounting height of the robot is 15mm 3 Make sure that there is no large slope on site The maximum gradeability of the robot is 8 5 3 QR code deployment In order to e...

Страница 17: ...low 3 Precautions for saving QR code No duplicate QR code boards can appear in the same environment When mapping the robot stops at the QR code board for 1 2 seconds to ensure that the QR code is save...

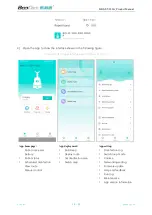
Страница 18: ...browser scan to download the App 5 5 Turn on connect the robot 1 Turn on the switch to initiate the working mode of the robot Power switch 2 Turn on the phone wifi search the wifi network beginning w...

Страница 19: ...ace and function buttons App homepage Robot name and battery Robot status Scheduled disinfection View route Manual control App deployment Build map Deploy route Set disinfection area Switch map App se...

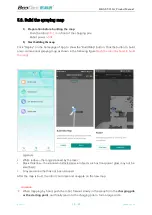
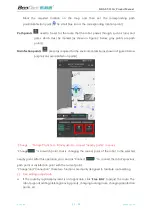
Страница 20: ...map as shown in the following figure Push the robot by hand to build the map Legends White radius the range scanned by the laser Black thick line the scanned obstacles special objects such as transpar...

Страница 21: ...g scene is too large noise you can use Incremental composition to enlarge repair the map When passing the QR code stay in front for more than 1 second and there will be a voice prompt after the entry...

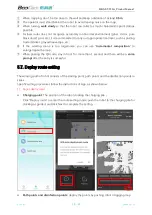
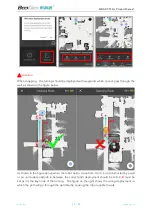
Страница 22: ...e 3 below purple icons are disinfection points Change Connect function Mainly used to connect nearby points in series Change is to switch point that is changing the current point of the robot to the s...

Страница 23: ...gure below As shown in the figure above when the robot has to move from A to C but is obstructed by a wall or an unmovable obstacle in between the correct path deployment should be A B C B must be set...

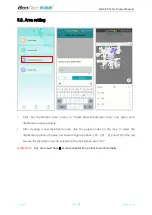
Страница 24: ...sinfection area separately After creating a new disinfection area click the purple nodes on the map to select the disinfection points in the area as shown in Figure 4 above 220 221 222 and 224 in the...

Страница 25: ...e also functions such as voice prompts volume adjustment maintenance prompts and other functions such as disinfection log line patrol mode selection firmware upgrade etc Click Schedule on the homepage...

Страница 26: ...ous acid and chlorine dioxide or fast water soluble disinfection tablets All disinfectants should be used immediately before use to avoid impairing the disinfection effect due to oxidation and volatil...

Страница 27: ...30 boocax com 6 2 Start spraying When all preparations are ready return to the homepage of App click the start button and the robot will start spraying according to the settings Thereafter the robot w...

Страница 28: ...here is a new version of the firmware that can be upgraded Step 2 Connect to the robot and upload the firmware to the robot body for upgrade Turn on the mobile phone wifi find the robot enter the pass...

Страница 29: ...do not power off or turn off the power The whole process of firmware upgrade is about 5 minutes During this period any operation on the robot is prohibited Open the App enter the settings firmware upg...

Страница 30: ...8661 Beijing Headquarter Shenzhen Branch Shandong Branch Room 606 Jianjin Center Yongtaiyuan A No 1 Qinghe Haidian District Beijing 3F Building 10 COFCO Fu an Robotics Industrial Park Fuyong Street B...

Отзывы: