background image

17 


 NOTE: 


Ask another person to assist. 


You possibly need:

 screw wrench, Phillips screw-

driver as well as a thin-blade screwdriver. 


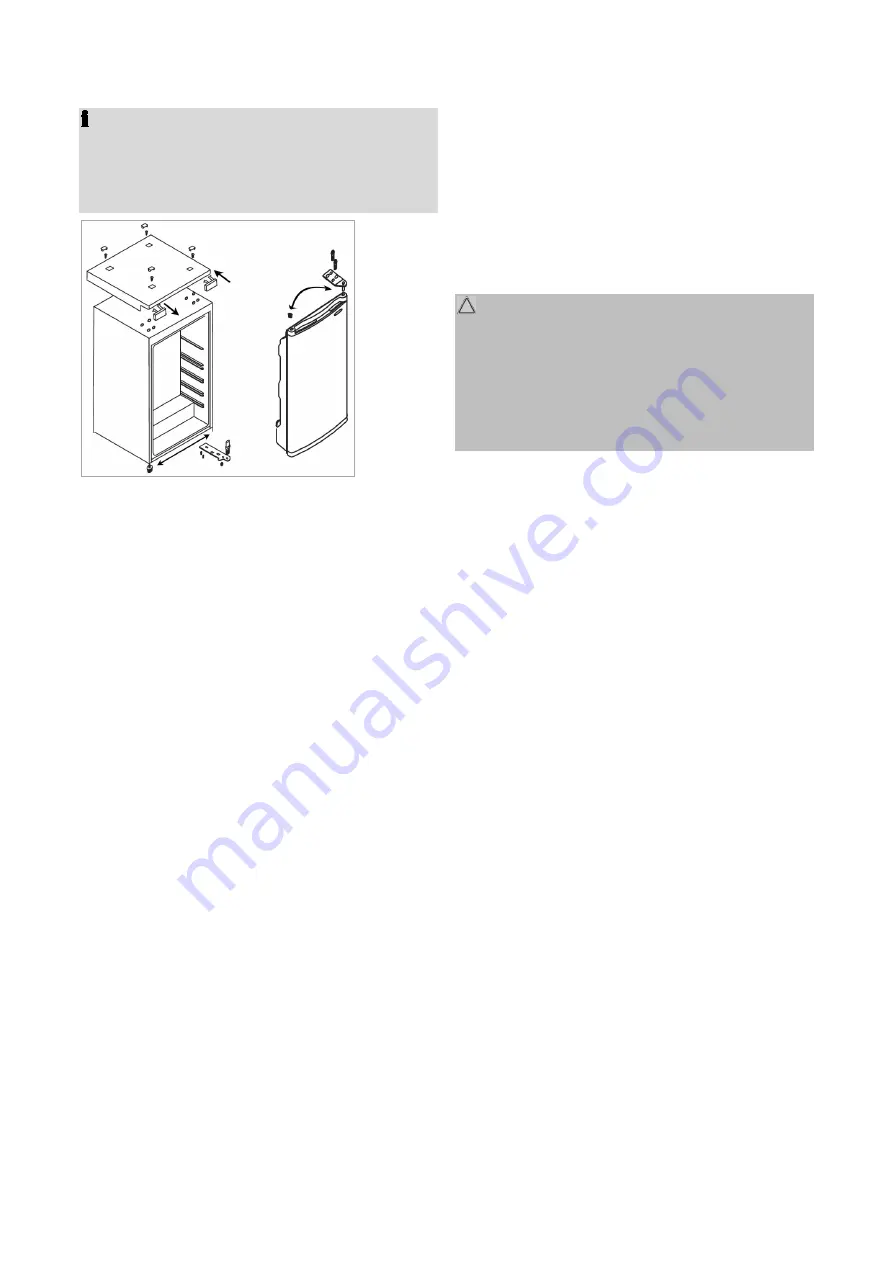
Remove the screw caps on the device cover, 
loosen the screws and remove the device cover. 


Move the blanking cap of the device cover to the 
opposite side. 


Dismount the upper door hinge and lift the appli-
ance door. 


Tilt the appliance slightly backwards and block it 
in this position. Unscrew the feet and disassemble 
the lower door hinge. 


Transfer and fasten the lower door hinge to the 
opposite appliance side after unscrewing the 
hinge pin and replacing it from the other hinge 
side. Screw in the feet. 


Put the appliance back in the upright position. 
Put on the appliance door and fix it in its intended 
position. 


Transfer and attach the upper door hinge to the 
opposite appliance side. 


Transfer and attach the upper door hinge to the 
opposite appliance side after changing the posi-
tion of the hinge pin holder and the blind plug. 


Attach the device cover and put on the screw 
caps again. 


Check that the door is optimally aligned both vertical-
ly and horizontally to ensure a smooth opening and 
closing of the door. 


Startup / Operation 

Prior to first use 

 CAUTION: 

After transport, the appliance should be left standing 
upright for four hours before connecting to the power 
supply. Nonobservance could lead to malfunction of 
the cooling system and causes an appliance break-
down. 


Clean the appliance interior including all accessory 
parts. Consider the instructions which we provide in 
the chapter “Cleaning and Maintenance”. 


Starting the appliance 


Connect the appliance to the power supply. 


Operate the temperature control. See also the 
section "Settings". 


Settings 

The power levels [ MIN – MAX ] regulate the different 
values of the internal temperature. 


Setting MIN:


Lowest setting (warmest inside temperature) 
Setting NORMAL:


Medium setting (optimal operating temperature) 
Setting MAX:


Highest setting (coldest inside temperature)


Note that the temperature will change depending on 
the ambient temperature, frequency of door opening 
and the amount of food in the appliance. 


During initial operation, turn the temperature control 
to the highest setting first, until the appliance has 
reached the desired operating temperature. After-
wards it is recommended to turn the control back to a 

Содержание GS 195.1

Страница 1: ...HAUSHALTS GEFRIERSCHRANK GS 195 1 HOUSEHOLD FREEZER HUISHOUDELIJKE VRIEZER CONG LATEUR DOMESTIQUE Bedienungsanleitung Garantie Instruction Manual Gebruiksaanwijzing Mode d emploi...

Страница 2: ...and Maintenance Page 19 Troubleshooting Page 20 Technical Data Page 20 Disposal Page 21 NEDERLANDS Inhoud Inleiding Pagina 22 Algemene opmerkingen Pagina 22 Bijzondere veiligheidsinstructies voor dit...

Страница 3: ...ginalger t abweichen Benutzen Sie das Ger t ausschlie lich f r den privaten und den daf r vorgesehenen Zweck Dieses Ger t ist nicht f r den gewerblichen Ge brauch bestimmt Es darf nur in der Art und W...

Страница 4: ...ngen oder sonstigen Mittel um den Abtauvorgang falls notwendig zu beschleunigen au er den in der Anleitung beschriebenen Hilfsmitteln Modellabh ngig im Lieferumfang enthalten Besch digen Sie nicht den...

Страница 5: ...bel ersetzen lassen Wenn Kabel oder Stecker besch digt sind d rfen Sie das Ger t nicht mehr benutzen Bei Entsorgung nutzen Sie die von Elektroger ten vorgesehenen Sammelstellen K hlmittel WARNUNG vor...

Страница 6: ...zu den Seitenw nden und oberhalb des Ger tes jeweils min 100 mm Stellen Sie das Ger t so auf dass die Ger tet r vollst ndig zu ffnen ist Das Ger t darf nur an einem Ort stehen dessen Umgebungstempera...

Страница 7: ...de ckung auf die gegen berliegende Seite Demontieren Sie das obere T rscharnier und heben Sie die Ger tet r aus Stellen Sie die T r sicher beiseite Kippen Sie das Ger t leicht nach hinten und blo ckie...

Страница 8: ...l lagern HINWEIS Empfehlung Damit die Temperatur tief genug ist lassen Sie das Ger t einige Zeit vork hlen bevor Sie erstmals Le bensmittel einlegen ACHTUNG Beachten Sie grunds tzlich die Lagerungsvor...

Страница 9: ...Produkte soll ten sobald wie m glich verzehrt werden und nicht wieder einfrieren au er sie werden zu einem Fer tiggericht weiterverarbeitet Bei Stromausfall Ger tet r geschlossen halten Beachten Sie...

Страница 10: ...u en fl chen das Zubeh r sowie die T rdichtung re gelm ig mit lauwarmem Wasser und mildem Reinigungsmittel oder mit einem sauberen feuchten Mikrofasertuch ohne Reinigungsmittel Entnehmen Sie daf r den...

Страница 11: ...nkonformit t Hiermit erkl rt der Hersteller dass sich das Ger t GS 195 1 in bereinstimmung mit den folgenden Anforderungen befindet Europ ische Niederspannungsrichtlinie 2014 35 EU EU Richtlinie f r e...

Страница 12: ...e Leistung von uns als Hersteller des Ger tes Die gesetzlichen Gew hr leistungsrechte Nacherf llung R cktritt Scha densersatz und Minderung werden durch diese Garantie nicht ber hrt Garantieabwicklung...

Страница 13: ...ing instructions may differ from the original device The appliance is designed exclusively for private use and for the envisaged purpose This appli ance is not fit for commercial use The appliance is...

Страница 14: ...other means to accelerate the de frosting process if necessary except those described in this manual depending on the model included the scope of delivery Do not damage the refrigerant circuit Do not...

Страница 15: ...f this unit contains the refrigerant Isobutane R600a a natural gas that is flammable and of high environmental compatibility Make sure no parts of the coolant circuit get damaged during transport and...

Страница 16: ...next to a stove direct sunlight or any other heat sources at locations with high humidity e g outdoors bathroom as metal parts would be suscepti ble to corrosion under such circumstances near volatil...

Страница 17: ...ly aligned both vertical ly and horizontally to ensure a smooth opening and closing of the door Startup Operation Prior to first use CAUTION After transport the appliance should be left standing uprig...

Страница 18: ...on Freezing Fresh food should be frozen as fast as possible to the core During freezing operation the tempera ture of fresh food should be lowered as fast as possible to keep formation of ice crystals...

Страница 19: ...in their original position Adjust the temperature not colder than necessary Allow warm food to cool before placing it in the appliance Open the unit door only as necessary Defrost the unit regularly...

Страница 20: ...ized technician Technical Data Climate class N ST T this appliance is intended to be used at ambient temperature ranging from 16 C to 43 C Freezing capacity the maximum freezing capacity within 24 hou...

Страница 21: ...r their disposal This helps avoid the potential effects of incorrect disposal on the environment and human health This will contribute to the recycling and other forms of reutilization of electrical a...

Страница 22: ...nele apparaat Het apparaat is alleen ontworpen voor priv gebruik en het beoogde doel Dit apparaat is niet geschikt voor commercieel gebruik Dit apparaat mag alleen gebruikt worden zoals beschreven in...

Страница 23: ...e apparaten of andere middelen om het ontdooiproces te versnellen indien nodig behalve die beschreven in deze handleiding afhankelijk van het model inbegrepen in de leveringsomvang Voorkom dat het koe...

Страница 24: ...CHUWING voor brandbare stoffen Het koelcircuit van dit apparaat bevat het koelmiddel isobutaan R600a een natuurlijk gas dat brandbaar en zeer milieuvriendelijk is Zorg ervoor dat geen enkel deel van h...

Страница 25: ...erkant van het apparaat bevindt Plaats het apparaat op een stabiele en veilige ondergrond Als het apparaat niet horizontaal staat verstel de voetjes dienovereenkomstig Vermijd de installatie in de buu...

Страница 26: ...ast na het losdraaien van de scharnierpen en het terugplaatsen aan de andere zijde van het scharnier Schroef de voetjes terug Zet het apparaat weer rechtop Plaats de deur terug en bevestig deze in de...

Страница 27: ...rontreiniging te voorkomen leef de volgende aanwijzingen na De deur te lang open laten kan een aanzienlijke toename van de temperatuur binnenin de vakken van het apparaat veroorzaken Maak de oppervlak...

Страница 28: ...en Het aanraken van de metalen delen in de vriezer kan symptomen gelijk aan brandwonden veroorzaken als de huid gevoelig is Raak geen bevroren voedsel aan met natte of vochtige handen Werkingsgeluid S...

Страница 29: ...droogd is kunt u het apparaat opnieuw inschakelen Ontdooien VOORZICHTIG Gebruik nooit metalen voorwerpen bijv messen om ijs van de verdamper te verwijderen Anders kan dit beschadigen Een defecte verda...

Страница 30: ...s het recht voor om in de loop van onze voortdurende productontwikkeling technische en ontwerpwijzigingen aan te brengen Dit apparaat is getest volgens alle relevante huidige CE richtlijnen zoals elek...

Страница 31: ...ent pour un usage priv et dans le but pour lequel il a t con u Cet appareil ne convient pas une utilisation com merciale Celui ci doit uniquement tre utilis de la mani re d crite dans le mode d emploi...

Страница 32: ...ctions N utilisez pas de dispositifs m caniques ou autres moyens pour acc l rer le processus de d givrage si n cessaire sauf ceux qui sont d crits dans ce manuel en fonction du mod le inclus dans la l...

Страница 33: ...les points de collecte d sign s pour les appareils lectriques afin de mettre l appareil au rebut R frig rant AVERTISSEMENT de substances inflammables Le circuit de refroidissement de l appareil contie...

Страница 34: ...r les c t s de l appareil et un espace libre d environ 100 mm au minimum sur le dessus Un espace suffisant sur l avant de l appareil doit tre pr serv pour que la porte puisse tre ouverte sans tre g n...

Страница 35: ...du cache de l appareil sur le c t oppos D montez la charni re sup rieure de la porte de l appareil et soulevez la porte de ce dernier Penchez l appareil l g rement en arri re et calez le dans cette po...

Страница 36: ...e des aliments soit assez basse nous vous recommandons de pr refroidir l appareil plusieurs fois avant d y mettre des aliments ATTENTION Respectez toujours les instructions de conservation indiqu es s...

Страница 37: ...aximum Ne pas stocker de bouteilles ni de canettes Ces derni res peuvent casser et leur contenu se con geler elles peuvent m me exploser dans le cas des liquides gazeux Une fois que les produits ont t...

Страница 38: ...hoc lec trique La vapeur chaude pourrait endommager les pi ces en plastique L appareil doit tre sec avant d tre remis en route ATTENTION N utilisez pas de brosse en fer ou d autre article coupant ou a...

Страница 39: ...rature ambiante com prise entre 16 C et 43 C Capacit de cong lation la capacit de cong lation maximale en 24 heures est de 3 2 kg Vitesse d augmentation de la temp rature la p riode de temps pendant l...

Страница 40: ...s que vous n utilisez plus Cela permet d viter les effets n fastes potentiels d une limination incorrecte sur l environnement et la sant humaine Cela contribuera au recyclage et autres formes de r uti...

Страница 41: ...41...

Страница 42: ...42...

Страница 43: ...43...

Страница 44: ...44 C Bomann GmbH www bomann germany de Made in P R C Stand 08 2020...

Отзывы: