background image

04/2013 

  Do not connect the device to the mains with wet hands. 

  Install the device for the wall socket to be freely accessible. 


R

EVERSE 

T

HE 

D

OOR 

O

PENING


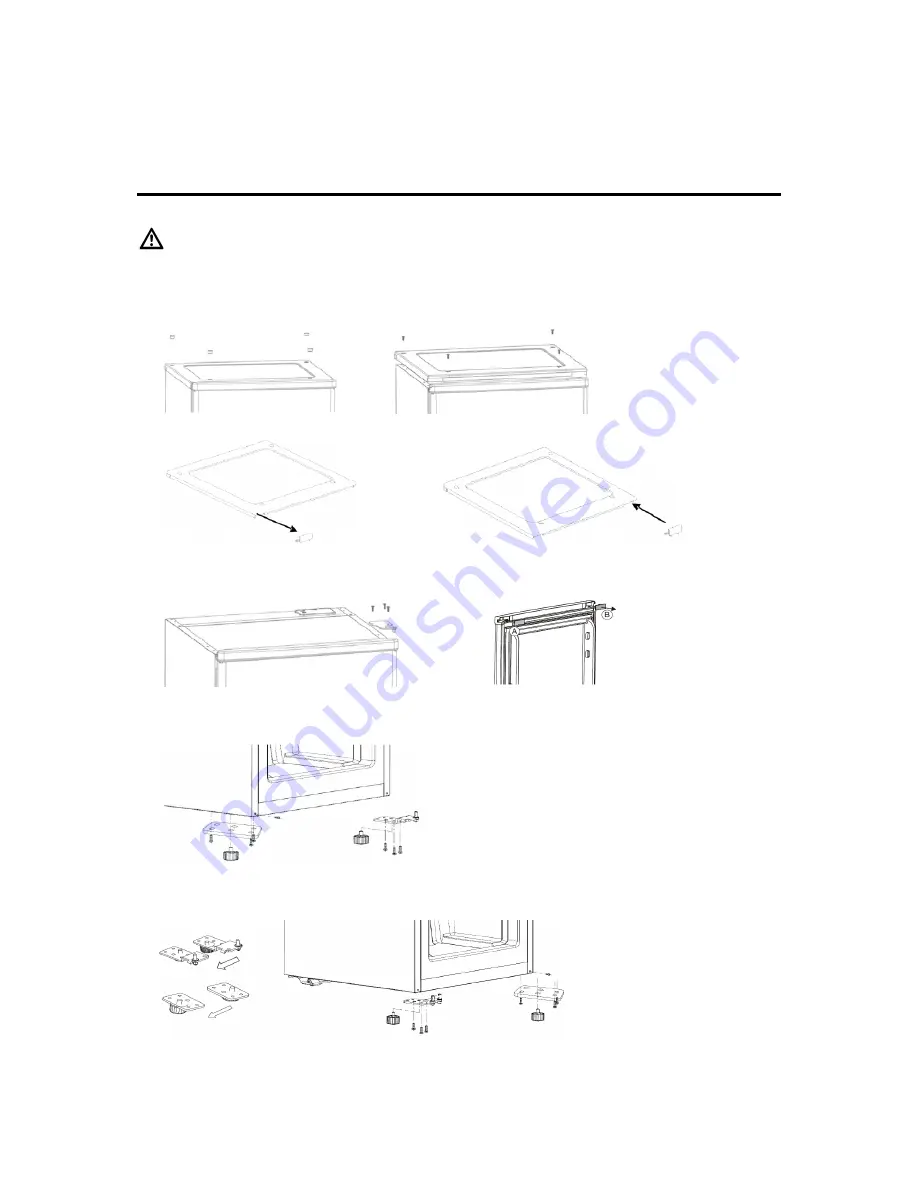
If required, the door opening can be moved from the right (supplied condition) to the left side. 


 WARNING 

When replacing the door stop, the device must be disconnected from the power supply. Always unplug 
the device first.


1.  Use  a  flat  bladed  screw  driver  to  remove  the  screw  covers  at  the  device  top  cover.  Unscrew  the 

below screws and remove the device cover. 


2.  Put the blind cap of the top cover at the opposite side. 


3.  Dismount the upper door hinge by unscrewing the screws.  

Open the  door  a  little, take the  door carefully from the lower door  hinge. Put the blind cap of the 
device door B at the opposite side A and place it on a padded surface to prevent it from scratches. 


4.  Tilt the device slightly backwards and block it in this position.  

Unscrew both feet and remove the door hinge incl. hinge pin and the separate screw-in foot brack-
et by unscrewing the screws. 


5.  Loose the hinge pin from the door hinge and put it to the other side of the hinge. 

Afterwards  you  screw  on  the  door  hinge  at  the  opposite  side  of  the  device  and  fix  the  separate 
screw-in foot bracket for the foot at the corresponding other side too. Screw both feet on again. 


Replace the device upright. 
Insert the door on the hinge pin of the lower door hinge and fix the door to the property position. 


Содержание GS 184 NoFrost

Страница 1: ...1 04 2013 User Manual FREEZER GS 184 NoFrost Please read this manual carefully and keep for future reference...

Страница 2: ...cling of electric and electronic equipment The disposal must comply with the local regulations in place For further information please contact your local authorities or waste collection service Disabl...

Страница 3: ...with physical sensory or mental abilities or lack of experience and knowledge unless they are supervised or guided Children should be supervised to ensure that they do not play with the device Transpo...

Страница 4: ...nd left side of the door You may remove adhesive residue with a cleaning solvent Also remove any adhesive tapes and packaging materials from the inside of the device PRODUCT DESCRIPTION Delivery scope...

Страница 5: ...o direct sunlight Do not place near heaters next to a stove or any other heat sources Do not use the device outdoors Only install at a location with an ambient temperature suitable for the climate cla...

Страница 6: ...ing the screws Open the door a little take the door carefully from the lower door hinge Put the blind cap of the device door B at the opposite side A and place it on a padded surface to prevent it fro...

Страница 7: ...mpressor and hence result in failure of the device This would void your warranty claim Clean the interior of the device including all accessory parts located inside Connect the device to the mains sup...

Страница 8: ...ly quit super freeze mode after 24 hours at the same time super indicator will shut off Alarm for Freezer If the power of appliance has been cut for a long time or stopped for any reason and the insid...

Страница 9: ...e food will not be affected Do not store bottles or cans These can break when the contents freeze or even explode if they contain carbonated drinks Do not eat food that is still frozen Do not allow ch...

Страница 10: ...ch as the juice of lemon or orange skin butanoic acid or cleaning agents containing acetic acid can damage plastic parts Prevent contact of any part with such substances Do not use abrasive cleaning a...

Страница 11: ...food was placed in the appliances within last 24 hours The appliance is near a heat source Please lock in the section Control panel settings Open door only as long as necessary Turn the temperature re...

Отзывы: