background image

4

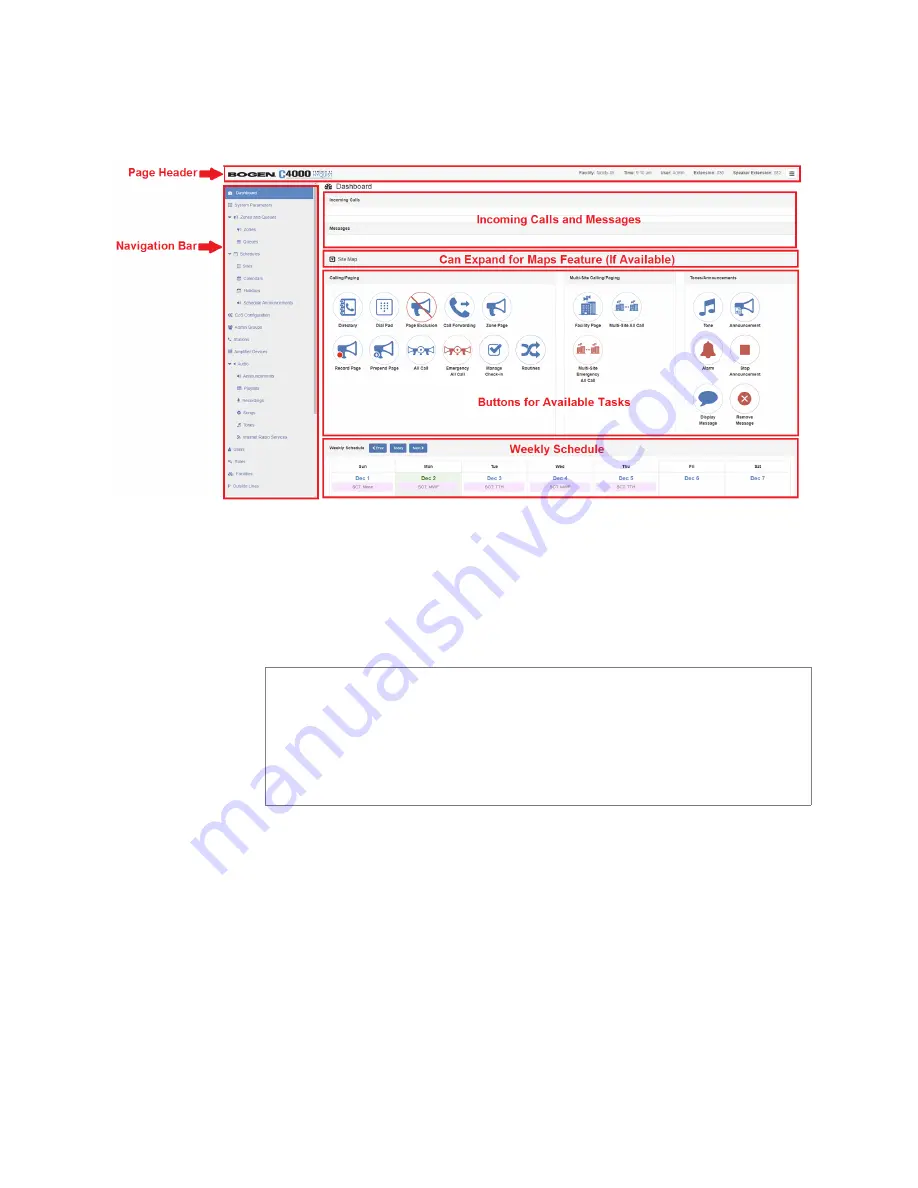
The left side, or navigation bar, of the dashboard (

"Figure 1-3, Dash-

board Areas” on page 4

), lists the areas of the C4000 system that you 

can access. Accessibility to C4000 features and functionality is con-

trolled by your assigned role.

The top right section of the page header provides the facility name, 

server time in hours and minutes, the username for the account and 

the extension for the station. The facility name and time will not 

appear if the screen is reduced in size, such as when viewing from a 

phone or tablet.
Incoming Calls and Messages appear in the message page of the 

dashboard. 

Figure 1-3, Dashboard Areas

Note: 

The navigation bar does not appear if you are not authorized 

to make changes to the C4000 configuration. Instead, you see only 

common tasks, such as making a page. If you are authorized to 

make changes to the C4000 configuration, refer to the 

Nyquist 

C4000 System Administrator Manual

 for information about per-

forming these tasks.

Содержание Nyquist C4000 Series

Страница 1: ...User Manual Nyquist C4000 Series Version 2 0 2019 Bogen Communications Inc All rights reserved 740 00126A 191211 ...

Страница 2: ...Cisco SPA112 and the Phone Adapter Configuration Utility are copyrighted by Cisco Inc All other copyrights and trademarks are the properties of their respective owners ...

Страница 3: ...ng Song Information 18 2 2 6 Deleting a Song 18 2 3 Managing Playlists 19 2 3 1 Viewing Playlists 19 2 3 2 Creating a Playlist 20 2 3 3 Adding Songs to a Playlist 23 2 3 4 Changing Song Order in a Playlist 24 2 3 5 Deleting a Song from a Playlist 24 2 3 6 Editing a Playlist 24 2 3 7 Deleting a Playlist 25 2 4 Using Internet Radio Services 25 2 4 1 Viewing Internet Radio Services 26 2 4 2 Adding a ...

Страница 4: ...ting and Stopping Tones 61 4 3 Viewing Available Tones 64 4 4 Uploading Tones 66 4 4 1 Generating Tones 68 4 4 2 Using Line Input for Tones 70 4 5 Editing Tones 72 5 Making Pages and Calls 77 5 1 Managing Calls 78 5 1 1 Placing Call Using Directory 78 5 1 2 Placing Call Using Dial Pad 81 5 2 Using Page Exclusion 82 5 2 1 Deleting From Page Exclusion List 84 5 3 Using Call Forwarding 84 5 4 Launchi...

Страница 5: ...2 Configuring Check In 107 6 2 1 Managing Exclusion and Vacancy Lists 108 7 Managing Display Messages 111 7 0 1 Creating a Display Message 111 7 1 Using Color in Display Messages 116 7 1 1 Removing Messages 119 8 Routines and Other Tasks 123 8 1 Starting and Stopping Routines 123 8 2 Viewing the Schedule for the Week 128 8 3 Manually Controlling Output Contacts 129 Index 131 ...

Страница 6: ...vi ...

Страница 7: ...o Services View 26 Figure 2 13 Add Source Page 27 Figure 2 14 Add Credential 31 Figure 2 15 Edit Credential 32 Figure 2 16 Audio Distribution Portion of Dashboard 34 Figure 2 17 Audio Distribution Set in CoS 34 Figure 2 18 Role Permissions for Audio Distribution 35 Figure 2 19 Create an Audio Distribution 35 Figure 2 20 Audio Distribution Play Icon 37 Figure 2 21 Adding Scheduled Audio 38 Figure 2...

Страница 8: ...Figure 5 14 Record Page Button 89 Figure 5 15 Record Page 90 Figure 5 16 Prepend Page Button 91 Figure 5 17 Prepend Page 91 Figure 5 18 All Call Button 92 Figure 5 19 All Call 93 Figure 5 20 Emergency All Call Button 94 Figure 5 21 Emergency All Call 95 Figure 5 22 Facility Page Button 96 Figure 5 23 Facility Page 96 Figure 5 24 Multi Site All Call Button 98 Figure 5 25 Multi Site Emergency All Ca...

Страница 9: ...ix Figure 8 4 Routines Manager 128 Figure 8 5 Weekly Schedule Section of Dashboard 128 Figure 8 6 Schedule Page 129 Figure 8 7 Output Control Section 130 Figure 8 8 Manual Control Buttons 130 ...

Страница 10: ...x ...

Страница 11: ...an Audio Distribution Parameters 36 Table 3 1 Add Announcement Page Parameters 49 Table 3 2 SSML Formats for Text to Speech Entries 51 Table 3 3 Announcements Page Parameters 54 Table 3 4 Edit Announcement Page Parameters 56 Table 4 1 Tones Page Parameters 65 Table 4 2 Add Tone Page Parameters Upload 68 Table 4 3 Add Tone Page Parameters Generate 70 Table 4 4 Add Tone Page Parameters Line Input 72...

Страница 12: ...xii ...

Страница 13: ...ntrol and interoperability with third party devices and systems such as access control fire alarm clock and PBX systems C4000 also features a built in streaming Internet radio service air able and optional custom tailored music selections from SOUNDMA CHINE the premier music subscription service for business Both services are perfect for a wide variety of background music applica tions Note Your s...

Страница 14: ...y to read and use format The view of the dashboard varies depending upon the permissions the role you are assigned 1 1 1 Accessing the Dashboard To access your dashboard Step 1 From your Chrome browser type the C4000 server s IP address in the address bar for example https 192 168 1 0 and press Enter Step 2 On the Login page type your username and password Note Do not use third party Chrome browse...

Страница 15: ...3 Step 3 Select Login Figure 1 2 C4000 Dashboard Note The Nyquist system does not support opening multiple instances or tabs of the Nyquist Web UI for the same user ...

Страница 16: ...tension for the station The facility name and time will not appear if the screen is reduced in size such as when viewing from a phone or tablet Incoming Calls and Messages appear in the message page of the dashboard Figure 1 3 Dashboard Areas Note The navigation bar does not appear if you are not authorized to make changes to the C4000 configuration Instead you see only common tasks such as making...

Страница 17: ...rity of the dashboard is set up to allow you to perform com munications activities view this week s scheduled events and per form audio distribution At the top of the dashboard messages appear that can provide infor mation about your system such as notifying you when any registered stations or devices have stopped responding to the server Figure 1 4 Maps Pane Figure 1 5 Dashboard Messages ...

Страница 18: ...creen functionality The UI provides buttons which appear with a name and a graphic and icons which are graph ics only Figure 1 6 Audio Distribution Section of Dashboard Table 1 1 UI Icons Icon Description Add icon Selecting this icon allows you to add an item Edit icon Selecting this icon allows you to edit an item Delete icon Selecting this icon allows you to delete an item Information icon Selec...

Страница 19: ...enu that appears in the top right portion of the Admin Web UI s navigation pane The menu contains the following options About Selecting this option displays the version number and contact information for Bogen Communications Inc Help Topics Selecting this option Admin Manual Selecting this option displays the Nyquist C4000 System Administrator Manual The Nyquist C4000 System Adminis trator Manual ...

Страница 20: ...8 ...

Страница 21: ...The Audio Distribution tones and announce ment files added through the audio file management feature can be set through the Schedules feature to automatically play during spec ified times Through the airable Internet radio service you can listen to live radio stations and add media catalogs and music services without updating devices or software White noise and pink noise Tone files are included w...

Страница 22: ...efer to the Nyquist C4000 System Administrator Manual Audio Distribution sources can include Audio from any Nyquist appliance with one or more Line Inputs such as MMPAs audio power amplifiers and paging amplifiers User supplied music songs and playlists airable Internet radio service SoundMachine Stations Figure 2 1 Audio Distribution Sources ...

Страница 23: ...g Line Input Sources If your Nyquist system uses any Nyquist appliance with one or more line inputs these stations will appear as sources for Line Input when creating Audio Distribution Figure 2 2 Line Input Sources ...

Страница 24: ...12 The available Input Channel selections can range from 1 or 2 for an amplifier or 1 to 4 for an MMPA Figure 2 3 Available Channels for an MMPA Figure 2 4 Line Input for NQ A4300 Audio Power Amplifier ...

Страница 25: ...y stick these songs can then be played via the playlists feature see Playing Songs Directly from a USB Memory Stick on page 14 By default white noise and pink noise songs are provided to help tune the volume of an Audio Distribution zone Refer to the Nyquist C4000 System Administrator Manual 2 2 1 Viewing the Song List From the Songs page you can add edit or delete a song If you delete a song that...

Страница 26: ...n the root directory of the USB memory stick Valid formats for these files are mp3 wav and aac The Nyquist server automatically mounts the USB memory stick adds all songs found in the root directory to the songs list and creates a playlist for the added songs The default name for the playlist is USB Music Library Table 2 1 Songs Page Parameters Title Displays the user provided song title Artist Di...

Страница 27: ...ovable media such as a Flash drive You can add a song to playlists as part of the Add Song process or you can add a song to a playlist later through the Playlists menu You can select to add one song or multiple songs C4000 can use any ID3 tag data and save that automatically An ID3 tag acts as a container file within an MP3 audio file and commonly contains the title artist name album track data ye...

Страница 28: ...select Yes for Multiple Songs Then use the Shift or Control Figure 2 6 Add Song Page Note If the imported song file contains meta data Nyquist auto matically fills in the Title Artist Album Track Number Year and Genre after you press the Save button If no meta data exists the song Title is set to Untitled and the other parameters are left blank Most MP3 files do contain meta data You can also choo...

Страница 29: ...e name of the album the song is from Track Number Displays the track on the album for the song Year Displays the year the song was recorded Genre Displays the music genre or category for the song File Upload Allows you to select the song that you want to upload Playlists Select the playlists that you want to add the song to You can select multiple playlists select all playlists by selecting Add Al...

Страница 30: ...a song from your C4000 sys tem If you delete a song that is in a Playlist the song is automatically removed from the Playlist To delete a song Step 1 On the navigation bar expand Audio Step 2 Select Songs Step 3 On the Songs page select the Delete icon next to the song that you want to delete Table 2 3 Edit Song Page Parameters Title Displays the user provided song title Artist Displays the name o...

Страница 31: ...Nyquist C4000 System Administra tor Manual 2 3 1 Viewing Playlists Through the Playlists page you can view all playlists available to your C4000 system and create delete and manage a playlist With the Manage Playlist feature you can add delete or change the order of a playlist s songs To view playlists Step 1 On the navigation bar expand Audio Step 2 Select Playlists The Playlists page appears The...

Страница 32: ...description of the play list appears Note Valid characters include uppercase letters A Z low ercase letters a z numerals 0 9 space and the following special characters Scheduled Audio Repeat When enabled the playlist audio will be repeated after all songs have been played When disabled Scheduled Audio will automatically stop after the last song has been played from the playlist When disabled a cor...

Страница 33: ... navigation bar expand Audio Step 2 Select Playlists Step 3 Select the Add icon Step 4 On the Add Playlist page complete parameters for this playlist See Add Playlist Parameters on page 22 Step 5 Select Save Figure 2 9 Add Playlist Page ...

Страница 34: ...ot needed when Scheduled Audio is started via the schedule Note When playlists are being used by the Audio Distribu tion feature the Scheduled Audio options are ignored Scheduled Audio Shuf fle When enabled the order in which the songs are played is shuffled When disabled the playlist songs will be played in the order that they appear in the playlist Note When playlists are being used by the Audio...

Страница 35: ...ar expand Audio Step 2 Select Playlists Step 3 On the Playlists page select the Manage icon next to the playlist that you want to add songs to Step 4 On the Manage Playlists page drag and drop the song you want to add from the Songs field to the Playlist field Step 5 After all desired songs have been added to the Playlist select Save Figure 2 10 Manage Playlist Page ...

Страница 36: ...g from a playlist To delete a song from a playlist Step 1 On the navigation bar expand Audio Step 2 Select Playlists Step 3 On the Playlists page select the Manage icon next to the playlist Step 4 Drag and drop the song from the Playlist field to the Songs field Step 5 After all desired changes are completed select Save 2 3 6 Editing a Playlist The Edit icon allows you to edit the parameters for a...

Страница 37: ... the playlist Step 4 When prompted select Delete 2 4 Using Internet Radio Services Through the Internet Radio Services you can add online content such as music services and Internet radio using Airable by TuneIn With this service you can listen to live radio stations and add media catalogs and music services without updating devices or software You can navigate through the catalog of radio station...

Страница 38: ...ell as information about each station Through the Internet Radio Services page you can also select to manage credentials for services such as SOUNDMACHINE See Managing Credentials on page 30 To view Internet Radio Services added to your system Step 1 On the navigation bar expand Audio Step 2 Select Internet Radio Services The following parameters appear for each source configured for your C4000 sy...

Страница 39: ... Step 4 Select from the list of Sources Step 5 If you select Radio do the following a Select how you want to select a source Options are Table 2 6 Internet Radio Services Station Displays the icon name and description of the radio sta tion Codec Displays how the streaming media is compressed and decompressed Sample Rate Displays the number of samples of audio carried per sec ond Mono Stereo Displa...

Страница 40: ...arameters Local stations Select to view a list of stations near your loca tion Popular stations Select to view stations considered to be the most popular Trending Select to view the stations that are gaining momentum High quality Select to view the stations with a high sound quality New stations Select to filter the list of stations by new sta tions added to Internet Radio Services Filter Select t...

Страница 41: ...ill down to a specific album or song Music Selection Schedules Displays the Schedules that have been cre ated through SOUNDMACHINE See Using SOUNDMACHINE Music Selection Schedules on page 34 Schedules allow the playing of specific sta tions or mixes during specific times of the day For example you can play soft jazz music during morning hours and select a different genre mix for mid day When you c...

Страница 42: ...MACHINE ser vice For information about roles and permissions refer to the Nyquist C4000 System Administrator Manual 2 4 4 1 Viewing Credentials The Credentials list allows a quick view of the users who have logon credentials To view the Credentials list Step 1 On the navigation bar expand Audio Step 2 Select Internet Radio Services Step 3 Select Credentials The Credentials list displays the follow...

Страница 43: ...1 On the navigation bar expand Audio Step 2 Select Internet Radio Services Step 3 Select Credentials Step 4 Select the Add icon Step 5 Complete the following parameters Figure 2 14 Add Credential Table 2 9 Add Credential Parameters Name Use the drop down arrow to select the name of the service Username Enter the username for this account Password Enter the password for this account Enabled Select ...

Страница 44: ...t Step 1 On the navigation bar expand Audio Step 2 Select Internet Radio Services Step 3 Select Credentials Step 4 Select the Edit icon next to the account that you want to edit Step 5 Make the desired changes See Edit Credentials Parameters on page 32 Step 6 Select Save Figure 2 15 Edit Credential Table 2 10 Edit Credentials Parameters Name Use the drop down arrow to select the name of the servic...

Страница 45: ...Add ing a Source on page 27 or Add Credential see Add Credentials on page 31 windows To sign up for SOUNDMACHINE Step 1 On the navigation bar expand Audio Step 2 Select Internet Radio Services Step 3 Do one of the following Select Add Source Select Credentials and then select the Add icon Step 4 Select Sign Up Step 5 When the SOUNDMACHINE and BOGEN page appears follow the on screen instructions Pa...

Страница 46: ...or Audio Distribution will stop when the empty time period is encountered You cannot name a Music Selection Schedule using all special charac ters the name must contain at least one alpha or numeric character or the Music Selection Schedule will not appear Scheduled Audio takes priority over a Music Selection Schedule 2 5 Creating an Audio Distribution To use the Audio Distribution feature you mus...

Страница 47: ...35 You must also be assigned a Role that has permissions to create Audio Distribution Figure 2 18 Role Permissions for Audio Distribution Figure 2 19 Create an Audio Distribution ...

Страница 48: ...order set Shuffle to Yes Step 7 Select Save Step 8 To end the playing of audio select the Stop icon next to the playlist Note If you are using at least one C4000 Matrix Mixer Pre Amp Line Input appears as a Line Input Playlist Source option Table 2 11 Create an Audio Distribution Parameters Line Input Play list Source Use the Line Input Playlist Source drop down menu to select the audio source Aud...

Страница 49: ... Edit or Delete icon next to the Audio Distribution To manually start and stop Audio Distribution Step 1 If not already on your dashboard select Dashboard from the navigation bar Step 2 Select the Play icon next to the Audio Distribution that you want to launch Shuffle If you select a playlist and want to shuffle the song order set Shuffle to Yes Description Add a description for the Audio Distrib...

Страница 50: ...g an event ensuring that you set the Scheduled Audio for the playlist Matrix Mixer Pre Amp channel or amplifier to be used for this event For information about creating an event refer to the Nyquist C4000 System Administrator Manual You can also select to stop the Scheduled Audio by selecting Stop Playlist or Stop Line Input Figure 2 21 Adding Scheduled Audio ...

Страница 51: ...s not appear in this Scheduled Audio list The Routines feature lets you automatically launch one or more actions using Audio Distribution Audio Dist as a trigger For exam ple maybe you want a bell or tone to sound in the kitchen when the lunchtime music begins to alert kitchen staff that orders will soon be coming To do this you can create a routine add an Audio Dist trig ger Type and then create ...

Страница 52: ...ng Tones and will automatically resume when the higher priority feature is finished Audio Distribution volume to all speakers can be changed by setting Audio Distribution Cut Level dB available in System Parameters The Audio Distribution volume to zones can be changed by setting Audio Distribution Cut Level dB in Edit Zone For more informa tion refer to the Nyquist C4000 System Administrator Manua...

Страница 53: ...vent with Scheduled Audio interrupts the Audio Distribution briefly plays between the tone and the Scheduled Audio A playlist will continue playing until manually stopped 2 6 2 Audio Distribution Status When you start Audio Distribution a popup window appears letting you know that Audio Distribution was enabled A popup window also appears when you stop Audio Distribution Figure 2 24 Audio Distribu...

Страница 54: ...informational message appears in the Messages window of the Admin Web UI dashboard indicating the song that is currently playing and to which speakers all or selected and to which zones audio is playing to Figure 2 26 Audio Distribution Status ...

Страница 55: ...d during events such as tornado warnings or active shooter sce narios Announcements can also precede a page 3 1 Starting and Stopping Announcements You can launch previously recorded announcements from the dash board and select the zone where the announcement will play Note Make sure that stations and zones have been configured and that the station you are using to launch an announcement has the a...

Страница 56: ...d stop an announcement Step 1 If not already on your dashboard select Dashboard from the navigation bar Step 2 Under Tones Announcements select Announce ment Figure 3 1 Announcement Icon Figure 3 2 Announcement Page ...

Страница 57: ... task select Dial Pad and enter the 4 digit password Step 6 If prompted enter 1 for confirmation Step 7 To end the announcement select Stop Step 8 You can also stop an announcement by performing the following steps a Under Tones Announcements select Stop Announcement b Follow screen prompts An announcement will end automatically after it has reached its number of times to play Figure 3 3 Announcem...

Страница 58: ...00 system also supports the simultaneous playing of multiple announcements to different zones However there are some set rules and priorities that govern how and when announcements play For example announcements played via an I O controller can be played to a selected zone but not to All Speakers When you attempt to play a non emergency or Normal announce ment to a zone you will receive a busy sig...

Страница 59: ...larm or tone page or queued page or All Call will stop playing An Emergency announcement can be played on a zone while a Normal announcement plays on a different zone Multiple Emer gency and Normal announcements can be played to different zones but not to All Speakers 3 3 Adding an Announcement If the permission and CoS settings allow you can upload an announcement which can be an audio recording ...

Страница 60: ...n bar expand Audio Step 2 Select Announcements Step 3 On the Announcements page select the Add icon Step 4 Complete the parameters on the Add Announcement page See Add Announcement Page Parameters on page 49 Step 5 Select Save Figure 3 4 Add Announcement Page ...

Страница 61: ...cement s row ID You can change the DTMF Code after the announcement is saved by editing the announce ment in the Admin Web Interface Announcements view The saved announcement has Play to Zone set to blank no zone selected This means that when you play an announcement via an IP phone Announcement menu selection you will be asked to enter a zone number where 0 All Speakers You can define a permanent...

Страница 62: ...5 in 0 5 increments Text To Speech Type the text that you want converted to speech for this announcement Ensure that the File Upload parameter is blank The system will generate a wav file Note This field only appears if you have the Text To Speech feature license Play to Zone Select either All Speakers or a specific zone for this announcement to play Note If the Type for the station is set to Admi...

Страница 63: ...is is a break sentence break Adjust Speech Rate I am now prosody rate x slow speaking at half speed prosody I am now prosody rate slow speaking at 2 3 speed prosody I am now prosody rate medium speaking at normal speed prosody I am now prosody rate fast speaking 33 faster prosody I am now prosody rate x fast speaking twice as fast prosody I am now prosody rate default speaking at normal speed pros...

Страница 64: ...h default This is normal pitch pros ody prosody pitch 50 This is 50 lower pros ody prosody pitch 50 This is 50 higher prosody prosody pitch 6st This is six semitones lower prosody prosody pitch 6st This is six semitones higher prosody prosody pitch 25Hz This has a pitch mean 25 Hertz lower prosody prosody pitch 25Hz This has a pitch mean 25 Hertz higher prosody prosody pitch 75Hz This has a pitch ...

Страница 65: ...ody volume 33 This is 33 softer pros ody prosody volume 33 This is 33 louder pros ody prosody volume 33 This is 33 louder pros ody prosody volume 33 This is 33 of normal volume prosody Add Emphasis to Speech This is emphasis level strong stronger emphasis than the rest This is emphasis level moderate stronger empha sis than the rest This is emphasis level none the same as empha sis than the rest S...

Страница 66: ...tion bar does not appear if you are not authorized to make changes to the C4000 configuration Contact your system administrator or refer to the Nyquist C4000 System Administrator Manual Figure 3 5 Announcements Page Table 3 3 Announcements Page Parameters Name Displays the user provided name of the announcement file Note Valid characters include uppercase letters A Z low ercase letters a z numeral...

Страница 67: ... specific zone for this announcement to play Note If the Type for the station is set to Admin Web Inter face Admin Phone IP Phone Analog Phone or Mobile Device and an Announcement Zone was set for the sta tion the Announcement Zone overrides the Play to Zone Description Provides a description of the announcement Note Valid characters include uppercase letters A Z low ercase letters a z numerals 0 ...

Страница 68: ...s You cannot assign the same DTMF code to multiple announcements Note When you record an announcement by dialing 990 or by selecting Record Announcement on the Admin phone s Announce menu the initial DTMF Code for the recorded and saved announcement will be set to the announcement s row ID You can change the DTMF Code after the announce ment is saved by editing the announcement in the Admin Web In...

Страница 69: ...e number to use whenever an announcement is started from an IP phone This will allow callers to direct the announcement to any zone desired at the time it is played Note If the Type for the station is set to Admin Web Inter face Admin Phone IP Phone Analog Phone or Mobile Device and an Announcement Zone was set for the sta tion the Announcement Zone overrides the Play to Zone Description Provides ...

Страница 70: ...nouncement Step 1 On the navigation bar expand Audio Step 2 Select Announcements Step 3 On the Announcements page select the Delete icon next to the announcement that you want to delete Step 4 When prompted select Delete ...

Страница 71: ...ms Alarms are audio files used to indicate a situation such as a fire When you elect to sound an alarm only the tones with a type of Alarm appear in the selection list To start and stop an alarm Step 1 On the navigation bar select Dashboard Note Make sure that stations and zones have been configured and that the station you are using to launch an alarm or tone has the appropriate Class of Service ...

Страница 72: ...60 Step 2 Under Tones Announcements select Alarm Figure 4 1 Alarm Button Figure 4 2 Alarm Page ...

Страница 73: ...ssword Step 5 If prompted enter 1 for confirmation Step 6 To end the alarm select Stop 4 2 Starting and Stopping Tones Tones are similar to alarms but are usually used to signal an announcement or a time based event Launching a tone sends a tone to all zones with a Type of Time or a combination of Time and Paging Audio or both Figure 4 3 Alarm Page With Stop Option ...

Страница 74: ...62 To start and stop a tone Step 1 If not already on your dashboard select Dashboard from the navigation bar Step 2 Under Tones Announcements select Tone Figure 4 4 Tone Icon ...

Страница 75: ...elect the tone that you want to sound Only tones that have not been hidden appear Figure 4 5 Tone Page Note Tones play continuously if one of three conditions exist Its Type is Alarm times to play is set to 0 or length is set to 0 ...

Страница 76: ...nes page you can view a list of available tones delete user provided tones or select to add or edit a tone You cannot delete a default tone but you can prevent it from being viewed on the dashboard or on Admin Phones that have a tones alarms menu A hidden tone still appears on the Tones page Figure 4 6 Tone Page With Options Note The navigation bar does not appear if you are not authorized to make...

Страница 77: ... the announcement file Note Valid characters include uppercase letters A Z low ercase letters a z numerals 0 9 space and the following special characters Type Displays the tone type as Normal or Alarm Hide Specifies if the tone should be hidden from the dashboard view or Admin Phone menu DTMF Code Provides the DTMF code used with manual dial pad announcement or tone activation Length Time in secon...

Страница 78: ...ual tone activation Times to Play Displays the number of times the tone plays Parameters are 0 to 10 Note A setting of 0 results in the tone playing continuously until it is manually stopped via the dashboard Time Between Repeats seconds Displays the time in seconds before the tone is replayed You can select between 0 5 to 5 in 0 5 increments Playback Allows you to manually play the tone Selecting...

Страница 79: ... navigation bar expand Audio Step 2 Select Tones Step 3 On the Tones page select the Add icon Step 4 On the Add Tone page ensure Upload File is selected Step 5 Complete the parameters Step 6 Select Save Figure 4 8 Add Tone Upload File ...

Страница 80: ...played on the dash board view Times to Play Select the number of times the tone will play Parameters are 0 through 10 Note A setting of 0 results in the tone playing continuously until it is manually stopped via the dashboard Time Between Repeats Seconds Select the time in seconds between replaying of the tone You can select between 0 5 to 5 in 0 5 increments DTMF Code Provide the DTMF code used w...

Страница 81: ...n the navigation bar expand Audio Step 2 Select Tones Step 3 On the Tones page select the Add icon Step 4 On the Add Tone page select Generate Tone Step 5 Complete the parameters Step 6 Select Save Figure 4 9 Add Tone Generate Tone ...

Страница 82: ...ncy Hz Enter the frequency for the tone You can select a frequency from 300 to 2000 Hz Duration seconds Enter the time in seconds that the tone is to play Times to Play Select the number of times the file will play Parameters are 0 through 10 Note A setting of 0 results in the file playing continuously until it is manually stopped via the dashboard Time Between Repeats seconds Select the time in s...

Страница 83: ...ep 1 On the navigation bar expand Audio Step 2 Select Tones Step 3 On the Tones page select the Add icon Step 4 On the Add Tone page select Line Input Step 5 Complete the parameters Step 6 Select Save Figure 4 10 Add Tone Line Input ...

Страница 84: ...ergency announcement Hide Specify if the tone is to be hidden or displayed on the dash board view Length Enter the number of seconds for the tone to play The length can range from 0 to 999999 Note A setting of 0 results in the file playing continuously until it is manually stopped via the dashboard DTMF Code Provide the DTMF code used with manual dial pad announcement or tone activation Amplifiers...

Страница 85: ...e navigation bar expand Audio Step 2 Select Tones Step 3 On the Tones page select the Edit icon Step 4 On the Edit Tone page make changes to the parame ters Step 5 After completing all changes select Save Figure 4 11 Edit Tone Pages ...

Страница 86: ...s in the tone playing continuously until it is manually stopped via the dashboard This param eter does not appear for Line Input tones Time Between Repeats second Displays the time in seconds between replaying of the tone You can select between 0 5 to 5 in 0 5 increments Note This parameter does not appear for Line Input tones DTMF Code Provides the DTMF code used with manual dial pad announcement...

Страница 87: ... power amplifier or MMPA and its associated station number Note This parameter only appears for Line Input tones Input Channel Specifies the matrix channel being used for input Note This parameter only appears for Line Input tones Table 4 5 Edit Tone Page Parameters Continued ...

Страница 88: ...76 ...

Страница 89: ...5 Making Pages and Calls 77 Making Pages and Calls Paging and telephone call features appear in the Calling Paging sec tion of the dashboard Figure 5 1 C4000 Dashboard ...

Страница 90: ...ations that can receive calls These can include computers with the Admin Web UI computers with the Web UI telephones VoIP speakers or digital call switches and speak ers To place a call using the directory Step 1 If not already on your dashboard select Dashboard from the navigation bar Step 2 Under Calling Paging select Directory Note Placing intercom calls requires an Intercom License Figure 5 2 ...

Страница 91: ...79 Step 3 On the Directory popup select the extension that you want to call Note that you can sort the list of extensions by exten sion number or name Figure 5 3 Directory Page ...

Страница 92: ...80 Step 4 Select End Call to end the call Figure 5 4 Calling Extension ...

Страница 93: ... Using Dial Pad To place a call using the Dial Pad Step 1 If not already on your dashboard select Dashboard from the navigation bar Step 2 Under Calling Paging select Dial Pad Figure 5 5 Dial Pad Button Figure 5 6 Dial Pad ...

Страница 94: ...ect End Call to end the call 5 2 Using Page Exclusion You can exclude stations from paging except for Emergency Level All Call pages Emergency Level All Call pages will be sent and heard at the station even if that station is set to exclude paging To exclude a station from paging via the dashboard Step 1 If not already on your dashboard select Dashboard from the navigation bar Step 2 Under Calling...

Страница 95: ...dd icon to add a station to the page exclu sion list Warning Adding or deleting a station from the page exclu sions list may force the station to reboot Figure 5 8 Paging Exclusions Page Figure 5 9 Add Paging Exclusion Page ...

Страница 96: ...ant to remove from the Paging Exclusions list Step 4 When prompted select Delete 5 3 Using Call Forwarding If your station has been configured for call forwarding you can for ward your calls to another extension Note that call forwarding is not the same as having your extension set to ring at an Admin Station during day or night hours Your Nyquist system administrator sets the Day Admin and Night ...

Страница 97: ... on your dashboard select Dashboard from the navigation bar Step 1 Under Calling Paging select Call Forwarding Step 2 If prompted that the station wants to use your micro phone select Allow Figure 5 10 Call Forwarding Button Figure 5 11 Call Forwarding Popup Menu ...

Страница 98: ...bell tone comes in Nyquist rings as opposed to auto answering Step 3 Use the drop down menu to select the extension where you want calls to be forwarded Step 4 Select one of the following options Always Forward Busy Forward No Answer Forward Busy or No Answer Forward Cancel Forwarding Current Forwarding Status 5 4 Launching Pages Depending on how your C4000 system is set up you can launch Nor mal ...

Страница 99: ...e Zone Paging To make a single zone page via the dashboard Step 1 If not already on your dashboard select Dashboard from the navigation bar Step 2 Under Calling Paging select Zone Page Figure 5 12 Paging Single Zone ...

Страница 100: ...on your computer then you cannot launch audio distribution tones alarms and so on When attempting to making a call with the computer s microphone turned off C4000 automatically hangs up the call If you make a second call the dashboard displays a message that the phone is in use Also when the microphone is off and a bell tone comes in C4000 rings as opposed to auto answering Step 7 After you hear t...

Страница 101: ...o the queue The interrupted message will play again from the beginning of the message when the zone becomes idle Multi Site Emergency All Call Multi Site All Call Emergency All Call All Call Alarm Tone and Emergency Announcement will also interrupt any playing recorded zone messages All re queued interrupted messages will play again from the beginning of the message when the zones becomes idle Sel...

Страница 102: ... the recording 5 4 3 Prepend Page You can prepend a page with a special announcement For example if you have a pre recorded weather alert announcement you can prepend that announcement file so that it plays first as you prepare to make a page Figure 5 15 Record Page Note You can sort the queues by Name or Number Note Pressing any key terminates the recording without adding the page to the queue ...

Страница 103: ... To prepend a page Step 1 If not already on your dashboard select Dashboard from the navigation bar Step 2 Under Calling Paging select Prepend Page Figure 5 16 Prepend Page Button Figure 5 17 Prepend Page ...

Страница 104: ...your station Step 7 After the prepend announcement ends speak into the microphone Step 8 Select End Call to end the page 5 4 4 All Call Paging All Call paging is a simultaneous page to all facility stations unless the station has been excluded from pages An All Call page takes higher priority over normal paging To launch an All Call page Step 1 If not already on your dashboard select Dashboard fro...

Страница 105: ...e microphone on your computer then you cannot launch audio distribution tones alarms and so on When attempting to making a call with the computer s microphone turned off C4000 automatically hangs up the call If you make a second call the dashboard displays a message that the phone is in use Also when the microphone is off and a bell tone comes in C4000 rings as opposed to auto answering Step 6 Aft...

Страница 106: ...ransmitted to all stations even those stations that have been set up for page exclusion To launch an Emergency All Call page Step 1 If not already on your dashboard select Dashboard from the navigation bar Step 2 Under Calling Paging select Emergency All Call Figure 5 20 Emergency All Call Button ...

Страница 107: ...er then you cannot launch audio distribution tones alarms and so on When attempting to making a call with the computer s microphone turned off C4000 automatically hangs up the call If you make a second call the dashboard displays a message that the phone is in use Also when the microphone is off and a bell tone comes in C4000 rings as opposed to auto answering Step 6 After you hear the tone speak ...

Страница 108: ...e facilities you can launch a Facility Page To launch a facility page Step 1 If not already on your dashboard select Dashboard from the navigation bar Step 2 Under Multi Site Calling Paging select Facility Page Figure 5 22 Facility Page Button Figure 5 23 Facility Page ...

Страница 109: ...o ciated with your station Warning If you turn off the microphone on your computer then you cannot launch audio distribution tones alarms and so on When attempting to making a call with the computer s microphone turned off C4000 automatically hangs up the call If you make a second call the dashboard displays a message that the phone is in use Also when the microphone is off and a bell tone comes i...

Страница 110: ...ulti Site All Call Step 3 If you must enter a password to complete this task select Dial Pad and enter the 4 digit password Step 4 If prompted enter 1 for confirmation Step 5 If prompted allow C4000 to use the microphone asso ciated with your station Warning If you turn off the microphone on your computer then you cannot launch audio distribution tones alarms and so on When attempting to making a ...

Страница 111: ...nd Call to end the page 5 4 8 Multi Site Emergency All Call If your station s CoS allows multi site paging you can launch a Multi Site Emergency All Call page A Multi Site Emergency All Call page has priority over any other pages To launch a Multi Site Emergency All Call page Step 1 If not already on your dashboard select Dashboard from the navigation bar Step 2 Under Multi Site Calling Paging sel...

Страница 112: ...you cannot launch audio distribution tones alarms and so on When attempting to making a call with the computer s microphone turned off C4000 automatically hangs up the call If you make a second call the dashboard displays a message that the phone is in use Also when the microphone is off and a bell tone comes in C4000 rings as opposed to auto answering Step 6 When the Emergency page appears select...

Страница 113: ...the Admin Station You can also elect to use audio feedback that tells the staff member they have successfully checked in Calls placed to perform Manage Check In are not processed as part of the call count Urgent and Emergency calls can still be placed by stations and are not included as part of Manage Check In As long as Privacy Mode is not enabled and a room s device allows two way transmission y...

Страница 114: ...ge Check In A separate tab appears so that you can toggle the dashboard and Manage Check In views The status of each station appears in a color coded box The follow ing table explains the use of colors to describe status Figure 6 1 Manage Check In Button Figure 6 2 Manage Check In Table 6 1 Color coded Check In Status Color Status Green Checked in ...

Страница 115: ...he Vacancy List appear in the color coded display Show Excluded When enabled stations in the Exclusion List appear in the color coded display Show Name When enabled the station s name appears along with the station s extension number Displaying the name is useful if you are not sure where a station is located when only the extension number is displayed Show Not Checked In Only Note Show Vacant and...

Страница 116: ... GA10PV display sta tions If you want audio instruction announcements or text instruc tions on web interface stations or GA10PV display stations refer to the Nyquist C4000 System Administrator Manual for instructions on setting up a routine that includes audio instructions in an announce ment or text instructions to be sent to web interface dashboards and GA10PV displays The routine can be trigger...

Страница 117: ...witch present in the room that contains the VoIP Speaker Only station In this case the I O controller Input contact closure can trigger a Routine that performs a check in If a station with call switch is configured to only place Urgent or Emergency calls the station cannot participate in the Check in pro cess This station should either be added to the Exclusion List see Managing Exclusion and Vaca...

Страница 118: ...y Mode You can use Spy Mode to listen to a station as long as Privacy Mode is not enabled and the station device allows two way transmission This feature adds another step toward verifying that the room s occu pants are safe To activate Spy Mode Step 1 If not already on your dashboard select Dashboard from the navigation bar Step 2 Under Calling Paging select Manage Check In Step 3 On the Manage C...

Страница 119: ...ned To configure check in options Step 1 If not already on your dashboard select Dashboard from the navigation bar Step 2 Under Calling Paging select Manage Check In Step 3 On the Manage Check In page select Configure Step 4 Complete the configuration options Step 5 Select Save Figure 6 5 Configure Check in ...

Страница 120: ...abled Specifies if Manage Check In can be used If Disabled you can configure Manage Check In options but you cannot start the check in process Enable audio prompts and con firmation mes sages Specifies if audio files will be used as part of Manage Check In When enabled audio prompts and audio feedback play at stations when the stations perform check in If disabled no audio prompts or audio feedbac...

Страница 121: ...st via dashboard Step 1 If not already on your dashboard select Dashboard from the navigation bar Step 2 Under Calling Paging select Manage Check In Step 3 On the Manage Check In page select Configure Step 4 Add desired station or stations to the Exclusion List Step 5 Select Save To remove a station from the Exclusion List via the dashboard Step 1 If not already on your dashboard select Dashboard ...

Страница 122: ...the Vacancy List via the dashboard Step 1 If not already on your dashboard select Dashboard from the navigation bar Step 2 Under Calling Paging select Manage Check In Step 3 On the Manage Check In page select Configure Step 4 Select the stations that you want to remove from the Vacancy List Step 5 Select Save ...

Страница 123: ...ges from the message queue The station s Display Configuration option controls the overall appearance of the display for example what type of clock appears whether an event or the date appears and the background color of the screen For information about setting the display configuration for an NQ GA10PV refer to the Nyquist C4000 System Administrator Manual 7 0 1 Creating a Display Message Figure ...

Страница 124: ...112 To create a display message Step 1 If not already on your dashboard select Dashboard from the navigation bar Figure 7 2 Display Message Button ...

Страница 125: ...new message Step 4 Select Send Figure 7 3 Display Message Note The options set through the Display Message page are for the message only If you want to change how the clock date and other display features appear you must set configuration options for the NQ GA10PV station Refer to the Nyquist C4000 System Administrator Manual ...

Страница 126: ...ssage Identifier Date Time By default the current date and time appears in the Date Time field Display Time seconds Appears only if Expiration Mode is set to Display Time Sets the length of time for the message to be displayed before it expires Time can range from 1 to 99999 Date Time Appears only if Expiration Mode is set to Date Time By default is set to the current date and time To change the d...

Страница 127: ...ies are removed Background Color Select the color for the message background You can select a color by Using the color picker Entering a hex color for example 000000 for black Entering an RGB color for example rgb 0 0 0 for black Entering a color alias name for example red blue etc For more information see Using Color in Display Messages on page 116 Font Select the down arrow to view a list of ava...

Страница 128: ...gb 0 0 0 for black Entering a color alias name for example red blue etc When you enter a color alias name the corresponding hex color code appears in the text portion of the color field and the swatch color Font Color Select the color for the message text You can select a color by Using the color picker Entering a hex color for example 000000 for black Entering an RGB color for example rgb 0 0 0 f...

Страница 129: ...e2 brown a52a2a burlywood deb887 cadetblue 5f9ea0 chartreuse 7fff00 chocolate d2691e coral ff7f50 cornflowerblue 6495ed cornsilk fff8dc crimson dc143c cyan 00ffff darkblue 00008b darkcyan 008b8b darkgoldenrod b8860b darkgray a9a9a9 darkgreen 006400 darkkhaki bdb76b darkmagenta 8b008b darkolivegreen 556b2f darkorange ff8c00 darkorchid 9932cc darkred 8b0000 darksalmon e9967a darkseagreen 8fbc8f dark...

Страница 130: ...tskyblue 87cefa lightslategray 778899 lightsteelblue b0c4de lightyellow ffffe0 lime 00ff00 limegreen 32cd32 linen faf0e6 magenta ff00ff maroon 800000 mediumaquamarine 66cdaa mediumblue 0000cd mediumorchid ba55d3 mediumpurple 9370d8 mediumseagreen 3cb371 mediumslateblue 7b68ee mediumspringgreen 00fa9a mediumturquoise 48d1cc mediumvioletred c71585 midnightblue 191970 mintcream f5fffa mistyrose ffe4e...

Страница 131: ...0cb plum dda0dd powderblue b0e0e6 purple 800080 red ff0000 rosybrown bc8f8f royalblue 4169e1 saddlebrown 8b4513 salmon fa8072 sandybrown f4a460 seagreen 2e8b57 seashell fff5ee sienna a0522d silver c0c0c0 skyblue 87ceeb slateblue 6a5acd slategray 708090 snow fffafa springgreen 00ff7f steelblue 4682b4 tan d2b48c teal 008080 thistle d8bfd8 tomato ff6347 transparent transparent turquoise 40e0d0 violet...

Страница 132: ...120 To remove a message Step 1 If not already on your dashboard select Dashboard from the navigation bar Step 2 Under Tones Announcements select Remove Mes sage Figure 7 4 Remove Message Button ...

Страница 133: ...121 Step 3 Select the Remove icon next to the message that you want to delete Step 4 Select Delete Selected Figure 7 5 Remove Message ...

Страница 134: ...122 ...

Страница 135: ...s site lockdown weather events or emergency evacuation If you have the proper permissions and your station has the neces sary CoS parameter set you can manually launch a routine via the dashboard A routine can also be automatically launched By an event such as playing a specific announcement Via third party switch contact closures recognized by the Nyquist I O Controller Note Routines are created ...

Страница 136: ...h as Play a lockdown announcement Display lockdown instructions on monitors connected to NQ GA10PV devices Close I O controller output contacts to trigger third party systems that lock doors Initiate the check in process Launch an emergency all call announcement To allow a third party system to launch a routine via the Routines API you must enable Allow API for the routine You can manually launch ...

Страница 137: ...125 To launch a routine from the dashboard Step 1 If not already on your dashboard select Dashboard from the navigation bar Step 2 Under Calling Paging select Routines Figure 8 1 Routines Button ...

Страница 138: ...126 Step 3 Select one of the listed routines Figure 8 2 Routines List ...

Страница 139: ... 1 for confirmation Step 6 To end the routine select Stop You can also stop a routine using the Routines Manager To stop a routine via the Routines Manager Step 1 If not already on your dashboard select Dashboard from the navigation bar Step 2 Under Calling Paging select Routines Step 3 Select Routines Manager Figure 8 3 Routine Page ...

Страница 140: ...ect a specific schedule for a day you can also view details of that schedule To view this week s schedule Step 1 If not already on your dashboard select Dashboard from the navigation bar Step 2 Scroll to the Weekly Schedule section Figure 8 4 Routines Manager Note Stopping a routine does not reverse any actions that the rou tine has already started You may need to clear the actions manu ally Figur...

Страница 141: ...4 Select Close when done viewing 8 3 Manually Controlling Output Contacts If you are using the C4000 I O Controller to recognize third party contact closures you can manually control output contacts Prerequisites for using manual controls are adding an I O Controller as a station and configuring a controller rule for at least one output contact with the Action set as Manual Figure 8 6 Schedule Pag...

Страница 142: ...3 Select the button for the action that you want The button labels are set in the rule for the output con tact Figure 8 7 Output Control Section Figure 8 8 Manual Control Buttons Note If you have set up a rule with a duration of 0 then selecting the contact displays two buttons one for opening and one for closing the circuit If duration is set to a number other than 0 you can only close the circui...

Страница 143: ... check in status 102 configuring check in options 107 confirmation messages for Check In process 108 D dashboard described 2 Default Color Alias 117 Delete icon about 6 Display Configuration 111 Display Message color alias 117 overview 111 removing messages 119 selecting colors 116 setting options 114 using color 116 display message creating 112 Display Message page 113 DTMF used for manual an nou...

Страница 144: ...all 99 single zone 87 PC defined 1 playlist adding songs to 23 change song order 24 changing song order 24 create 20 deleting song from 24 editing 24 overview 19 view 19 Playlists Page 19 R Remove Message page 119 resetting the check in process 106 routine launching from the Admin Web UI 124 S schedule viewing from dashboard 128 song add to playlist 23 delete 18 deleting 18 deleting song in playli...

Страница 145: ...e input 71 upload 67 using Matrix Mixer Pre Amp channel as source 70 tones defined 61 editing 72 overview 59 starting and stopping 62 uploading 66 view 64 viewing 65 Tones Page 65 U UI about 2 how to use 6 V Vacancy List for Check In fea ture 108 W web based UI 2 ...

Страница 146: ...134 ...

Отзывы: