Mini XPress
17
Step 3:
Assembly
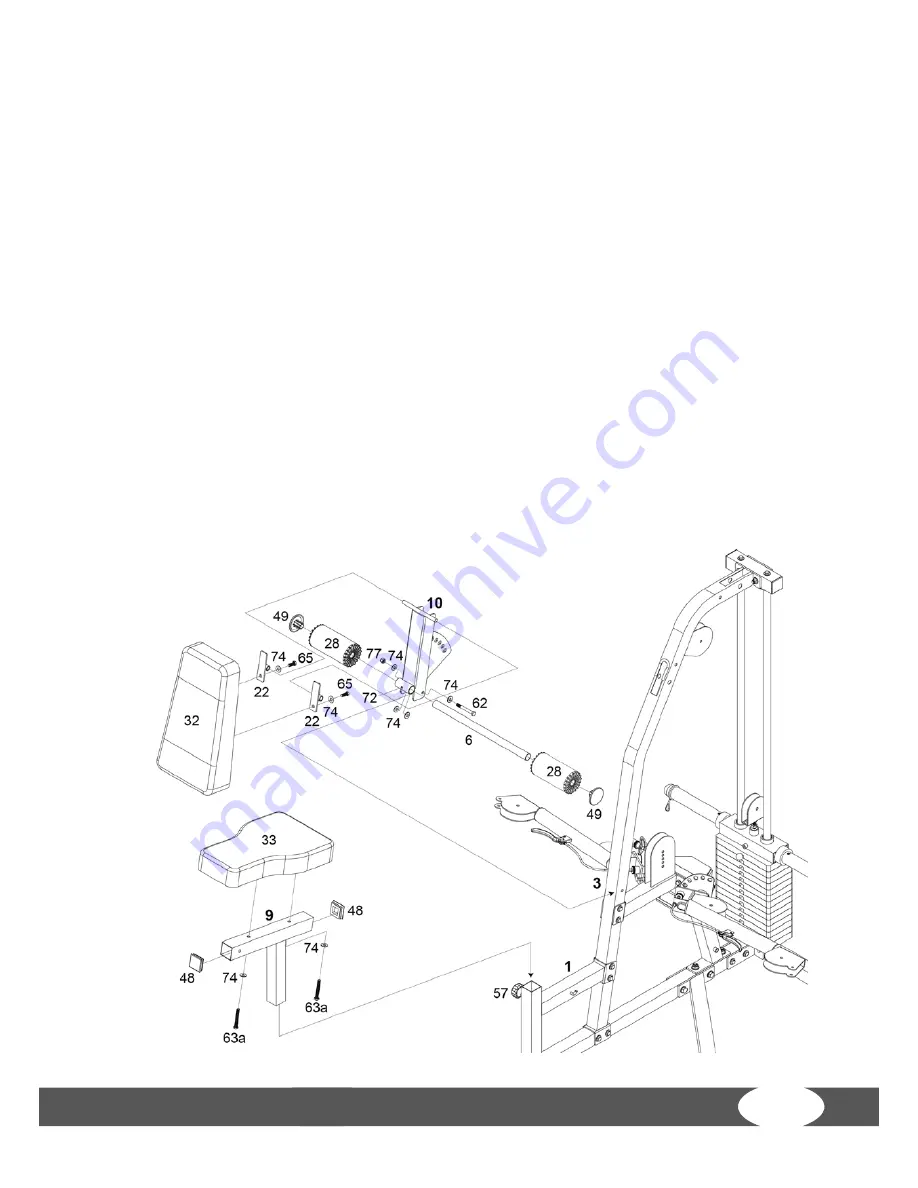
1. Attach the seat back adjuster (10) to the upright (3) using one screws (62), two
washers (74) and one nut (77). Do not tighten completely, leave the bolt loose, just
enough to let the seat back adjuster (10) pivot freely.
2. Attach the pop pin (58) for the seat back adjuster (10) to the upright (3). Slide two
metal hinges (22) onto each end of the round top of seat back adjuster (10), then
attach the back pad (32) to the metal hinges (22) using four screws (65), and two
washers (74). Insert the foam roller holder (6) into the hole in the seat back adjuster
(10). Moisten the inside holes of two foam pads (28) with water and slide onto each
end of the foam roller holder (6). Cap the foam roller holder (6) with two plastic
washers (49). Lock the foam roller holder (6) into place with the pre-installed set
screw (72) on the seat back adjuster (10).
3. Attach the seat pad (33) to the seat adjuster (9) using two screws (63a) and two
washers (74). Cap the front and rear of the seat adjuster (9) with two 50mm. Plugs
(48). Pull the pre-installed pop pin (57) to let the seat adjuster into the seat frame of
base.
Tighten all bolts and nuts.
Содержание BC-735
Страница 1: ...Assembly and operating instructions Multi gym Mini XPress BC 735...
Страница 2: ...Mini XPress 2...
Страница 12: ...Mini XPress 12...
Страница 13: ...13...
Страница 35: ...35 8 4 Exploded drawing...
Страница 37: ...37...
Страница 38: ...Mini XPress 38 Lat pull optional...
Страница 43: ...43...
Страница 44: ...Mini XPress 44 Leg curl optional...
Страница 49: ...49 10 4 Exploded drawing...
Страница 50: ...Mini XPress 50 Note...
Страница 51: ...51...
Страница 52: ...Multi gym Mini XPress...


