background image

5

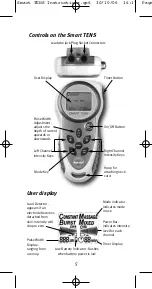
Controls on the Smart TENS

User display

Left Channel
Intensity Keys

Right Channel
Intensity Keys

Mode Key

Load Detector -
appears if an
electrode becomes
detached from
skin. Intensity will
drop to zero.

Pulse Width
Display - 
ranging from 
20-200µ

Leadwire Jack Plug Socket Connectors

Timer Button

User Display

On/Off Button

Pulse Width
Adjustment -
adjusts the
depth of current
upwards or
downwards

Hoop for
attaching neck
cord

Mode indicator -
indicates mode 
in use

Power Bar -
indicates intensity
level for each
channel

Timer Display

Low Battery Indicator - flashes

when battery power is low

Smart TENS Instructions.qx6  30/10/06  16:17  Page

Содержание Smart TENS

Страница 1: ...Smart TENS Instructions for use TM Smart TENS Instructions qx6 30 10 06 16 16 Page ...

Страница 2: ...ed by medical professionals TENS is drug free with no known side effects It can also be used in conjunction with any additional medication if required Explanation of Symbols on Unit Equipment providing a particular degree of protection against electric shock particularly regarding allowable leakage currents having an F type floating applied part Warning refer to page 4 of these instructions Denote...

Страница 3: ... Stimulation works by passing mild electrical impulses through the skin into the nerve fibres which lie below via electrode pads TENS impulses help your body produce its own pain killing chemicals such as endorphins What can TENS be used for TENS can be used for many chronic and acute pain conditions such as back pain shoulder pain arthritis sciatica sports injuries migraine period pain and post o...

Страница 4: ...of flammable gas 4 Do NOT drop this unit onto a hard surface 5 Do NOT attempt to dismantle the Smart TENS 7 Only use specified batteries and electrodes 8 If damaged do not use Return to supplier 9 Remove the batteries when not in use 10 Do NOT use while driving or operating potentially dangerous machinery or while using a microwave 11 Keep out of the reach of children 12 Do NOT place electrodes on...

Страница 5: ...Display ranging from 20 200µ Leadwire Jack Plug Socket Connectors Timer Button User Display On Off Button Pulse Width Adjustment adjusts the depth of current upwards or downwards Hoop for attaching neck cord Mode indicator indicates mode in use Power Bar indicates intensity level for each channel Timer Display Low Battery Indicator flashes when battery power is low Smart TENS Instructions qx6 30 1...

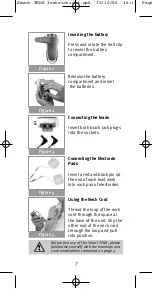
Страница 6: ...ensuring the positive and negative terminals are correctly positioned as marked in the battery compartment Replace the cover c Take the two blue leadwires and insert each of the black jack plugs at one end of each leadwire into the sockets at the top of the Smart TENS unit see fig 3 page 7 d Now insert the pins at the other end of the leadwires into the sockets attached to the sticky electrodes Do...

Страница 7: ... Release the battery compartment and insert the batteries Connecting the leads Insert both black jack plugs into the sockets Connecting the Electrode Pads Insert a red and black pin at the end of each lead wire into each pair of electrodes Using the Neck Cord Thread the loop of the neck cord through the space at the base of the unit Slip the other end of the neck cord through the loop and pull int...

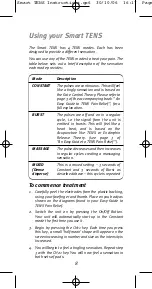
Страница 8: ... as the intensity is increased 4 You will begin to feel a tingling sensation Repeat step 3 with the CH2 key You will now feel a sensation in both sets of pads Description The pulses are continuous This will feel like a tingly sensation and is based on the Gate Control Theory Please refer to page 3 of the accompanying book An Easy Guide to TENS Pain Relief for a full explanation The pulses are off ...

Страница 9: ...less you experience discomfort 9 Some people achieve pain relief after short periods of time Others may require to use their TENS for a lot longer 10 If you continue to stimulate for a number of hours check you to make sure your self adhesive electrodes have not dried out If this is the case dampen them slightly If electrodes are allowed to dry out this can cause minor skin irritation 11 Always en...

Страница 10: ... not recommended as it does not include the boost function required for use during contractions For information on TENS for use during labour please visit www babycaretens com or call 0845 230 9737 Troubleshooting Questions Q Why does the pulse sensation not appear to be as strong after you have used the Smart TENS for a while A Increase the intensity you may have become acclimatised to a lower se...

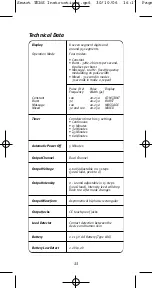
Страница 11: ...250 MIXED Timer Contdown timer has 5 settings Continuous 15 Minutes 30 Minutes 45 Minutes 60 Minutes Automatic Power Off 5 Minutes Output Channel Dual Channel Output Voltage 0 60V adjustable in 15 steps 500Ω load peak to 0 Output Intensity 0 120mA adjustable in 15 steps 500Ω load Intensity level will drop back to 0 after mode changes Output Waveform Asymmetrical bi phasic rectangular Output Jacks ...

Страница 12: ...w w w e l l e t e n s c o m a u P h 0 2 6 1 4 0 1 2 3 2 s a l e s e l l e t e n s c o m a u E l l e T E N S A u s t r a l i a P OB o x 7 4 1 8 F i s h e r L P O F i s h e r A C T 2 6 1 1 ...

Отзывы: