


Setting up your Smart TENS
Check you have the following contents:
1 x Smart TENS
1 x Pack of 4 self-adhesive electrodes
2 x Leadwires
2 x AA batteries
1 x Neck cord
1 x Carrying pouch
1 x Easy Guide to TENS
The assembly stage
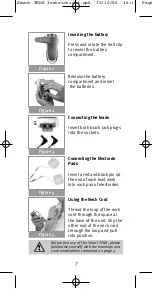
a) Press and rotate the belt clip at the back of the
Smart TENS in either direction to reveal the
battery compartment (see fig 1,page 7).
b) Release the battery compartment cover and
insert 2 x AA batteries (see fig2, page 7),
ensuring the positive (+) and negative (-)
terminals are correctly positioned as marked in
the battery compartment. Replace the cover.
c) Take the two blue leadwires and insert each of
the black jack plugs (at one end of each
leadwire) into the sockets at the top of the
Smart TENS unit (see fig 3, page 7).
d) Now insert the pins (at the other end of the
leadwires) into the sockets attached to the
sticky electrodes. Do not remove the electrodes
from the backing at this stage (see fig 4,
page 7).
e) If you wish, attach the easy-release neck cord
which enables you to hang the Smart TENS
from your neck (see fig 5, page 7).
6
Smart TENS Instructions.qx6 30/10/06 16:17 Page


