


5. Troubleshooting
D1 series
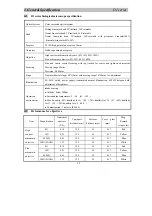
Symptom Cause
Remedy
1. Opticis
View field diaphragm is not large enough
Open the diaphragm more
Condenser is too low
Adjust condenser position
Condenser is not center
Center condenser
The lamp is not
bright enough
Light path selecting lever is not at position for
binocular
Pull it to position for binocular
Nosepiece is not on the right position
Turn it to right position
the edge of view
field is dark or even
Dust on lens(condenser, objective or eyepiece)
Clean them
Stain on sample
Clean sample
stain inside of view
field
Stain on lens(condenser, objective or eyepiece)
Clean them
No cover glass on sample
Add cover glass
The cover glass is not the standard
Please use standard
δ
0.17mm
Sample is faced down
Put it again
Oil on (dry) objective
Clean the objective
No oil on objective (oil)
Use oil
Bubble inside oil
Wipe off bubble
Wrong immersion oil
Use right one
Aperture diaphragm is not opened correctly
Adjust it
Stain or dust on prism of eyepiece
Clean it
image blur
Condenser is too low
Adjust it
The sample is not fixed
Fix it
Nosepiece is not at right position
Turn it to right position
one side of image is
dark or image swing
while focusing
Condenser is not center
Center condenser
13


