background image

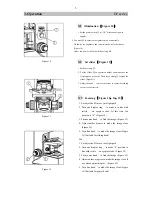
Figure 1 


Before Use 


D1 series      


1. Notice


 As the microscope is a precision instrument, a always 

operate it with care, avoiding physical shake during the 

operation. 

 Do not let the microscope emerge in the sun directly, either 

not in the high temperature, damp, dusty or acute shake 

place. Make sure the worktable is horizontal. 

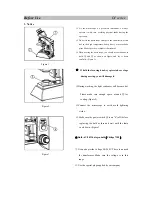
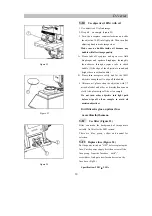
 When moving the microscope, you should use both hands to 

hold 

 and 

 as shown on figure, and lay it down 

carefully. (Figure 1) 


    If hold the focusing knob, eyepiece tube or stage 

during moving, you will damage it.   


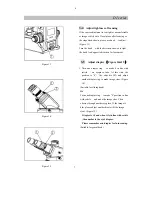
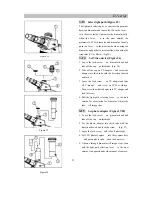
During working, the light condenser will become hot. 

Please make sure enough space  around 

 for 

cooling.(Figure 2) 

Connect the microscope to earth avoid lightning 

strike. 

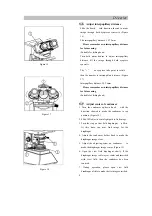
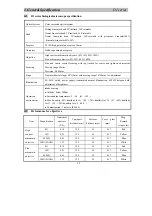
 Make sure the power switch 

 is on “0” (off) before 

replacing the bulb or fuse and wait until the lamp 

cools down. (Figure 3 


 Bulb: 6V/20W halogen bulb

Philips 7388


 It can adapt wide voltage 90~240V. There is no need 

for transformer. Make sure the voltage is in this 

range.  

 Use the special plug supplied by our company. 


Figure 2 

Figure 3 

Содержание D1 Series

Страница 1: ...e using method troubleshooting and maintenance about the microscope particularly Please read it before using carefully The manufacturer is entitled to amend or improve the instrument The quality for this microscope is according to GB T2985 1999 biological microscope standard ...

Страница 2: ...just diopter 7 3 6 Adjust interpupillary distance 8 3 7 Adjust center of condenser 8 3 8 View field diaphragm 9 3 9 Aperture diaphragm 9 3 10 Use objective with Oil 10 3 11 Use filter 10 3 12 Replace fuse 10 3 13 Select light path 11 3 14 Set video device 11 3 15 Set photo adapter 11 4 General specification 12 4 1 D1 series biological microscope specification 12 4 2 Objective parameters 12 5 Troub...

Страница 3: ...nd lay it down carefully Figure 1 If hold the focusing knob eyepiece tube or stage during moving you will damage it During working the light condenser will become hot Please make sure enough space around for cooling Figure 2 Connect the microscope to earth avoid lightning strike Make sure the power switch is on 0 off before replacing the bulb or fuse and wait until the lamp cools down Figure 3 Bul...

Страница 4: ...device you should use these chemical in a ventilated place Don t use organic solution to wipe the surfaces of the other components Please use the neutral detergent If the microscope damped by the liquid you should cut off the power immediately and wipe it dry Never disassemble or service the microscope yourself It will influence its function or damage it After using cover the microscope with a dus...

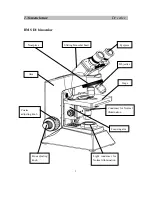
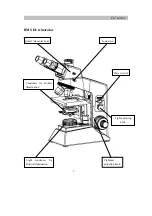
Страница 5: ...1 series BMS D1 binocular 1 Eyepiece Nosepiece Objective Stage Condenser for Normal illumination Light condenser for Normal illumination Focusing arm Fine adjusting knob Coarse adjusting knob Arm Sliding binocular head ...

Страница 6: ...D1 series BMS D1 trinocular 2 Tightness adjusting knob Gemel trinocular head Light condenser for Kohler illumination Condenser for Kohler illumination Power switch Lock screw Light adjusting knob ...

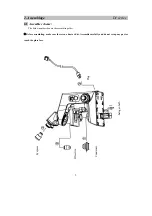
Страница 7: ...semble scheme The below numbers denote the assembling older Before assembling make sure there is no dust or dirt Assemble carefully and do not scrap any part or touch the glass face 3 Eyepiece Objective Condenser Plug halogen bulb ...

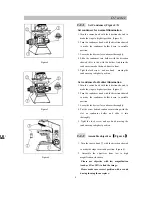
Страница 8: ...rse knob with the direction showed to make the stage to highest position Figure 5 2 Turn the condenser knob with the direction showed to make the condenser holder down to suitable position 3 Loose the lock screw for condenser thoroughly 4 Put the screw behind condenser matching with the slot on condenser holder and slide it into thoroughly 5 Tight the lock screw and use knob moving the condenser u...

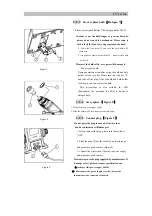
Страница 9: ... can replace the bulb This microscope is also suitable for LED illumination the operation for LED is similar to halogen bulb 2 2 4 Set eyepiece Figure 8 1 Take off the cap on eyepiece cap 2 Slide the eyepiece into eyepiece tube throughly 2 2 5 Connect plug Figure 9 Do not press the plug too much Be aware that bend or enlacement will damage it 1 Before connect the plug please turn the switch to OFF...

Страница 10: ...using Figure 12 14 15 1 Let objective 4X move into light path 2 Turn one dioptor ring to make it in line with reticle on eyepiece tube At this time the position is 0 Figure 14 3 Turn coarse knob to find the image Figure 12 4 Adjust anther dioptor to make the image clear Figure 14 5 Turn fine knob to make the image clear Figure 12 Suitable for sliding head Or 1 Let objective 4X move into light path...

Страница 11: ...e it in line with reticle on eyepiece tube At this time the position is 0 Use objective 10X and adjust another diopter ring to make image clear Figure 14 Suitable for sliding head Or Turn one dioptor ring to make 0 position in line with reticle and make the image clear Then observe through another eyepiece If the image is blur please adjust another diopter till the image clear Figure 15 Diopter is...

Страница 12: ...sing Suitable for sliding head 3 7 Adjust center of condenser 1 Turn the condenser up down knob with the direction showed to make the condenser to top position Figure 18 2 Slide 10X objective into light path to find image 3 Turn the ring on view field diaphragm to Min At this time you may find image for the diaphragm 4 Adjust the condenser holder knob to make the diaphragm image clear 5 Adjust the...

Страница 13: ...ture number for illumination and objective is matching you can get the better resolution and contrast of image and to increase depth of field 2 As the contrast of sample for microscope is very low please turn the knob during operation to let the arrowhead point to number chip which shows same magnification as objectives That means adjust the aperture diaphragm of condenser to 70 80 of objective ap...

Страница 14: ...wing the oil to wipe off the bubble 4 After use oil please clean the objective with 3 7 mixed alcohol and ether or dimethylbenzene on cloth Also please wipe off the oil on sample Do not turn other objective into light path before wipe off oil on sample to avoid oil moisten objectives It will dissolve glue on prism if use more dimethylbenzene 3 11 Use filter Figure 23 Filter can make the background...

Страница 15: ...ith the direction showed and lock it 3 Loose the lock screw on TV adapter and take off C mount and screw in CCD or vidicon Then screw the whole adapter into TV adapter and lock the screw 4 Pull the light path selecting lever to the most outside for observation for binocular Adjust the tube till image clear 3 15 Set photo adapter Figure 27 28 1 Loose the lock screw on trinocular head and take off t...

Страница 16: ...ange 28mm Precision 0 002mm Stage Dual mechanical stage 140 132mm with moving range 76 50mm low adjustment Illumination 85 265V wildly power supply transmitted normal illumination 6V20W halogen bulb adjustment of brightness Operation environment Indoor using Altitude below 2000m Surrounding temperature 5 40 41 109 Max humidity 80 humidity for 31 88 70 humidity for 34 93 60 humidity for 37 99 50 hu...

Страница 17: ...ple Clean sample stain inside of view field Stain on lens condenser objective or eyepiece Clean them No cover glass on sample Add cover glass The cover glass is not the standard Please use standardδ0 17mm Sample is faced down Put it again Oil on dry objective Clean the objective No oil on objective oil Use oil Bubble inside oil Wipe off bubble Wrong immersion oil Use right one Aperture diaphragm i...

Страница 18: ...pped down slowly while observation Tightness adjusting ring is too loose Adjust it to suitable The coarse knob can not be adjusted up The top limited screw locked Loose the screw a bit The coarse knob can not be adjusted down The condenser holder is too low Rise it The sample is not set correctly Re set it The specimen can not be moved smoothly Specimen holder is not fixed Fix it 3 Electrics No po...

Отзывы: