background image


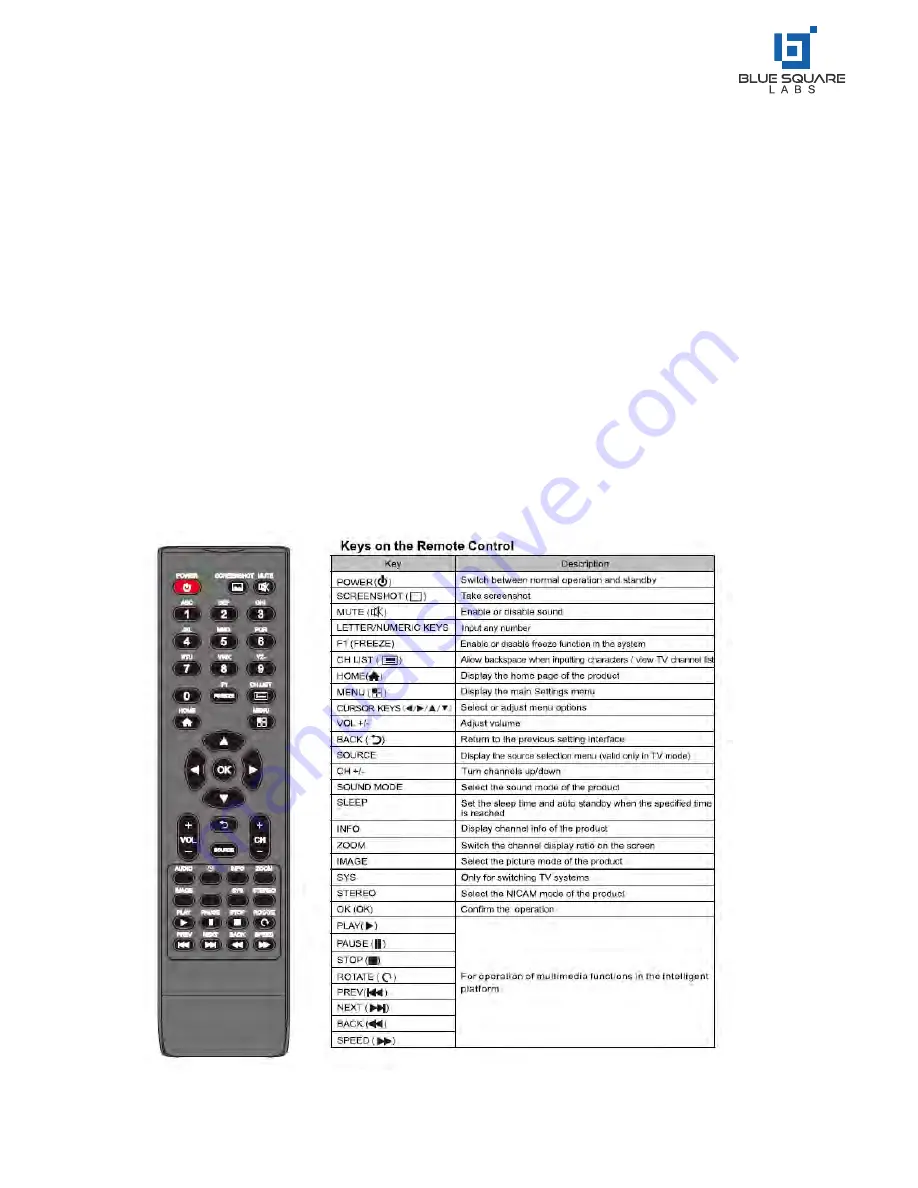
Remote Control


Install Batteries in the Remote


Remove the 

battery compartment cover and follow the polarity marks “+” and “

-

“ in the battery 

compartment to install two AAA batteries (No.7, 1.5V) 

Precautions for Use of Remote Control


Aim the remote control at the IR receiver when using the remote control. Any object placed 
between the remote control and the remote receiver may disturb normal operation. 


Protect the remote control from violent vibrations or shock. Never set, or place the remote 
in direct sunlight, or in a heated environment as it may damage the controller. 


When the remote receiver on the main unit is in direct sunlight or strong light, it is possible 
that the remote-control malfunctions. In such case, please change the angle of lighting or 
the machine, or operate the remote control close to the remote receiver. 


Never use batteries of different types or mix a new battery with a used one. Always replace 
batteries in pair. 


Never try to dispose of batteries in a fire, or recharge decomposed batteries. Never 
recharge, short-circuit, disassemble/assemble, heat or burn any used batteries. Please 
dispose of waste batteries according to applicable environmental regulations. Do not expose 
batteries to any hot environment, like direct sunlight, over the fire, etc. 

Remark:

 The actual appearance of the remote control may be different from the picture


Содержание BSLOLSK6514T20UAG

Страница 1: ......

Страница 2: ...al for LCD Electronic Whiteboard Note Please read this Manual carefully before using the product Do not attempt to disassemble the product If the product does not work please contact us or our dealer in your area ...

Страница 3: ... 7 RemoteControl 8 Basic Operations 9 13 PowerOn Standby 9 SignalSourceSelection 9 MenuOperations 10 Setting List 11 12 Instructions forIntelligent Platform 13 16 Basic Operations 13 QuickStart 13 14 Intelligent Application 14 16 Settings 16 17 ImportantStatement aboutNetwork Service 18 Troubleshooting 19 TechnicalSpecifications 20 21 Contents of Hazardous Substances 22 ...

Страница 4: ...een tested strictly prior to shipment However improper installation and use may cause harm which may include but is not limited to electrical shock or fire hazards To ensure safe use service life and full performance please read and understand the operating instruction and observe the following safety precautions carefully before using this product Keep this manual for future reference and to ensu...

Страница 5: ...2 Safety Warning and Precautions Cont ...

Страница 6: ... Remote Control User Manual IEC Power Cable 2 x Touch Pens 3M HDMI Cable Disc Optional Warranty Card Certificate of Conformity Flat Wall Mount Bracket Pre Installed 2 x AAA Batteries Caution If you experience any operating problems debug issues connection errors or operation faults please contact your dealer ...

Страница 7: ...product 1 Power Socket 2 HDMI In 3 HDMI Out 4 LAN Port 5 VGA In 6 PC Audio In 7 AV Out 8 YPbPr YCbCr In 9 AV In 10 Audio In 11 USB In 12 Headphone Out 13 Optical SPDIF In 14 Touch USB In 15 OPS PC USB In 16 RS232 In Out 17 Front Headphone Out 18 MIC In 19 PC In 20 USB In Media 21 LED Light Sensor Caution Please disconnect the power plug before installing or removing the product ...

Страница 8: ...n Diagram Diagram for connecting the product to a PC Caution Please disconnect the power plug before installing or removing the product Please Note This connection diagram in this manual is purely for reference and is subject to actual operations ...

Страница 9: ...or connecting the panel to another product Caution Please disconnect the power plug before installing or removing the product HDMI OUT will mirror the image from HDMI1 HDMI2 and HDMI3 Daisy Chaining the video signals The maximum number of loops 8 ...

Страница 10: ...te control 4 CH CH button in the OSD menu press these two buttons to select adjustment items up and down their functions are identical to on the remote control 5 Enable Disable the gesture function showing the shortcut menu by a swipe gesture on the left or right side 6 Indicator and remote receiver 7 On Off button I indicates On O indicates off This button is optional subject to the actual produc...

Страница 11: ...e remote receiver on the main unit is in direct sunlight or strong light it is possible that the remote control malfunctions In such case please change the angle of lighting or the machine or operate the remote control close to the remote receiver Never use batteries of different types or mix a new battery with a used one Always replace batteries in pair Never try to dispose of batteries in a fire...

Страница 12: ... remote control the screen will display the Input Source menu At this moment you can press on the remote control or on the front panel to select a source Press OK on the remote control the product will switch to the input source selected Menu Operations The menu operations described in this section are relative to the LCD panel when in standard operation For operations in the intelligent mode plea...

Страница 13: ... Mode and Settings 2 Press on the remote control or on the front panel to select the desired item in the category 3 Press OK on the remote control to enter the item to be adjusted 4 Press on the remote control or on the front panel to change the value or setting 5 When the screen displays the main menu press the MENU button to exit the main menu 6 During menu operation the colour of an option icon...

Страница 14: ...on of pictures increase the analogue value to improve the sharpness decrease the analogue value to reduce the sharpness 0 100 PC Screen Adjustment Automatically correct the screen valid only under VGA signal Saturation Adjust the colour depth of pictures increase the analogue value to increase the colour depth depth the analogue value to reduce the colour depth 0 100 Colour Temp Adjust the overall...

Страница 15: ...Sound Sound Mode Select the sound effect mode Standard Music Movie and User Bass Adjust the Bass Output Increase the analogue value to raise the bass level decrease the analogue value to lower the bass lebel 0 100 Treble Adjust the Treble Output The greater the analogue value 0 100 the higher the treble Sound Balance Adjust the balance between the left and right channels Adjust the analogue value ...

Страница 16: ...iately 2 Long Press Click and hold down the left click for more than 3s then release it 3 Clicking the left mouse functions as the OK key on the remote control 4 Clicking the right mouse functions as the Back key on the remote control Language and Keyboard Settings Language Select Settings Preferences Language in the intelligent mode and press OK press to select the desired language Then press OK ...

Страница 17: ...lastly select Uninstall and click OK from here the system will automatically uninstall the app Multimedia Player If the APK Installer is not pre installed you can access the file manager to select and install the corresponding APK app Connect the USB storage device via USB port select Local Play in the main interface of intelligent mode and press OK to run it The following categories can be access...

Страница 18: ...imum output current of USB ports on the product is 500mA the product will enter Protect Mode if this limit is exceeded If you connect an external device with heavy current it is suggested to use an external power supply Description of option icons in the play interface Options in Image Viewer Options in Audio Player Menu Options in Video Player Menu ...

Страница 19: ...lly obtain an IP address 2 If your router is not set to automatically obtain an IP Address you must complete the network connection by following steps select Static in TP configuration 3 Select IP Address and configure an available IP address 4 Select Default Gateway and configure an available gateway 5 Select Network Prefix Valid Length and configure a valid length of subnet mask 6 Select Preferr...

Страница 20: ... but any devices searching out your network can be connected to your open WiFi network If you select WPA PSK WPA2 PSK for encryption you need to enter a protection password having more than 8 bits When other devices out the WiFi network you have shared the correct password must be entered to connect to your network 5 After selecting Encrpt the system will automatically configure a password for you...

Страница 21: ...direct or unexpected losses or damages arising from your or any third party s access to any contents or services or any information or third party software through this product Third party services may be subject to change removal or discontinuation without prior notice Our company does not represent or warrant that some services or contents will remain accessible at any time Our company will not ...

Страница 22: ... on source device 1 Use the auto adjustment function 2 Enter PC Screen Adjustment to adjust the horizontal or vertical position 3 Use the recommended mode on PC Panel is not responding to remote control 1 The IR receiver on the panel is being obstructed by an object 2 Battery level of the remote is low 1 Clear any obstructions blocking the IR receiver 2 Replace batteries in the remote control The ...

Страница 23: ...n 10bit 1 07 Billion 10 Bit 1 07 Billion 10 Bit Sensing Type 20 Point Infrared Touch 20 Point Infrared Touch 10 Point Infrared Touch Touch System Touch System Windows 7 Windows Vista Windows XP Android MAC OS Surface Protection 4mm Anti Glare Toughened Glass Frame Material Aluminum Aluminum Aluminum Light resistance Available Available Available Android CPU Quad core ARM cortex A53 1 5Ghz Quad cor...

Страница 24: ...ackage Size mm W x D x H 1765 320 1165mm Heavy Carton 1765 320 1165mm Heavy Carton 2200 360 1490mm Heavy Carton Product Weight 54kg 65kg 86kg Shipping Weight 64kg 77kg 112kg Housing Material Metal Plastic Metal Plastic Metal Plastic Housing color Black Black Black Frame width T B L R 26 52 66 6 26 52 26 52 mm 26 52 66 6 26 52 26 52 mm 26 5 66 5 26 5 26 5 mm VESA 4 M8 Screw hole 400 400mm 4 M8 Scre...

Страница 25: ...22 ...

Страница 26: ......

Отзывы: