


-29-
Revision 3/F3542
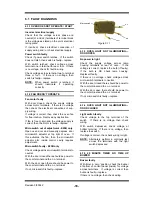
7) Adjust the calibration nut located at the
base of the thermostat shaft.
To increase oven temperature, turn
calibration nut anticlockwise.
To decrease oven temperature, turn
calibration nut clockwise.
Adjustment of the calibration nut by 1°
angular will alter oven temperature by
approximately 2°C (3.6°F).
8) Reassemble broil switch onto thermostat
and fit assembly back onto control panel.
9) Turn on power and recheck oven
thermostat calibration.
10) Repeat procedure if necessary.
Figure 6.4.5
Calibration Nut
6.4.3 DOOR MICROSWITCH ADJUSTMENT
1) Open oven door.
2) Open control panel (refer 6.2.1).
3) With fingers, bend actuator arm of
microswitch so that switch operates when
door is in closed position.
Actuator Arm
Figure 6.4.6
6.4.4 60 MINUTE TIMER ZERO POSITION
ADJUSTMENT
1) Remove 60 minute timer knob by pulling it
firmly away from control panel.
2) Open control panel (refer 6.2.1). Loosen
two screws on control panel holding 60
minute timer.
Figure 6.4.7
3) The timer can now be rotated as required
to ensure that the buzzer sounds at the
zero position.
Two Screws
Содержание E25
Страница 1: ... 1 Revision 3 F3542 SERVICE MANUAL E25 CONVECTION OVEN ...
Страница 30: ... 30 Revision 3 F3542 7 ELECTRICAL CIRCUIT SCHEMATIC 7 1 E25 ...
Страница 31: ... 31 Revision 3 F3542 7 2 E25B ...
Страница 32: ... 32 Revision 3 F3542 8 ELECTRICAL WIRING DIAGRAM 8 1 E25 ...
Страница 33: ... 33 Revision 3 F3542 8 2 E25B ...
Страница 36: ... 36 Revision 3 F3542 11 PARTS DIAGRAMS 11 1 MAIN ASSEMBLY E25 ...
Страница 38: ... 38 Revision 3 F3542 11 2 MAIN ASSEMBLY E25B 110V ONLY ...
Страница 46: ... 46 Revision 3 F3542 ...


