


-23-
Revision 3/F3542
Two Screws
6.3 REPLACEMENT
6.3.1 LIGHT BULB / GLASS
6.3.2 DOOR MICROSWITCH
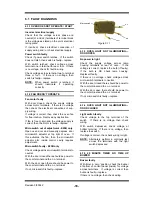
1) Unscrew lamp cover.
1) Open oven door.
2) Open control panel (refer 6.2.1).
3) Remove two screws holding microswitch
to bracket.
6.3.3 INDICATOR NEON LIGHT
1) With control panel open (refer 6.2.1)
remove the wires from the back of the
neon.
6.3.4 POWER / LIGHT SWITCHES
1) With control panel open (refer 6.2.1)
remove the wires from the back of the
switch, noting their positions.
Two Screws
6.3.5 BUZZER
1) Remove control panel (refer 6.2.1).
2) Remove two screws holding buzzer to
panel.
4) Transfer wires to new buzzer.
5) Reassemble in reverse order.
Figure 6.3.5
2) Unscrew bulb out of fitting.
3) Screw in replacement bulb.
4) Replace lamp cover.
Lamp
Cover
Figure 6.3.1
4) Transfer wires to new micro-switch and
re-assemble.
5) Adjust microswitch (refer 6.4.2).
Figure 6.3.2
2) From back push neon through front of
panel rotating clockwise.
3) Push new neon in from front of panel, and
reconnect wires.
2) From back push switch through front of
panel.
3) Push new switch in from front of panel,
and reconnect wires.
Neon
Wires
Switch
Wires
Figure 6.3.3
Figure 6.3.4
Содержание E25
Страница 1: ... 1 Revision 3 F3542 SERVICE MANUAL E25 CONVECTION OVEN ...
Страница 30: ... 30 Revision 3 F3542 7 ELECTRICAL CIRCUIT SCHEMATIC 7 1 E25 ...
Страница 31: ... 31 Revision 3 F3542 7 2 E25B ...
Страница 32: ... 32 Revision 3 F3542 8 ELECTRICAL WIRING DIAGRAM 8 1 E25 ...
Страница 33: ... 33 Revision 3 F3542 8 2 E25B ...
Страница 36: ... 36 Revision 3 F3542 11 PARTS DIAGRAMS 11 1 MAIN ASSEMBLY E25 ...
Страница 38: ... 38 Revision 3 F3542 11 2 MAIN ASSEMBLY E25B 110V ONLY ...
Страница 46: ... 46 Revision 3 F3542 ...


