background image

4 Clearview

+

Quick Guide

IMPORTANT

A reboot is required after applying a configuration file.

The user is also able to reboot the unit and upload/download configuration files. Once downloaded, the settings can be 

applied to the unit or the user can choose to set the unit back to the default factory settings with a click of a button.

System Settings

To change the System and Ethernet Settings, including unit identification and location, go to the “

System

” tab (shown next 

page).

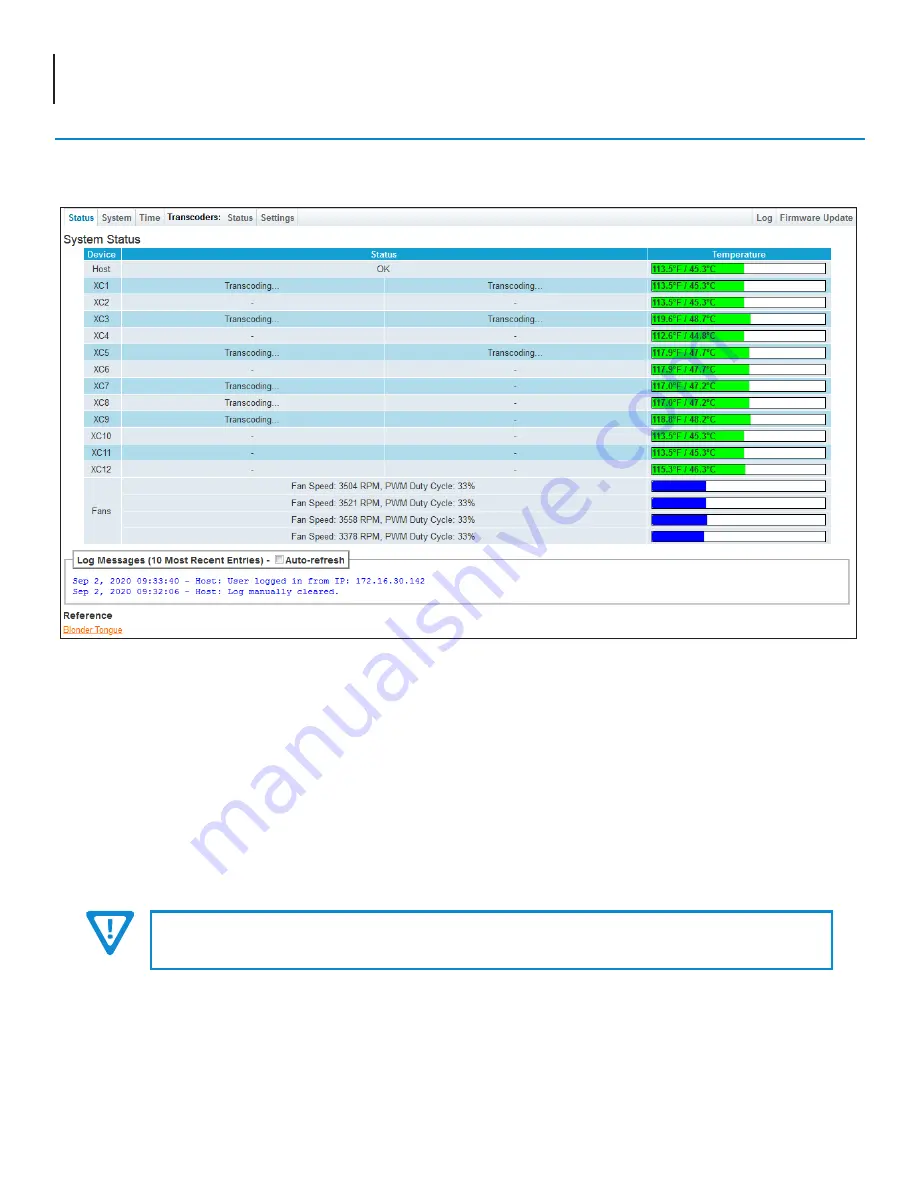
This section provides status messages, temperatures, and fan RPM for the Host system as well as each transcoder used.
The page also features a recent logged message box beneath the main status area which shows the 10 most recent entries 

within the Event Log. To see a more in-depth log of event messages, click the “

Log

” tab located on the right side of the 

navigation menu at the top.

Step 4: Basic Configuration

System Status

Once you are logged into the unit, you will be presented with the “

System Status

” page (“Status” tab): 

Status Page - Full View

The Ethernet Settings that can be changed are “

IP Address

”, “

Subnet Mask

”, “

Default Gateway

”, “

Primary DNS

”, and 

Secondary DNS

”.  In addition, the network settings for each transcoder slave are individually configurable.

This section also allows the user to individually configure the network settings for each numbered transcode pair (XC1 to XC12).
Click “

Apply Settings

” in order to save new or changed settings.

Содержание Clearview+

Страница 1: ...f their respective owners Blonder Tongue Labs Inc ISO 9001 2015 Certified P N 651251900A Rev 090920 Quick Guide HD Transcoder MPEG 2 H 264 AVC H 265 HEVC for up to 24 SPTS Programs Stock Model Name Description 6557 1 Clearview MPEG 2 H 264 AVC H 265 HEVC to MPEG 2 H 264 AVC H 265 HEVC HD Transcoder ...

Страница 2: ...igital AC3 AAC MPEG1 Layer2 pass through only and MP3 1080i to 720p or 720p to 1080i resolution conversions yields improved compatibility bandwidth savings 24 front panel Status LEDs one 1 per each program stream Front panel Temperature LED Easy to use GUI for monitoring and control Before You Begin You will find the following items in the box Clearview Transcoder QTY 1 Power Cord with IEC C13 lin...

Страница 3: ...ight click on the Local Area Connection and then click on the Properties d A dialog box entitled Local Area Connection Properties will appear In this box double click on the Internet Protocol Version 4 TCP IPv4 e A dialog box entitled Internet Protocol Version 4 TCP IPv4 Properties will appear Select the Use the following IP address option and enter the following addresses IP address 172 16 70 2 S...

Страница 4: ...features a recent logged message box beneath the main status area which shows the 10 most recent entries within the Event Log To see a more in depth log of event messages click the Log tab located on the right side of the navigation menu at the top Step 4 Basic Configuration System Status Once you are logged into the unit you will be presented with the System Status page Status tab Status Page Ful...

Страница 5: ...cated on the right side The visual representation of the transcode pipeline on the left side is interactive Clicking on a Transcode block displays the corresponding settings in the Video Audio Pipeline Settings table located on the right side The corresponding tab is also highlighted for persistent indication of the Transcode pipeline settings currently being shown Step 5 Transcoder Configuration ...

Страница 6: ...also shown on the left side When hovering over a Transcode block the corresponding status table highlights Transcoders Status Page Visual and Informational Status Pipeline Status States Light Gray Red Question Mark The transcoder has not been detected yet Light Gray The transcoder is disabled Dark Gray Orange Arrow The transcoder is idle Green The transcoder is active Red The transcode has failed ...

Страница 7: ...55 255 0 0 3 The Management PC is configured to be at 192 168 3 5 with a subnet mask of 255 255 0 0 Note The subnet mask of the Video Source Sink device must be configured to be on the same subnet mask as the Management PC Accessing devices from the Management PC To access the Video Source Sink device go to http 192 168 3 18 To access the Clearview unit go to http 192 168 6 60 Note Additional Clea...

Страница 8: ...ent at 1 800 523 6049 Ext 4256 or visit our website www blondertongue com for further information Product and Documentation Updates Download the latest User Manual PDF by visiting our website Navigate to the product page by entering the full Model Name or Stock Number in the search field Upon reaching the product page the User Manual download link will be located beneath the product image Firmware...

Отзывы: