


42
43
First commissioning and installation
After you have safely installed your device and have carried out all the wirings, you can switch on your CVR-10
for the first time. Please hold your password (WEP or WPA) and, if necessary, your network identifier (SSID)
ready for a possible WLAN installation. After turning on, the CVR-10 will start on CD mode.
▶ Please, confirm the question after starting the equipment assistant wizard with “Yes”, press the arrows
keys of the remote control until “Yes” lights up and confirm with the key “Enter”
▶ Select your desired time format, either 12 h or 24 h display and confirm with the key „Enter“.
▶ Select in the next step „Update from DAB“ (recommended) and confirm.
▶ Every time it starts, your CVR-10, will in future recover automatically from this source the information to
time and datum.
▶ For the following time zone setting, please select for Germany UTC +1: 00. For other locations, please select
the appropriate time zone and confirm.
▶ In the following setting, please indicate whether your location currently has summer time, then „ON“
would be the correct input
▶ In the following query „Keep network connected?“, it should be confirmed with „Yes“ in order to avoid
interception and streaming problems.
▶ When choosing WLAN region, please choose “Most of Europe”.
▶ Now it starts searching a WLAN connection and shows you all found WLAN networks (SSID) in your sur-
rounding. Select your WLAN network. In case your WLAN does not appear, this could be due to the fol-
lowing reasons:
WLAN aerial not installed.
WLAN signal too weak at the installation place (perhaps it would be necessary to adjust the aerial to
the router and on the CVR-10 or use a WLAN repeater).
WLAN SSID suppressed on the router, select the input “Manual configuration”.
If you connect the CVR-10 with an ethernet cable with your router, instead of using WLAN,
select “Cable”.
▶ In case your router supports WPS, select “Press key” and then press the appropriated button on the router.
Alternatively you can also choose “skip WPS” and subsequently enter the network password (WEP or WPA).
Afterwards, in both cases the device should be finally connected.
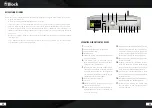
Design of the device
▶ Connect the FM / DAB + cable antenna to the device.
▶ Connect your speakers. You can either loose the screw connection and connect the stripped cable end or
connect the loudspeakers cables with banana plugs directly into the connections. They can be connected
to the CVR-10 two different loudspeaker pairs, one pair on the „A“ to the marked connections and one
on the terminals labelled „B“. Make sure you have the correct polarity of the positive (red) and negative
(black). If you want to connect two pairs of speakers to „A“ and „B“ in a parallel operation, both loudspea-
ker pairs must have at least 8 ohms.
▶ 3. If you need additional input sources such as from the tape deck, TV, DVD player, satellite recei-
ver or disk players, connect these devices to the corresponding input jack of the CVR-10 using sui-
table cables. For this purpose, you have 3 analogue inputs (TV, AUX, DVD), 1 analogue Phono
input with a preamplifier for record players with MM system (connect them eventually to an availa-
ble earthing-conductor cable with the ground screw connection) and four digital grounding cables
(3x optical and 1x coaxial) are available. In addition, an analogue line-in connection is also provided at the
front.
▶
When using an external device to record the signal sources of your CVR-10, please connect this unit to the
REC-OUT jack. This output emits an unregulated signal without volume control or sound regulation from
the CVR-10.
▶
If you want to use another (high end) amplifier or an active subwoofer on the CVR-10, please connect it to
the pre-out jacks of the CVR-10. This output emits a signal from the CVR-10 influenced in volume and tone
control.
▶
When connecting your CVR-10 wireless over an existing WLAN to the Internet, please install the supplied
WLAN aerial.
▶
When connecting your CVR-10 to the Internet via Ethernet (wired), please connect your router using the
RJ-45 cable to the Ethernet socket of the CVR-10.
▶ Connect the power cable to the device and to a power outlet.
Содержание CVR-10
Страница 1: ...2018 CVR 10 Bedienungsanleitung Manual ...


