


40
41
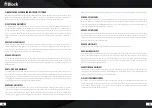
The remote control
1.
„Standby“ button: switches the device to „Clock“ mode, the display will show the
time and the date. To save energy, switch off the device in the net counter.
2.
„Mute“ button: switches the sound off.
3.
“A/B” button: switches the output to the speaker boxes A, B or both.
4.
Operating Mode select button: • IR starts the Internet radio • Media / USB (SPO-
TIFY): starts the media player or USB playback Press it again to switch in the Spotify
mode. • DAB starts the DAB + radio reception. • Press it again to switch the in the
Bluetooth mode. • FM starts the FM radio reception. • TV / AUX – his button activates
all the external inputs on the rear panel. • DVD: activates the back-sided DVD input
of the device • Pressing twice activates the Bluetooth mode. • Phono: activates the
back-sided phono input (record player) • CD: starts the integrated CD player. • OPT:
pressing several times switches on the optical inputs from 1-3 • COA: activates the
back-sided coaxial entrance .
5.
„Line-In“ button: activates the front connector behind the magnetic cover.
6.
„Info“ button: press this button to select FM, DAB +, Internet radio and media player
additional information can be called up.
7.
Arrow upwards: on FM mode to increase the frequency in 0.05 MHz . In menu to
select the different points.
8.
Arrow to the left: to reach the previous setting in the menu.
9.
Arrow to the right: to access selected functions in the menu.
10.
Arrow down: in FM mode by the frequency in 0.05 MHz increments to reduce. To
select the different points in the menu.
11.
„P“ button: recalls or saves pre-set transmitters in radio mode.Taste „Menü“:
12.
„Menu“ button: displays the system menu.
13.
“Play” button
14.
Balance” button: moves the speaker balance to the left
15.
“Balance” button: moves the speaker balance to the right
16.
„“ button: increases the volume
17.
„Volume“ button: reduces the volume
18.
„Pause“ button
19.
„Stop“ button
20.
„Back“ button: on radio mode, the device searches the previous lower transmitter.
On CD and media player mode, the unit jumps to the previous track.
21.
„Forward“ button: on radio mode, the device searches the next higher transmitter.
On CD and Media Player mode, the device jumps to the next track.
22.
„Fast backward“ button: only on CD mode.
23.
„Fast forward“ button: only on CD mode
24.
„Tone“ button: activates the treble and bass settings.To adjust the volume, use the
VOL- / VOL + buttons.
25.
„SUR“ button: press this button to switch the different digital sound optimization.
26.
„RAN“ button: switches the random playback on / off during CD operation.
27.
„REP“ button: switches to automatic replay during CD operation.
28.
Button „1 - 10“: on radio mode, recalls on the stored transmitters and on CD mode,
it chooses the single pieces of the CD.
29.
„SCAN“ button: searches automatically all available stations in DAB + mode.
30.
„CD“ button: opens and closes the disc tray.
1
2
4
5
8
11
13
14
15
20
22
24
25
28
29
30
27
26
23
21
19
17
18
16
12
10
9
7
6
3
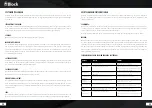
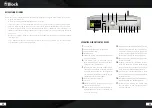
Connections on the device
1.
Mains connection: the mains connection cable
may show no damages or defects.
2.
warnings
3.
3. a. Loudspeaker connections A: please en
sure the correct connection of plus and minus!
b. Loudspeaker connections B: please ensure
the correct connection of plus and minus!
4.
Type designation and electric current specifications.
5.
Optical Inputs 1-3: connect here an optical digital
cable.
6.
Coaxial input: connect here a coaxial cable.
7.
Pre-Out Output jack: to connect another
amplifier or a subwoofer.
8.
Rec-Out jack: to connect a recording device.
9.
TV input jack: to connect a TV set.
10.
AUX input jack: to connect an additional device.
11.
DVD input jack: to connect a DVD player.
12.
Phonon input jack: to connect a record player
with MM system.
13.
Ground screw connection: to connect a ground
cable for record player.
14.
DAB + / FM aerial connection
15.
Lan connector jack for RJ-45 plug (Ethernet)
16.
Bluetooth-aerial connection (picture of put up
aerial)
17.
WLAN aerial connection (picture of put up aerial).
18.
Inspection marks and disposal instructions.
2
2
18
4
7 8 9 10 11 12 13
3b
3a
14
5
6
15
16 17
Содержание CVR-10
Страница 1: ...2018 CVR 10 Bedienungsanleitung Manual ...


