background image


Air Controls 

The Blaze B600/B900 and B605/B905 range wood heaters 
feature a single air control system. It is designed to introduce 
oxygen into the base of the fire controlling the rate of 
combustion of the wood as well as oxygen being drawn into 
the upper firebox where combustion of the gases occurs.  

The air control is operated by sliding the stainless steel 
cylindrical handle located on the top left side of the heater. 
Pulled all the way out offers maximum burn rate, while 
pushed all the way in offers minimum burn rate. 

Secondary air holes in the rear of the firebox provide 
additional oxygen for a more complete combustion of the 
gases released from the burning wood. 

Door Handle 

Warning: the door handle may get hot if appliance has been 
left in High burn setting for an extended period of time. A 
stainless steel handle extension is supplied with the heater 
that can be inserted in the end of the door handle when 
opening and closing if too hot to handle. 

Fan 

The fan can be used to spread heat around the room quicker, 
as well as distribute heat into other rooms. It does not have to 
be on if not required. 

Plug the lead from the rear of the heater into a power-point. 
B600 & B900 models have an override switch on the rear 
panel next to where the power lead exists the heater base. 
This must be switched on for the fan to run. 

A remote control supplied with the heater is used to turn the 
fan on and determine the chosen speed. 

If the radio frequency used by the remote control interferes 
with other frequencies in the home such as wireless internet 
or child monitor refer to “11. Change Fan Controller 
Frequency
” in the Maintenance & Servicing section for details 
on changing the frequency. 


First few times the appliance is lit, it will give off some 
odorous fumes. This is caused by the paint curing. 


Do not touch the paint work while it is curing otherwise 
it can leave a permanent mark on the appliance. 


Once the paint has cured it will not re-occur. 


Keep the room well ventilated until these fumes have 
cleared. 


Burn only seasoned hardwood timber with a moisture 
content of less than 20%. 


Newly cut wood should be allowed to dry/season for 12 
to 18 months before use. 


Wood should be stored in an environment protected 
from the weather to minimise any potential moisture 
content. 


For best results, wood should not exceed 270mm in 
length and 150mm diameter. Any larger and appliance 
will not operate at its optimum. It is better to burn 
several smaller pieces of wood than one large single 
piece. 


Poor quality timber: 

o


Causes low combustion efficiency 

o


Produces poor emissions (smokey) 

o


Results in additional buildup of creosote (soot) in 
the flue which will then require regular cleaning 
and may result in a flue fire. 


Do not burn painted, impregnated/treated wood, 
manufactured board products or pallet wood.


Place firelighters or paper and dry kindling wood in the 
base of the firebox. 


Light the paper or firelighters. 


Open the air control located on the top left corner of 
the appliance by pulling out from the appliance. 


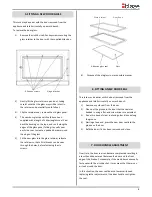
If necessary, leave the door slightly open as the fire 
establishes and the glass warms to avoid the build-up of 
condensation. 

2. USING APPLIANCE FOR FIRST TIME 


3. RECOMMENDED FUELS 


4. LIGHTING THE FIRE 


Содержание B600

Страница 1: ...nd Stylish Keep instructions in a safe place for future reference DO NOT DISCARD THESE INSTRUCTIONS Pecan Engineering Pty Limited proudly supports the activities of Landcare Australia through its membership of the AHHA B600 B900 B605 B905 ...

Страница 2: ...ZS4013 WARNING DO NOT USE FLAMMABLE LIQUIDSOR AEROSOLS TO START OR REKINDLE THEFIRE WARNING DO NOT USE FLAMMABLE LIQUIDS OR AEROSOLS IN THE VICINITY OF THIS APPLIANCE WHENIT IS OPERATING WARNING DO NOT STORE FUEL WITHINHEATER INSTALLATION CLEARANCES WARNING WHEN OPERATING THIS APPLIANCE ASAN OPEN FIRE USE A FIRE SCREEN WARNING OPEN AIR CONTROL AND DAMPERWHEN FITTED BEFORE OPENING FIRINGDOOR CAUTIO...

Страница 3: ... frequencies in the home such as wireless internet or child monitor refer to 11 Change Fan Controller Frequency in the Maintenance Servicing section for details on changing the frequency First few times the appliance is lit it will give off some odorous fumes This is caused by the paint curing Do not touch the paint work while it is curing otherwise it can leave a permanent mark on the appliance O...

Страница 4: ... the air slide 4 5mm The air slide can be adjusted to any position so desired depending on wanted heat output versus burn time Fan may be turned to low speed setting or off if the heater is putting out sufficient heat without the fan on Reload with more wood 1 Open air slide before opening door 2 Rake break up any existing coals 3 Load the wood with the length orientated front to back 4 Better res...

Страница 5: ...k inside of flue prior to each season for any build up of creosote wood tar To do this o First remove the baffle refer to 2 Replacement of Baffle under Maintenance Servicing section o Using a small mirror and torch hold the mirror on an angle below the flue with the torch shining at it and look for black creosote build up If only a fine black powdery layer then that is normal but if built up layer...

Страница 6: ...ught Contact the installer should this happen Trouble starting the fire If all ash has been removed from the firebox then it can upset the supply of air to the base of the fire It can aid the fire by retaining some ash when cleaning out the firebox The purpose of the firebricks in the appliance is to increase thermal mass and to guarantee the longevity of the steel firebox Over time the firebricks...

Страница 7: ...e rod Over time the screws securing the door hinge plate to the heater may loosen resulting in the door dropping i e visually appears on slight angle and no longer 100 horizontal This can result in a poor door seal and unnecessary amounts of oxygen entering the firebox and wood burning too quickly To fix this and reposition the door 1 With the supplied Allen key loosen the two screws on the hinge ...

Страница 8: ...x screws 6 Dispose of the old glass in a responsible manner This task may be easier with the door removed from the appliance and laid horizontally on a work bench 1 Remove any old seal from the door 2 Clean out the groove in the door that the seal was bedded in using a flat end screw driver or equivalent 3 Run a thin bead of clear roof and gutter silicone along the groove 4 Starting at one end pre...

Страница 9: ... To access the remote control receiver B600 B900 Models located in the base unit in the rear panel on the left hand side removed via two screws with a M6 Allen key B605 B905 located underneath at the rear of the base unit in a steel cabinet that can be removed via two screws with a M6 Allen key Fan Controller Remove the battery cover and batteries With a small screwdriver or equivalent change the ...

Страница 10: ......

Страница 11: ......

Страница 12: ...Pecan Engineering Pty Limited 13 Acorn Road Dry Creek South Australia 5094 T 08 8349 8332 F 08 8260 6643 Email info pecan eng com au ...

Отзывы: