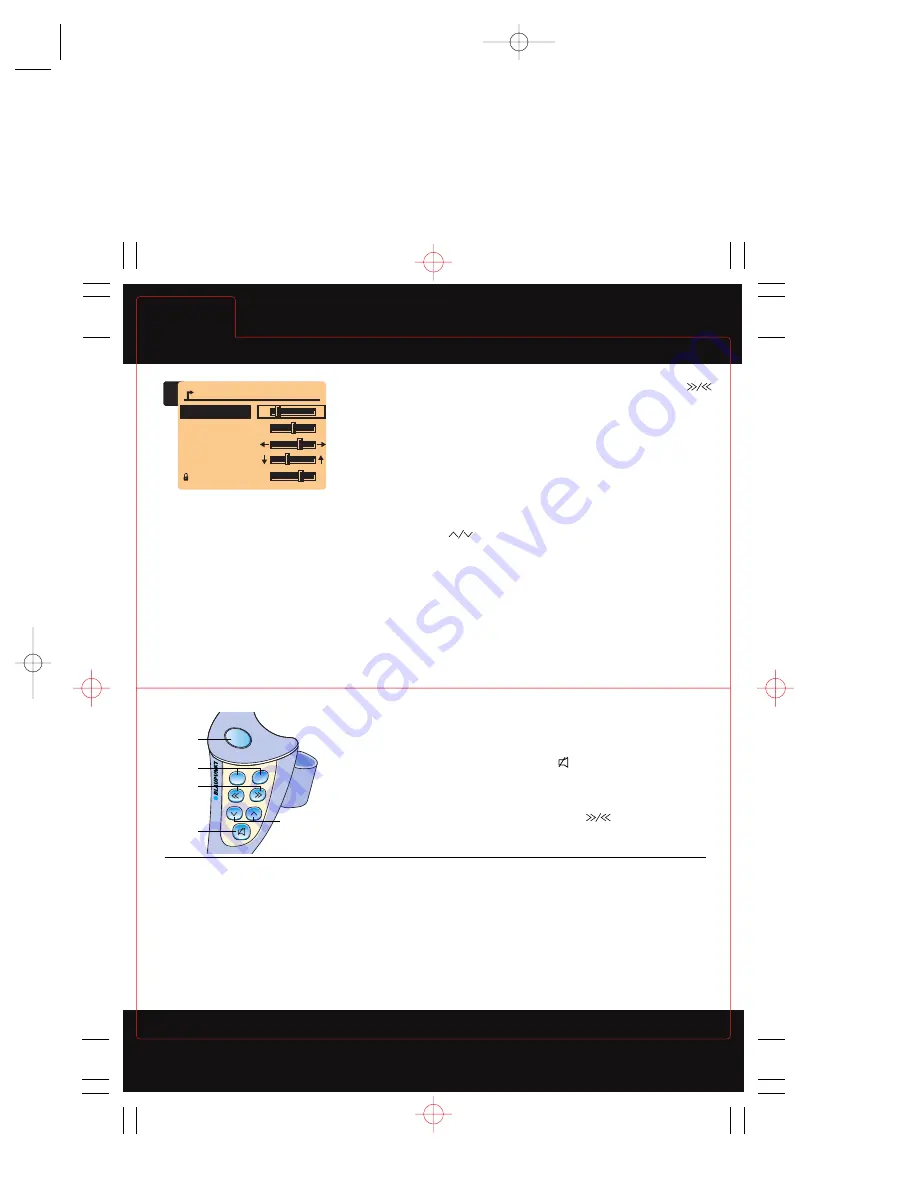
Blaupunkt TravelPilot RNS 150 US Скачать руководство пользователя страница 106

TONE
TONE MENU 1

Tip: There are separate memories
for bass and treble for each 
audio source (AM, FM, Integral
CD and CD changer); there is 
only one memory for balance,
fader and loud

TONE Menu activated by pressing
AUD (

A10

) for any audio source

To select an item for adjustment,
press rocker switch 

(

A7

) to

highlight item and press OK (

A8

)

Tip: When selected item appears
surrounded by a frame

Tip: FM TONE Menu shown
other TONE Menus are similar

Quick Tips

Bosch

page 26

TravelPilot

page 27

April 27, 2000

Tone/Remote

Tone/

Remote

Always check the Owner’s Guide for more operating information and safety features

To adjust, press rocker switch 
(

A7

) to increase/decrease setting and

press OK (

A8

)

Tip: If no input is received 
within 30 seconds system 
returns to previous menu

To return to previous menu without
making adjustments, press ESC (

A9

)

Balance adjusts right/left, Fader
adjusts front/rear

SRC

V—

V+

3

1

4

2

5

RC-O6 THUMMER™
Remote Control (optional)
1. SRC (Source key)

Press to sequence through Travel

P

ilot

®

operating modes on display

2. Tuning 

Press to select different preset
groups for radio or next/previous
track/disk for CD/CD changer

1

FM TONE

BASS

TREBLE
BALANCE
FADER

LOUD

(

i

)

( )

+

+

+

3. Volume control 

Press V+/V- to increase/decrease
volume

4. Mute 

Press to mute audio, to cancel 
press again or press V+ or V-

5. Seek 

Press 

to seek up/down,

see Radio

USING TRAVEL

P

ILOT

®

QUICK TIPS

®

When unit is first turned on, the last
used feature is displayed.
Throughout this guide an A and a
number make reference to controls.
The Quick Start feature is added for
repeat visits to quickly get you up 
to speed.

WARNING: To avoid driver 
distraction which could lead to 

an accident, system setting and
navigation information should be
entered with the vehicle stopped
at a safe location.
The TravelPilot

®

should be operated

by the driver only when traffic
conditions permit.

ABOUT THIS GUIDE

This guide has been prepared to help
you get quickly acquainted with your

Blaupunkt Travel

P

ilot

®

and to provide

a convenient reference source for 
common questions.

However, it is not intended as 
a substitute for your Travel

P

ilot

®

Owner’s Guide.

For complete operational instructions
and important safety messages,
please consult your Travel

P

ilot

®

Owner’s Guide.

2000 RNS150 Bosch Travel Pilot  6/15/00 2:40 pm  Page 14

Содержание TravelPilot RNS 150 US

Страница 1: ...Navigation TravelPilot RNS 150 US Operating instructions Mode d emploi Instrucciones de manejo Installation instructions Instructions de montage Installation instructions 1 RNS 150 gb 18 02 2000 9 58...

Страница 2: ...2 Equipment illustration 2 3 4 5 6 7 8 9 10 11 12 13 14 15 16 1 1 RNS 150 gb 18 02 2000 9 58 Uhr 2...

Страница 3: ...er switch The functions performed by the rocker switch depend on the menus or operating modes which are currently active 8 OK input confirmation key 9 ESC quits menus without saving any changes made A...

Страница 4: ...n Navigation operation CD player CDC operation Main tuner menu Tuner functions menu Tuner DSC menu CD DSC menu Nav DSC menu CD function menu Route guidance menu Main navigation menu Main CD menu 1 RNS...

Страница 5: ...situation at all times you could cause serious accidents To avoid being distracted by the TravelPilot please observe the following information Before you take your first trip using the TravelPilot mak...

Страница 6: ...Storing radio stations 22 Storing stations manually 22 Storing stations automatically with Travelstore 23 Starting Travelstore 23 How to reduce interference in FM radio reception 23 Activating deactiv...

Страница 7: ...ng characters 29 Deleting the current name 29 Deleting all of the names 29 Track programming 30 Creating the track program 30 Deleting tracks from the track program 31 Starting stopping the track prog...

Страница 8: ...fic congestion 54 Cancelling a detour of traffic congestion 54 Selecting route options 55 Setting a position marker 56 Storing the position marker 56 Traffic announcements during route guidance only i...

Страница 9: ...anger operation 72 Set up Basic settings 73 Activating the Set up menu 73 Adjusting the day night display the viewing angle contrast and brightness 74 Automatic switch to night display 74 Adjusting th...

Страница 10: ...off Press the ON button 2 The TravelPilot will switch on After the unit has played for an hour it will switch off automatically to prevent the vehicle battery from running down You can re peat this pr...

Страница 11: ...to select other functions such as activating traffic information standby and special functions such as Travelstore DSC menu Direct Software Control is used to adjust the options for the individual au...

Страница 12: ...ou have selected Note During voice output for navigation you can adjust the volume of the spoken driving recommendations without affecting the basic volume of the audio source The difference in volume...

Страница 13: ...can deactivate this automatic switch Refer to the information in the chapter on Set up Display It is possible to adjust the viewing angle of the display in your vehicle to obtain optimum legibility R...

Страница 14: ...the tone adjustments Use on the rocker switch 7 to move the selector bar to the menu item you would like to adjust and Press OK 8 or on the rocker switch 7 The control lever will appear surrounded by...

Страница 15: ...ted entering the code number Mark the symbol and press OK 8 to confirm your selection The system will switch on If you enter and confirm an incorrect code number by mistake you can repeat your entry T...

Страница 16: ...rresponding softkeys Switching RDS Radio Data System on off The Radio Data System is a service offered by radio stations which provides you with more enjoyment and convenience when listening to FM rad...

Страница 17: ...ctivating deactivating RDS REG Another attractive RDS option is the Alternate Frequency function The system performs a constant search for frequencies with better reception for the radio station selec...

Страница 18: ...y until the desired option ON or OFF appears ON is the default setting PTY Alarm The Alarm is a special program type If the TravelPilot detects an alarm mes sage e g a disaster alert a symbol will app...

Страница 19: ...eactivating the TA function for radio operation Use the DSC menu for the corresponding source to activate or deactivate the TA function A TA symbol in the status line indicates that the TA function is...

Страница 20: ...RDS only You can select RDS stations within reception range directly If it is possible to receive several stations which belong to the same broadcasting network you can press on the rocker switch 7 to...

Страница 21: ...t a station which is not detected by automatic seek tuning Press or on the rocker switch 7 Scan seek tuning During Scan seek tuning the system searches through the entire band to find radio stations w...

Страница 22: ...memory bank Storing stations manually To store stations manually Press TU to switch to the function menu for radio operation and select the softkey marked with the desired FM memory bank FM1 FM2 or F...

Страница 23: ...e function is completed the first station stored in the FMT memory bank will begin to play How to reduce interference in FM radio reception When listening to FM radio stations you will sometimes exper...

Страница 24: ...o indicate the number of GPS satellites received the CD function selected the currently selected audio source the sta tus of the TA function and a symbol which indicates that an audio CD has been inse...

Страница 25: ...anger menu will appear If you want to activate the integrated CD player Press CD C again The CD function menu for CD changer operation will appear Press the softkey marked CD If you have not inserted...

Страница 26: ...ey to switch the TA function on and off Selecting tracks During CD playback you can select tracks directly To select the next track Press on the rocker switch 7 If the last track on the CD is already...

Страница 27: ...as follows Press CD C to switch to the CD function menu and Press the softkey marked SCAN To end the SCAN function repeat these steps The SCAN function will end automatically if you activate the MIX...

Страница 28: ...name a CD Press CD C to switch to the CD function menu and Press the softkey marked NAME to access the CD Name menu Press the softkey marked EDIT The Edit menu will now appear Entering the name Use an...

Страница 29: ...D Name menu and Press the softkey marked CLR NAME The name will be deleted The name will also be deleted if you activate the Edit menu again and press the symbol or press and hold OK 8 to exit the men...

Страница 30: ...and RUN They will be marked with a lock symbol Use on the rocker switch 7 to select the track you want played first The tracks can be programmed in ascending order only i e 1 4 7 etc but not 3 1 4 etc...

Страница 31: ...n the status line To stop the track program in progress without deleting it Press the softkey marked RUN again Deleting individual track programs To delete the track program because for example you wa...

Страница 32: ...ectronic speedome ter signal the gyroscope and a signal transmitted by GPS satellites Global Positioning System The navigation system compares the data with the map information stored on the navigatio...

Страница 33: ...a surrounding the current location of the vehicle Location markers you have set This function is useful when you notice an interesting place during your trip e g a shop or restaurant and would like to...

Страница 34: ...cter When you enter an H as the first letter for your destination for example the edit list will move down to the names of places which begin with H This allows you to find your destination in the edi...

Страница 35: ...me you press the contents of the list will move up by one line The selection bar will remain on the second last entry and cannot be moved to the last entry until you have reached the end of the list S...

Страница 36: ...the editing field The first place name on the list of towns and cities which begins with the letter selected will appear in the editing list When the name of the town you want to select appears in the...

Страница 37: ...inations Surrounding the destination This will not be possible unless the corresponding data is available If there is no data available on individual menu items these will be marked with a lock symbol...

Страница 38: ...unless the corresponding data is available on your navigation CD If there is no data available for the menu items INTERSECTION and HOUSE NUMBER these will be marked with a lock symbol and it will not...

Страница 39: ...tions in the DSC menu if desired and start route guidance to the selected intersection For more information refer to the sections on Route options and Route guidance Destination entry Town centre If y...

Страница 40: ...e are more than 20 entries You can access special destinations for four different areas AT DESTINATION special destinations will be displayed for your current destination SUPRAREG DEST are not coverag...

Страница 41: ...for the destination se lected will appear Select the desired category If there are fewer than 20 entries available in the category selected a list will appear The special destinations available will a...

Страница 42: ...the special destination Switch to the list and Select the destination you are looking for Once you have selected and confirmed the special destination you are looking for the main navigation menu wil...

Страница 43: ...can start route guidance For more information refer to the section on Route guidance Special destinations Surrounding the current location This type of special destination is found in the area surrou...

Страница 44: ...mory refer to the chapter enti tled Destination memory There are three different destination memories to choose from LAST 10 MEMORY stores the last ten destinations driven to using route guidance The...

Страница 45: ...le position you have set as a marker during active route guidance or locating To set a position marker a navigation CD must be inserted in the system Selecting a position marker as your destination Yo...

Страница 46: ...u must turn off If you leave the digitised area OFF ROAD or OFF MAP will appear in the top line The visual driving recommendations appear in the symbol field in the left hand part of the display You c...

Страница 47: ...playing time indicator on off in the chapter entitled CD changer operation During a telephone call the audio source will mute and the display will read PHONE Note While the route guidance menu is acti...

Страница 48: ...possible for navigation CDs with the corresponding data base When NO MAP route guidance is active NO MAP will appear in the top line of the display and the distance to your destination as the crow fli...

Страница 49: ...by hotels and restaurants As this information depends on the data stored in the travel guide on your CD it is not possible to provide an exact description here Select the menu item TRAVEL GUIDE in the...

Страница 50: ...with the list Press ESC 9 to quit the menu Locating mode In the locating mode the name of the street you are currently travelling on will appear in the top line of the menu The symbol field shows a c...

Страница 51: ...item STORE DEST in the destination memory menu An edit menu which allows you to enter a short name will appear Enter a short name for the destination and confirm it If you do not want to give the des...

Страница 52: ...marker will appear in front of the entry Move the destination to its new position on the list and Press OK 8 Repeat this process until all of the entries are positioned as you want them Deleting desti...

Страница 53: ...list will be deleted After you have selected the option you want you will be prompted to confirm your selection Confirm it or return to the previous menu GPS status This displays the number of GPS sat...

Страница 54: ...o the menu item FROM Use to enter how far from your current location the detour should begin Use on the rocker switch 7 to move the selection bar to the menu item TO Use to enter how far from your cur...

Страница 55: ...uch longer route the TravelPilot will include the motorway in the route The same applies to ferries and toll roads To select the route options Activate the menu item ROUTE OPTIONS in the DSC menu You...

Страница 56: ...hether you want to enter a name for the position marker or return to the menu in which you set the position marker If you select the option SHORT N and enter a name for the position marker it will be...

Страница 57: ...tput The voice output provides you with information on how far you must travel until it is time to make a change in your direction and gives spoken driving recommendations Access the DSC menu for navi...

Страница 58: ...To alter the time display Press OK 8 Note You can also alter the time info display with the hotkey Allo cate the function TIME INFO to the hotkey To find out how to pro gram the hotkey refer to the s...

Страница 59: ...igation simulation Enter a destination Switch to the DSC menu for navigation and Select the menu item NAVI SIMULATION Press OK 8 The navigation system will be activated Start route guidance The route...

Страница 60: ...CD changer operation To start CD changer operation Press CD C If the CD source used last was the integrated CD player and there is still an audio CD in the drive it will begin to play Otherwise the C...

Страница 61: ...o right the number of GPS satellites received symbols for the operating modes SCAN MIX RPT a symbol for the currently active audio source the status of the TA function and a symbol which indicates whe...

Страница 62: ...When you have reached the last track pressing on the rocker switch 7 will select the first track on the CD Restarting tracks To restart the track currently playing or to select a previous track Press...

Страница 63: ...he CDs in the magazine For the MIX function you can determine whether only the tracks on the current CD or whether the tracks on all of the CDs in the changer are to be played in random order Press DS...

Страница 64: ...all of the tracks will be played for 10 seconds Scanning the tracks on one CD If you want to use the SCAN function for the tracks of the current CD only then CD must appear next to the menu item SCAN...

Страница 65: ...peat function Press ESC 9 Activating the Repeat function for one track If you want to repeat the current track only you have to set the Repeat function to TRCK before you select it Press DSC to access...

Страница 66: ...nt played first The tracks can be programmed in ascending order only i e 1 4 7 etc but not 3 1 4 etc Press the softkey marked ADD Press or on the rocker switch 7 to select the next track for the track...

Страница 67: ...am in progress without deleting it Press the softkey marked RUN again Deleting individual track programs To delete the track program because for example you want to program a new one Start the track p...

Страница 68: ...IT Entering the name The Edit menu will now appear Use and on the rocker switch 7 to move the cursor to the first letter in the name The letter marked will appear magnified on the right of the display...

Страница 69: ...leting all of the names If you want to delete all of the CD names stored in the memory proceed as follows Activate the CD Name menu and Press the softkey marked CLR ALL An inquiry in the display will...

Страница 70: ...on standby see Traffic Announcements TA on or off during CD changer operation Press DSC to activate the DSC menu for CD changer operation Press the softkey marked TA The current setting will appear ne...

Страница 71: ...vigation with the RC06 remote control Press down SRC 1 on the remote control until the system switches to navigation mode Adjusting the volume To adjust the volume with the remote control Press V or V...

Страница 72: ...N seek tuning for radio operation Hold 2 pressed down on the remote control until SCAN seek tuning begins Starting Travelstore If you want to start Travelstore Hold 2 pressed down on the remote contro...

Страница 73: ...set reset the unit to the default settings Fmseek Best Sens Set the unit s search sensitivity Activating the Set up menu If you are currently using a main or function menu Press DSC twice The system w...

Страница 74: ...automatic switch to night display Activate the Set up menu Select the menu item DISPLAY Select the menu item DAY NIGHT and Press OK 8 The setting will switch to OFF To reactivate this setting simply r...

Страница 75: ...em the minimum volume for traffic announcements TA MIN the minimum volume for voice output NAV MIN and the setting for GALA the speed dependent vol ume adjustment If the system volume is louder than t...

Страница 76: ...to adjust the setting To help you select the right setting the volume will increase and decrease as you make the setting Press OK 8 If you press ESC 9 to exit the menu the setting will not change and...

Страница 77: ...ry on the list menu Move the selection bar to the menu item HOTKEY Press OK 8 The Hotkey Set up menu will appear The selection bar will mark the first item on the list and an arrow symbol will mark th...

Страница 78: ...E FORMAT in the Time Set up Press OK 8 Selecting the time zone Select TIME ZONE in the Set up menu Time Press OK 8 Now you can select the value for the time zone Activating summer time If you activate...

Страница 79: ...corresponding spoken message from the navigation system if a navigation CD is inserted The system will switch back to the Set up menu Calibrating the system The Install Set up menu will provide you wi...

Страница 80: ...n you require NEW INSTALL or TYRE CHANGE Press OK 8 Before the process begins you will be prompted to confirm the deletion of any old calibration information Note If you select NEW INSTALL route guida...

Страница 81: ...speed of 19 mph Please note that the distance must be measured out exactly Select CALIBRATION from the Set up menu Install Mark and confirm the menu item MANUALLY Now you will be required to enter the...

Страница 82: ...test has ended the calibration menu will appear automatically Displaying the GPS status and position If you want to display the number of GPS satellites the system can current re ceive and your GPS p...

Страница 83: ...tem CODE in the Set up menu Security and Press OK 8 The coding will be activated deactivated The current setting will be displayed behind CODE For security reasons it will now be necessary to enter th...

Страница 84: ...tings made for navigation select CANCEL Step 2 This inquiry refers to deleting the name and track program memory for CD operation To reset the settings select YES otherwise Select CANCEL Step 3 The la...

Страница 85: ...ect the FMSEEK menu item using the buttons on the rocker switch 7 Press the OK button 8 several times until the required option is highlighted next to FMSEEK BEST The automatic search stops at station...

Страница 86: ...oadview Illinois 60153 1 800 266 2528 1 877 462 2528 Navigation Hotline Made in Germany Fabrique en Allemagne Hecho en Alemania Copyright 1999 by the Robert Bosch Corporation No portion of this work m...

Страница 87: ......

Страница 88: ......

Страница 89: ......

Страница 90: ......

Страница 91: ......

Страница 92: ...19 CDC AF AUX L 4 Channel RC 06 09 1998 Compatible CDC Block RCA Output Block Thummer Block D Wheel Sensor Input C C1 C2 C3 A B Main Power Block Speaker Block RNS150 Pinouts Tech Supplement March 2000...

Страница 93: ...ll in black when all are totally black calibration is complete Tip Try to make several turns and follow roads that curve do not drive on a straight road www blaupunkt com TravelPilot is a registered t...

Страница 94: ...arious functions as described under each feature 8 OK Input key to accept selected feature 9 ESC Escape key to quit menus 10 AUD Input key to activate audio menu see Tone 11 DSC Input key to activate...

Страница 95: ...OK A8 To adjust a selected item press rocker switch A7 to increase decrease setting and press OK A8 To toggle a selected item select again To access next previous page of a Menu press rocker switch A7...

Страница 96: ...ATUS i LANGUAGE i 5 TIME TIME FORMAT 24h TIME ZONE 1 SUMMER TIME OFF GPS TIME 10 06h SYS TIME 11 06h i Tip Selecting English Imperial displays distance in miles After selecting a language system loads...

Страница 97: ...n To access next previous page of a Menu press rocker switch A7 to highlight and press OK A8 To return to previous menu press ESC A9 CODE ENTRY If security code is enabled and battery is disconnected...

Страница 98: ...is currently located on and north compass heading DEST MEMORY Displays DEST MEMORY Menu for storing destination see Destination Memory Storing GPS STATUS Displays latitude and longitude of vehicle pos...

Страница 99: ...ntry further refines name on edit list line 13 2 DEST ENTRY DEST MEMORY TOWN STREET TOWN CENTRE SPECIAL DESTS i DEST ENTRY DEST SURROUND INTERSECTION HOUSE NUMBER POSITION MARK i 4 DEST MEMORY CHANGE...

Страница 100: ...me Line Displays remaining driving time to estimated time of arrival at destination as selected in route options To cancel route guidance press ESC A9 ar enter new destination Tip Route guidance data...

Страница 101: ...7 to mark FROM use to enter distance from current position to begin detour then use to mark TO and use to enter distance from current position to end detour select OK and press OK A8 Entering Route Op...

Страница 102: ...ffic announcements display of track and time or track only and provides access to setup With CD function active press DSC A11 CD DSC Menu 3 displayed To control a function repeatedly press softkey for...

Страница 103: ...verse audibly to stop press rocker switch A7 in any direction To select next track up down on rocker switch A7 press CD will select next track repeat current or select previous track To select differe...

Страница 104: ...name and press OK A8 character appears on Name line 3 Repeat to select remainder of name up to 7 characters For additional characters mark 15 and press OK A8 each press sequences another line of char...

Страница 105: ...2 1 Main Tuner Menu Tuner Functions Menu 97 1mhz i 8 TP FM1 TA 96 7mhz 101 3mhz 95 1mhz 92 7mhz 93 9mhz 103 5mhz 97 1mhz i 8 TP FM1 TA T STORE AM FMT FM1 FM2 SCAN 3 Tuner DSC Menu 97 1mhz i 8 TP FM1 T...

Страница 106: ...ess to select different preset groups for radio or next previous track disk for CD CD changer 1 FM TONE BASS TREBLE BALANCE FADER LOUD i 3 Volume control Press V V to increase decrease volume 4 Mute P...

Страница 107: ...e made A connection to the vehicle s Reverse Light must be made The GPS antenna must be used properly YOU MUST CALIBRATE THE UNIT BEFORE THE CUSTOMER LEAVES YOUR SHOP If there are any questions on how...

Страница 108: ......

Страница 109: ......

Страница 110: ......

Страница 111: ......

Страница 112: ......

Отзывы: