2
8
1.
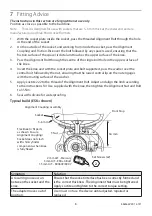
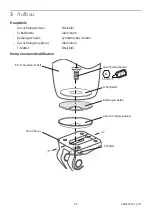
With the socket plate inside the socket, pass the threaded Alignment Bolt through the hole
in the end of the socket.
2.
On the outside of the socket, and working from inside the socket, pass the Alignment
Coupling and Friction Disk over the bolt followed by any spacers used, ensuring that the
friction surface of the spacer is distal and touches the upper surface of the knee.
3.
Pass the Alignment Bolt through the centre of the single bolt hole in the upper surface of
the knee.
4.
Invert the knee and with the socket plate and bolt supported, pass the washer over the
central bolt followed by the nut, ensuring that the raised central lip on the nut engages
with the mating surface of the washer.
5.
Apply Loctite 222 to the thread of the Alignment Bolt. Adjust and align the limb according
to the Instructions For Use supplied with the knee, then tighten the Alignment Nut and Bolt
to 35 Nm.
6.
Seal with silicone for waterproofing.
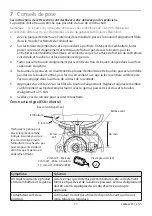
Typical build (ESK+ shown)
Symptom
Solution
A recurring noise occurs
between the socket and the
knee.
Ensure that the socket interface has been correctly formed and
is the correct thickness. The Alignment Nut must be tightened.
Apply Loctite and tighten to the correct torque setting.
The adapter moves out of
position.
User must not use the device until adjusted, repaired or
replaced.
The instructions in this section are for practitioner use only.
Position as close as possible to the build line.
Note… This kit is designed for use with sockets that are 5–6 mm thick at the distal end and are
manufactured using Blatchford socket formers.
Alignment Coupling Assembly
T-Nut
Front Stop
56 mm
Set Screws (x2)
LOCTITE
222
Flex knee to fit parts
as shown. Ensure
Alignment Coupling/
Socket does not clash
with shin/cylinder
components when knee
is fully flexed.
2 mm A/F - Mercury
3 mm A/F - ESK+ 4 Bolt
1.5 mm A/F - KX06V2/KX07
Socket
5–6 mm
7
Fitting Advice
938265PK1/1-0121
Содержание 239032
Страница 83: ...83 938265PK1 1 0121...


