


OBLASTRAC
THE
INNOVATORS
IN
SURFACE PREPARATION
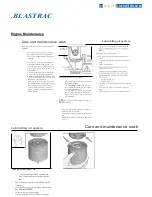
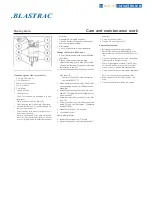
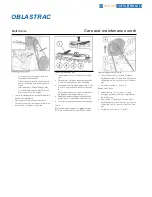
Belt drives
Care and maintenance work
Only carry
out
work
on
the
belt drive
with
the
engine
at a
standstill!
A
l
ways change both belts in se
ts in
case
o
f
wear on
the double belts
or da
m
ageto
one
V-belt.
After
repa
ir
work:
Check that
all guards
have
been
replaced and that
all
tools have
been
removed
from the
engine
.
•
Check
t
he
who
l
e belt drive visually for damag
.
e
•
Renew damaged parts.
•
Remount protective devices if
nece
ssary
.
•
Pay attention
to
correct frt of
new
be
l
ts,
check
t
he
tens
i
on after
ru
nning
for
1
5
min
utes.
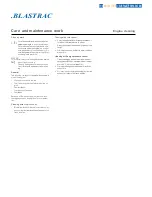
•
L
ow
er
indicator arm
(1)
into
the
measuring
de-
vice.
•
Place
guide
(3)
between
two
be
l
t
pu
lleys
on
t
h
e
V-belt (2). The
stop
have
to
be at
t
he
side
.
•
Pres
s t
h
e b
utt
on
(
4
)
a
t
ri
gh
t angl
es
to
the V-belt
(2) evenly until
you hear or fee
l
the spring snap
in
.
•
Lift
t
he
measuring
device
ca
refull
y
w
i
t
hout
a
lt
er-
ing the
pos
itionof
t
he indicator
arm (1)
.
•
Read the
meas
ur
ed val
u
e
at
the poi
nt
of inter-
section (arrow),
scale
(
5) and
in
dicator a
rm
(
1
).
•
I
f
necessa
ry
,
re
-
tension
belt
and
measure again
.
Tools
Be
lt
tension measuring device
(order
number:
8115) can
be
obtained
from
your DEUTZ partner.
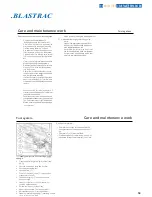
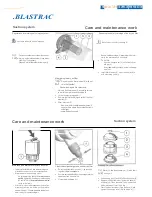
•
Loosen
the sc
rew(1),
(2)
and
(3)
slightly
.
•
Push
t
he generator
(4)
outwards
in
the
d
ir
ection
of the arrow
until you get the
correct
V
-b
elt
ten
-
sion
.
•
Retighten
t
he
screw
(1), (2)
and
(3)
.
Renew the V-be
lts
•
Loo
sen
t
he
screw
(1
)
,
(2) and (3) slightly
.
•
Swing
th
e
ge
ne
rator
(
4
)
in in t
he
oppos
t
i
e d
ir
e
c-
tio
n
to
t
he arrow
.
•
Remove
t
h
e V-be
lt
(5) and
fit
a new V-belt
.
•
Push
the ge
nerator(4)
outwards
in
the
di
rect
io
n
of
t
he
arrow
until
you
ge
t
the
co
rrect
V-belt
ten
-
sion.
•
Retighten
the
screw
(1), (
2
)
and
(3).
Checking the bel
t
tension
Tighten the
generator V
-
belts
Содержание 1-16DB4-V2
Страница 1: ...SERVICE MANUAL 1 16 DB4 V2 VERSION 1 1 www blastrac com 1 800 256 3440...
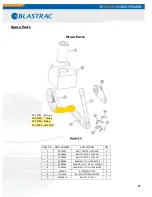
Страница 11: ...Tie Down Locations There are 4 tie down locations as show below Front Tie Downs Side Tie Downs 11...
Страница 36: ...Check for leaks after starting theengine...
Страница 38: ...35...
Страница 40: ...36...
Страница 42: ...37...
Страница 44: ...38...
Страница 46: ...39...
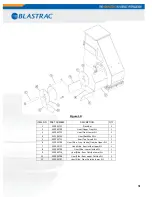
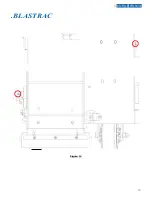
Страница 50: ...BLASTRAC RS IN SURFACE PREPARATION Figure 12 43...
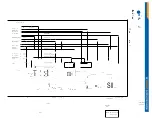
Страница 52: ...1 4 A W G F u l l l l e T o F J 1 R e d 1 2 A l G T 0 P I P n d er SW i1ch NJO S e n d e r S w i t c h N J C...
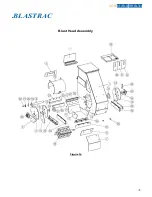
Страница 57: ...BLASTRAC VATORS IN SURFACE PREPARATION Blast Head Assembly Figure 14 48...