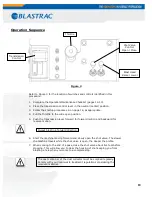

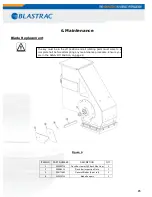
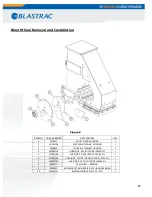


1.
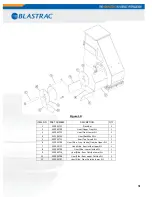
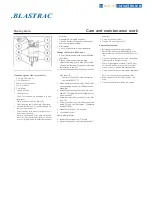
Bearing Collar:
Remove the two hex head set screws on each of the two bearing collars.
2.
Outside Blast Wheel Bearing:
a. Remove the three nuts holding the bearing, Item #4.
b. Pry the bearing off of the shaft.
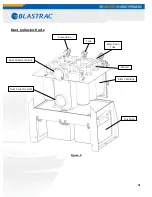
3.
Access Plate:
a. Remove the two nuts which connect the access plate, Item #5, to the housing.
b. Remove the nut in the center of the plate which holds the outside rear/lower
side liner in place.
c. Remove the inspection plate.
d. Remove the lower liner, Item #7.
4.
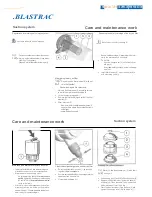
Cover Plate:
a. Remove the five nuts which connect the cover plate, Item #6, to the housing.
b. Remove the cover plate.
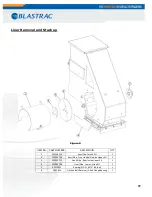
5.
Side Liners:
Remove the outside side liners, Items #8 and #9. The side liners may be firmly in
place and may require the use of a pry bar to be removed.
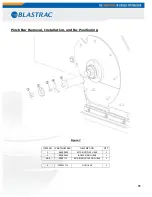
6.
Blast Wheel:
a. Slide the shaft seal, Item #11, and the bolt retainer, Item #12, off of the blast
wheel shaft.
b. Remove the blast wheel drum by pulling the drum shaft through the inside
bearing.
Note: If the drum shaft is resistant to coming through the bearing, you may use a block
of wood and a hammer to force it through.
7.
Blast Wheel Installation:
Reverse steps 1-6 to install a new blast wheel.
28
Содержание 1-16DB4-V2
Страница 1: ...SERVICE MANUAL 1 16 DB4 V2 VERSION 1 1 www blastrac com 1 800 256 3440...
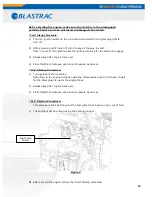
Страница 11: ...Tie Down Locations There are 4 tie down locations as show below Front Tie Downs Side Tie Downs 11...
Страница 36: ...Check for leaks after starting theengine...
Страница 38: ...35...
Страница 40: ...36...
Страница 42: ...37...
Страница 44: ...38...
Страница 46: ...39...
Страница 50: ...BLASTRAC RS IN SURFACE PREPARATION Figure 12 43...
Страница 52: ...1 4 A W G F u l l l l e T o F J 1 R e d 1 2 A l G T 0 P I P n d er SW i1ch NJO S e n d e r S w i t c h N J C...
Страница 57: ...BLASTRAC VATORS IN SURFACE PREPARATION Blast Head Assembly Figure 14 48...