background image

64

www.digiop.com

SECTION 9: UMS MULTI CLIENT SOFTWARE

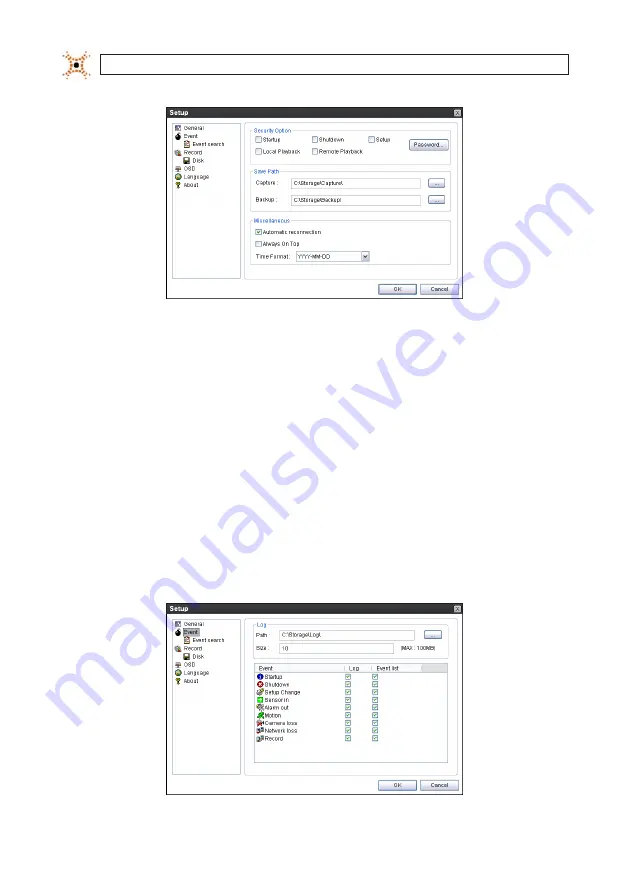
General options include: 

• 

Security Option

: Set a password for security options. If set, you must enter the password when accessing any of the security 

functions. 

• 

Save Path

: Specify the location backup and still image captures are saved. 

• 

Automatic Reconnection

: If a user selects this function, the client will automatically try to reconnect to the previously 

connected IP address if the network connection is lost.

• 

Display Network Statistics

: The client can display network status, bit rate and frame rate. 

• 

Time Format

: Select the format for displaying the time. 

After entering all fields in the 

Site Additions

 window, click 

OK

 to save your entries and exit the Setup menus. 

9.4.2  Event Setup

To open the Event menu, click the 

Event

 entry in the left frame of the 

Setup

 window. The Event menu allows you to configure how 

the client will display and log event information received from the DVR. 

Содержание BLK-DH200400D

Страница 1: ...Manual Products BLK DH200400D BLK DH200800D BLK DH201600D PLEASE READ THIS MANUAL BEFORE USING YOUR RECORDER and always follow the instructions for safety and proper use Save this manual for future reference BLK DH20xx00D_RM 8 3 11 ...

Страница 2: ...check and comply with all applicable local state and federal laws and regulations before engaging in any form of surveillance or any transmission of radio frequencies Microsoft Windows Windows Media and Internet Explorer are either registered trademarks or trademarks of Microsoft Corporation in the United States and or other countries Android is a trademark of Google Inc Use of this trademark is s...

Страница 3: ...5 3 4 2 SPOT OUT setup 16 3 4 3 PTZ Setup 16 3 4 4 MOTION ZONE Setup 17 3 5 STORAGE menu 18 3 6 SYSTEM menu 19 3 7 SECURITY menu 22 3 8 NETWORK menu 23 3 8 1 DHCP networks 25 3 8 2 ADSL PPPoE networks 25 3 8 3 LAN networks 26 3 8 4 DDNS option 26 3 8 5 Network ports 27 3 8 6 Network stream 28 3 8 7 CONFIG menu 28 3 9 Save setup 30 SECTION 4 Live Search and Playback 31 4 1 SEARCH menu 33 4 1 1 TIME...

Страница 4: ...2 Site Setup 49 8 4 3 Event Setup 50 8 4 4 Event Search Setup 51 8 4 5 Record Setup 52 8 4 6 Record Disk Setup 52 8 4 7 Language Setup 53 8 5 Connecting to a DVR 53 8 5 1 Bidirectional Audio 54 8 6 Remote Search mode and functions 54 8 6 1 Searching for and playing video recorded by the DVR 56 8 6 2 Backing up video from the DVR on the UMS Single Client PC 57 8 6 3 Image capture 59 SECTION 9 UMS M...

Страница 5: ...4 9 7 1 AVI backup during playback 75 SECTION 10 WebViewer 77 10 1 Connecting to the DVR with IE 77 10 2 Setup 82 10 2 1 Setup Display 82 10 2 2 Setup Record 83 10 2 3 Setup Device 83 10 2 4 Setup Storage 85 10 2 5 Setup System 85 10 2 6 Setup Security 87 10 2 7 Setup Network 88 10 3 DVR Search 88 10 3 1 Playing recorded video 90 10 4 Backup recorded video 90 10 4 1 Capture 91 SECTION 11 Specifica...

Страница 6: ...vi www digiop com ...

Страница 7: ...ly operator interface Record scheduler Software upgradable Backup via USB flash drive Network or DVD R W Exclusive file format backup AVI backup Network Access via WebViewer embedded browser based client UMS Client for monitoring a single DVR UMS Multi Client for monitoring multiple DVRs concurrently and smartphone apps for Apple iPhone and Android Your DVR includes DVR with DVD R W drive and hard...

Страница 8: ...otion is detected D NETWORK Indicates that a network client is connected E BACKUP Indicates that a USB or DVD R W storage device is storing images or video F POWER Indicates that the system is switched on Table 2 Front Panel Buttons No Name Description 1 Channel keys For channel 10 press the 0 key For channel 11 press the 10 and 1 key For channel 16 press the 10 and 6 key 2 Press to rewind the vid...

Страница 9: ...ns 14 BACKUP Press to capture live or playback mode video in JPEG format 15 t LEFT Press to move left or to change the values in Setup mode When entering a password it inserts a 4 16 p UP Press to move up the menu in Setup mode When entering a password it inserts a 1 17 u RIGHT Press to move right or to change the values in Setup mode When entering a password it inserts a 2 18 q DOWN Press to move...

Страница 10: ...rs No Name Description 1 VIDEO IN 16 connectors for video input 2 CVBS Spot out 1 Live view screen Spot out 2 One channel screen with an event image 3 AUDIO IN 4 RCA connectors for audio input 4 AUDIO OUT RCA connector for audio output 5 VGA Connector for a VGA monitor 6 RS 232 For factory use only SECTION 2 HARDWARE OVERVIEW ...

Страница 11: ...ING FAN 2 3 Remote Control TypicalRemoteControl NOTE TheremotecontrolprovidedwithyourDVRmayappeardifferentfromtheoneshownabove However thebuttonsfunctionas describedinthetablebelow Table 4 Remote Control Button Functions No Name Function 1 ID When a remote control ID number is setup in DVR press this button before the number 2 REC To start and stop manual recording 3 0 9 To select channel 1 2 3 or...

Страница 12: ...tems or select a channel 10 SETUP To open the SETUP menu 11 SEARCH To go to the SEARCH menu 12 ESC During setup To return to the previous menu screen During playback To exit playback mode System lock To lock a system when pressing ESC button for 5 seconds System unlock To unlock a system when pressing ESC button for 5 seconds 13 BACKUP To start a backup operations in live or playback mode 14 SEQ T...

Страница 13: ...ime the following messages appear After the initialization sequence completes select your preferred language and set the date and time When the Set date and time window opens use the dropdown lists to show the correct date and time then click Finish The date and time setting is used to timestamp recordings SECTION 3 SYSTEM SETUP ...

Страница 14: ...hen click the Setup entry in the pop up menu A LOG IN window will open 2 In the LOG IN window open the virtual keyboard and enter the PASSWORD or use the direction buttons on the front panel The default password is 1111 For improved security DIGIOP recommends that you change the password at this time You can select a new password through the SECURITY tab in the SETUP menu SECTION 3 SYSTEM SETUP ...

Страница 15: ...buttons in the upper right corner of the window Open a menu by clicking the tab To close the window click Cancel To save changes made to the menus before closing the window click OK The SETUP menus include the following tabs DISPLAY RECORD DEVICE STORAGE SYSTEM SECURITY NETWORK CONFIG QUICK SETUP For a summary of the elements in each SETUP submenu tab refer to Appendix C SECTION 3 SYSTEM SETUP ...

Страница 16: ...lowingdescriptionsoftheSETUPmenus theinstructionsfornavigatingthesystemincludesuseofthefrontpanel buttonsonly Usingamouseformenunavigationandsetupof systemoptionscanbeeasierandfaster 3 2 DISPLAY menu Opening the SETUP menu or clicking the DISPLAY tab opens the DISPLAY menu Open Submenu Button Table 5 DISPLAY menu options Item Description OSD Enable disable the on screen display OSD CONTRAST Set th...

Страница 17: ...s and close the window NAME Specify the channel name Press SEL to open the virtual keyboard use the p q t and u buttons and SEL button to enter the channel name Highlight the OK button and press SEL to confirm the settings and close the keyboard window The channel name can have 10 characters at most COVERT Enable disable display of the specified video channel in live display mode BRIGHTNESS Change...

Страница 18: ...the window RESOLUTION Select either CIF Half D1 or D1 using the p q t and u buttons FRAME RATE Set the frame rate for the specified channel The sum of the frame rate values from each channel cannot exceed the maximum frame rates for a specific recording resolution The maximum video frame rate is 120 fps QUALITY Select the recording quality for the specified channel Options are Network Standard Hig...

Страница 19: ...ns to highlight a record type None Continuous Motion Sensor then press SEL to select it Use the p q t andu buttons to highlight a timeslot in the schedule then press SEL to apply the record type to that timeslot Repeat this to apply other record types to other time slots Select the ALL option to apply the schedule to all cameras channels You can select or deselect any option by clicking it with a ...

Страница 20: ...EVICE menu Clicking the DEVICE tab opens the DEVICE menu To return to SETUP menu press the ESC button Table 7 Menu Items in Device Setup Screen Item Description VIDEO OUT Opens a submenu to select the VGA video resolution 1024 x 768 or 1280 x 1024 ...

Страница 21: ...remote control 1 Select ID number 2 On the remote control press the same number as the ID set in the DVR 3 An icon will be displayed on Live screen that corresponds to the remote control 0 99 SENSOR Select sensor number 1 4 TYPE Set the type of sensor for the specified channel OFF N O normal open N C normal closed 3 4 1 ALARM OUT submenu Table 8 Menu Item in ALARM OUT Setup Screen Item Description...

Страница 22: ...me for the event activated channel 1 10 sec SEQUENCE Enable disable sequential display of spot channel s in full screen If ON is selected the spot channel is displayed SEQUENCE DWELL TIME Set the dwell time for the spot channel display 1 10 sec SPOT CHANNEL Select a channel for spot monitoring Press SEL and select channel using the p q t and u buttons then press SEL 3 4 3 PTZ Setup To control the ...

Страница 23: ...Channel connected to a PTZ device NAME Protocol type SPEED 19200 14400 9600 4800 2400 ID 0 63 3 4 4 MOTION ZONE Setup Select MOTION ZONE using the p q t andu buttons select either PARTIAL ZONE or FULL ZONE then press SEL FULL ZONE The motion sensor is active on the whole screen Set the level of sensitivity for MOTION SENSITIVITY PARTIAL ZONE The motion sensor is active in the set detection frame h...

Страница 24: ...b opens the storage menu Navigate through the menu items using the p q t andu buttons press SEL to select the item use the p q t andu buttons to change the value then press SEL again to confirm that value Move to the next item you want to change using the p q t andu buttons To return to setup menu screen press ESC ...

Страница 25: ...ay need before formatting the disk DISK INFO Hard drive information RECORDING LIMIT Enable disable a recording limit RECORDING LIMIT DAYS Set the recording limit in days 1 90 days If set to 1 day data older than 24 hours will be removed S M A R T Use to set the HDD temperature limit 3 6 SYSTEM menu Clicking the SYSTEM tab opens the system menu Navigate through the menu items using the p q t andu b...

Страница 26: ... Press the SEL button to view system information hardware version software version storage size IP address MAC address and DDNS status LANGUAGE Select the display language using the p q t and u buttons When a language is selected the screen language changes Options include English Korean Japanese SP Chinese TR Chinese Czech Finnish French Greek Italian Dutch Norse Russian Spanish Turkish Polish Da...

Страница 27: ...SA nor EU set the BEGIN and END date and time of the daylight saving period using the p q t and u buttons then press the SEL button Press the ESC button to return to SET DATE TIME setup menu CAUTION Do not set the start time to 23 00 for DLS DLS can t be applied if the date of BEGIN and END is the same CLIENT ACCESS Enable Disable remote access through network client software BANDWIDTH SAVING Enab...

Страница 28: ...me server connection mode INTERVAL TIME INTERVAL Synchronize the clock by hours shown on the connection period option TIME Synchronize the clock at the time daily shown on the connection period menu CONNECTION PERIOD 1 24 3 7 SECURITY menu Clicking the SECURITY tab opens the security menu Navigate through the menu items using the p q t andu buttons press SEL to select the item use the p q t andu b...

Страница 29: ...al keyboard for each subsequent entry to specify the passwords Move to the OK button and press SEL to confirm the settings and return to the SECURITY menu The message PASSWORD CHANGED will be displayed The factory default password is 1111 NOTE Forimprovedsystemsecurity itisstronglyrecommendedthatyouchangethefactorydefaultpasswordduringtheinitialsetup ofyoursystem 3 8 NETWORK menu Clicking the SECU...

Страница 30: ...it is manually change GATEWAY Enter the Gateway IP address assigned for the DVR SUBNET MASK Enter the Subnet Mask for the subnet where the DVR is connected DDNS Enable disable use of a domain name server through which you access the DVR If ON the DDNS server name appears in the field DDNS 1 Select one of the following DDNS servers in USA use www ddnscenter com in Korea use www okddns com or if in ...

Страница 31: ...twork parameters may change ADSL and other network types that use a variable IP address method use this process to acquire an IP address 3 8 2 ADSL PPPoE networks Select the ADSL PPPoE option when the DVR is connected to a network using PPPoE Point to Point Protocol over Ethernet If the ADSL connection is not inputting the IP address and password through VDSL or if DVR is installed in IP sharer do...

Страница 32: ...odem into the Gateway field Similarly for Subnet Mask DNS address input relevant values for the IP sharer Table 14 NETWORK LAN menu options Item Description IP The fixed IP address of the DVR hardware SUBNET MASK The subnet mask for the LAN GATEWAY The IP address of the Gateway 1st DNS The IP address for the DNS server 2nd DNS The IP address for the DNS server 3 8 4 DDNS option DDNS options includ...

Страница 33: ...selection you can enter a DDNS ID and password 3 8 5 Network ports When you connect one or more DVRs to a network through an IP sharing device each DVR must be assigned a unique TCP port number for access from outside the LAN Additionally the IP sharing device must be configured to forward the assigned port to the specific DVR NOTE ThisportnumberislistednexttothePortmenuoptionintheNetworkSetupscre...

Страница 34: ...tream You can set the frame rate and bit rate for a network stream by channel The total frame rate is CIF 352 288 at 120 fps The bit rate can be set to 128 256 384 512 or 768 3 8 7 CONFIG menu Clicking the CONFIG tab opens the system configuration menu Navigate through the menu items using the p q t andu buttons press SEL to select the item use the p q t andu buttons to change the value then press...

Страница 35: ... LOAD SETUP FROM A USB You can upload the configuration of DVR to another DVR using the USB flash drive Plug the flash drive into the front panel USB port and press SEL to start the loading process LOAD DEFAULT Select ON to reset the system to the default settings The following items are not reset language DVR ID Security User Authentica tion Security User P W date format DLS settings network sett...

Страница 36: ...ETUP Item Description LOAD FACTORY DEFAULT Select ON to reset the system to the factory default settings 3 9 Save setup When configuration changes are made a SAVE SETUP confirmation window will open Select YES to save the changes you made ...

Страница 37: ...re displayed the On screen display OSD features as configured in the Display Setup screen OSD icons that indicate the status of the DVR are shown along the bottom of the screen Table 16 Status Indicator Icons in Live Viewing Screen Icon Description Power On Off button Lock Unlock SETUP button Setup button Click this button to open the SETUP menu ...

Страница 38: ...click this button to stop reporting the alarm Click the split screen icon to change the current split screen mode The current date and time Remote control ID display If a remote ID is not set the message A all is displayed Displays the amount of recording space used on the hard disk from 0 99 Indicates that HDD is recycled full and overwriting oldest data with new data Continuous recording in prog...

Страница 39: ...he video channel this icon will be highlighted bright red Indicates that a network client is connected to the DVR Indicates that sequencing mode is enabled OSD menu You can open the on screen display menu with the mouse by right clicking anywhere on the Live screen Options in the OSD menu are also represented by the icons in the tray at the bottom of the screen 4 1 SEARCH menu To open the SEARCH m...

Страница 40: ... ARCHIVE and LOG 4 1 1 TIME LINE search The TIME LINE search window is used to find stored video by using the time line bar Select TIME LINE in the SEARCH menu then select NEXT A calendar window will open The highlighted days in the calendar window indicate that data was recorded at that time The day selected is highlighted blue Select the day of interest then select NEXT ...

Страница 41: ...ns To stop the video playback press the ESC button on the front panel 4 1 2 EVENT search Use EVENT search to quickly find recordings associated with specific events To open the EVENT search window select EVENT on the SEARCH window then select NEXT A calendar window will open see above The highlighted days in the calendar window indicate that video was recorded at that time Select the day of intere...

Страница 42: ... minute recorded data on the DVR by selecting GO TO LAST TME on the SEARCH window Press the ESC to return to the SEARCH window 4 1 5 GO TO SPECIFIC TIME search In the SEARCH window select GO TO SPECIFIC TIME then use the p q t and u buttons to enter the starting time of the video you want to play To stop playing video press ESC If no video was recorded at the time you entered a NO DATA EXIST messa...

Страница 43: ... the ARCHIVE IMAGE window select the media location and format of the archive To close the ARCHIVE IMAGE window press ESC 4 3 PLAY mode Playing a recorded event changes the DVR mode from SEARCH to PLAY While in PLAY mode you can return to the SEARCH screen by pressing the ESC button Playback controls are located at the bottom of the screen ...

Страница 44: ... 8 x normal or 16x 16 x normal The speed is displayed in the lower right corner of the screen t Jump step backward The playback position moves 60 seconds back u II Select to play or pause a recording u Jump step forward Playback position moves 60 seconds ahead u u Select to fast forward the recording at 1x 1 x normal 2x 2 x normal 4x 4 x normal 8x 8 x normal or 16x 16 x normal The speed is display...

Страница 45: ...are Right Left UP Down Select Far REW KEY and Near FF KEY Press the ESC button to return to the previous menu Press the PTZ button to close the OSD menu AUTOSCAN Press the right key u to start auto scan Press the left key t to stop auto scan PRESET Select PRESET then press the left key t A number input window will appear Set the number 3 digits using the number key then press the SEL to confirm th...

Страница 46: ...to a USB flash drive insert the drive into the USB port on the back or front of the DVR If you want to backup to a CD or DVD place a blank CD R W or DVD R W disk into the DVD drive 3 Select BACKUP When the backup is complete a message will appear When the DVR backs up to a USB flash drive it will create a directory on the flash drive with a date coded named in the format YYYYMMDD ex 20110210 and w...

Страница 47: ...rectory on the flash drive with a date coded named in the format YYYYMMDD ex 20110210 and write the file there 6 3 Copy still images or video from the ARCHIVE list Video clips and images stored in the ARCHIVE list on your hard drive can be copied to a USB flash drive or a CD DVD To perform the copy 1 Use the p q t u and SEL buttons to open the SEARCH window and select ARCHIVE A calendar window wil...

Страница 48: ...ant to backup to a CD or DVD place a CD R W or DVD R W disk into the DVD drive 5 Select BACKUP to copy the file to the media drive 6 When the backup is complete select CLOSE button to return to the LOG list window 6 4 Playing backed up video clips Video clips are backed up from the DVR in AVI format These files can be played in Microsoft Windows with Window Media Player and other players compatibl...

Страница 49: ...ontact DIGIOP Support at 1 877 972 2522 To upgrade the firmware in your DVR 1 Obtain the firmware update file from DIGIOP Support The firmware upgrade file is usually named apph_xxxxxx bin where xxxxxx represents the revision level of the firmware 2 Plug a USB flash drive into a PC and format it for FAT32 if necessary 3 Create a new directory on the flash drive named upgrade 4 Copy the firmware fi...

Страница 50: ...rd Enter 12341234 then select OK 10 Return to the USER PASSWORD window and select OK The DVR will restart and open a Diagnostics screen 11 In the Diagnostic screen menu select USB Upgrade NOTE ToexittheDiagnosticsscreenandrestarttheDVR select BootApplication intheDiagnosticmenu 12 Follow the on screen instructions to install the firmware upgrade After the upgrade is completed select Boot Applicati...

Страница 51: ...raccesstheDVRatatime 8 1 PC Requirements For the UMS Single Client software the minimum PC requirements are CPU Intel Pentium IV 1 4 GHz or higher Memory 512MB 1GB or larger is recommended VGA memory 16 MB 64 MB or larger is recommended Resolution 1024 x 768 Supported operating systems Microsoft Windows 2000 XP Professional XP Home DirectX DirectX 8 1 or higher 8 2 Installing the UMS Single Client...

Страница 52: ... will open 4 Select a Program Folder for the Start menu then click Next The UMS client will be installed and a UMS Client icon will appear on the desktop 5 Close the InstallShield window 8 3 UMS Single Client initial display To open the UMS Single Client double click the icon on the desktop or open it through the Windows Start menu ...

Страница 53: ... window expanding window to full screen and closing the window DATE TIME Displays the current date and time CONNECT DISCONNECT Connect disconnect a DVR SEARCH Switches from Live mode to Search mode KEYPAD Select a channel Click the channel button or double click the channel on the Live view screen SPLIT SCREEN MODE Select a split screen mode 4 9 or 16 channel display PAN TILT ZOOM FOCUS Control th...

Страница 54: ...GE DVR HDD space used Indicator NETWORK BANDWIDTH Shows the transferred frames and network bandwidth AUDIO Adjust the volume Audio is on or muted by clicking the speaker icon LOG WINDOW 8 4 Setup The UMS Single Client includes several setup options including presets for the DVRs you want to connect to To open the setup menus click the Setup button 8 4 1 General Setup When the Setup menu is opened ...

Страница 55: ...e network connection is lost Display Network Statistics The client can display network status bit rate and frame rate Time Format Select the format for displaying the time After entering all fields in the Site Additions window click OK to save your entries and exit the Setup menus 8 4 2 Site Setup To open the Site menu click the Site entry in the left frame of the Setup window Initially no site DV...

Страница 56: ...R The default DVR port number is 5445 ID Enter your login ID login name PASSWORD Enter the password associated with the login ID The default login ID and password are Admin and 1111 Channels Enter the number of channels supported by your DVR 4 8 or 16 After entering all fields in the Site Additions menu click OK to save your entries and exit the Setup menus 8 4 3 Event Setup To open the Event menu...

Страница 57: ...the event on live video Event List For each event type select the checkbox to show the event in the Event List in live mode After entering all fields in the Site Additions menu click OK to save your entries and exit the Setup menus 8 4 4 Event Search Setup The Event Search window is used to display a list of the logged events that occurred during a specified time period Use the dropdown lists to c...

Страница 58: ...rd Condition Select Always or Event then Auto record Event If Event was selected as the Record Condition select the type of event and the duration of the recording Channels Select the channels to be recorded during the conditions selected above After entering all fields in the Record menu click OK to save your entries and exit the Setup menus 8 4 6 Record Disk Setup To open the Record Disk menu cl...

Страница 59: ... open the Language menu click the Language entry in the left frame of the Setup window Choose the preferred on screen language from the dropdown list then click OK to save the selection and close the Setup menu 8 5 Connecting to a DVR To connect to a DVR click the Connect button The Connect dialog window will open The Connect window is filled by the entry made in the Setup Site menu In the Connect...

Страница 60: ... have a microphone and speakers At the DVR connect a microphone to the audio in connectors and a pair of amplified speakers to the audio out connectors 8 6 Remote Search mode and functions After connecting to the DVR the UMS Single Client can be used to search for and playback recorded video Video clips can then be backed up to a USB drive or local hard disk To open the Search screen click the Sea...

Страница 61: ...return to normal viewing minimizing the window expanding window to full screen and closing the window DATE TIME Displays the current date and time CONNECT DISCONNECT Connect disconnect network connection LIVE Switches from search mode to live mode KEYPAD Select a channel Click the channel button or double click the channel on the live view screen SPLIT SCREEN MODE Select a split screen mode 4 9 or...

Страница 62: ...he calendar frame Time spans when video is recorded are marked in blue To expand the display for an hour when video was recorded drag the marker to the hour you want to expand then click the 0 60 button located below the time line PLAYBACK BUTTONS Use the playback buttons to control video playback The playback buttons are labeled with the standard icons used for video play control 8 6 1 Searching ...

Страница 63: ...ideo was recorded 4 Drag the marker on the timeline to the time at which you want to play recorded video Marker To expand the hour within which the marker lies click the 0 60 button below the time line 5 Play the video to determine the time where you want to start backing up a clip then pause the playback and click the MARK IN button 6 Continue playing the video to determine the time where you wan...

Страница 64: ...he BACKUP button The Backup menu window will open 9 In the Backup menu select the options you want then click OK 10 A pop up window will appear when the backup operation is complete Click OK to close the backup operation NOTE Videobackupcantakeseveralminutestocomplete dependingonthenumberofchannelsselectedandthedurationoftheclip ...

Страница 65: ...een can be captured in either Live mode or Search mode then saved as a BMP or JPEG file To capture a still image of the screen click the Capture button A Capture menu will open In the Capture menu select the options you want then click OK An image of the screen will be saved at the location you specified ...

Страница 66: ...lti Client software the minimum PC requirements are CPU Intel Pentium IV 2GHz or faster Memory 512MB 1GB or larger is recommended VGA memory 16MB 64MB or larger is recommended Resolution 1024 x 768 Disk space 1GB Supported operating systems Microsoft Windows 2000 XP Professional XP Home Vista Some versions of Windows Vista are incompatible Contact DIGIOP for more information Network 10 100BaseT ne...

Страница 67: ...d 4 Select a Program Folder for the Start menu then click Next The UMS Multi Client will be installed and a UMS Multi Client icon will be displayed on the desktop 5 Close the InstallShield window 9 3 UMS Multi Client initial display To open the UMS Multi Client double click the icon on the desktop or open it through the Windows Start menu ...

Страница 68: ...orded on the local PC SEARCH REMOTE Search for video files recorded on the DVR SITE CONTROLS Applies control to sites selected in the site list below These icons link to refresh thumbnail site addition site delete net finder site modify SITE LIST List of sites added to the DVR The site list appears in the pane beneath the site controls icons CONNECT Click to connect to sites selected in the frame ...

Страница 69: ... and microphone PTZ FOCUS ZOOM Buttons for controlling PTZ camera focus and zoom in out PTZ PAN TILT Buttons for controlling PTZ camera pan t u and tilt p q CHANNEL SPLIT Use to select the number of channels 1 4 9 16 shown on the screen SITE SPLIT Use to select the number of DVRs 1 4 9 16 shown on the screen 9 4 Setup The UMS Multi Client includes several setup options To open the setup menus clic...

Страница 70: ...cally try to reconnect to the previously connected IP address if the network connection is lost Display Network Statistics The client can display network status bit rate and frame rate Time Format Select the format for displaying the time After entering all fields in the Site Additions window click OK to save your entries and exit the Setup menus 9 4 2 Event Setup To open the Event menu click the ...

Страница 71: ...Site Additions menu click OK to save your entries and exit the Setup menus 9 4 3 Event Search Setup The Event Search window is used to display a list of the logged events that occurred during a specified time period Use the drop down lists to choose the From and To times then browse to the location of the log file To save the list of events to another file click Save An event timestamp can be used...

Страница 72: ...he Record menu click OK to save your entries and exit the Setup menus 9 4 5 Record Disk Setup To open the Record Disk menu click the Disk entry in the left frame of the Setup window The Disk menu allows you to select the location where recorded data is saved and the amount of space on the disk to allocate for recordings In the Disk menu select the storage drive from the dropdown list then enter th...

Страница 73: ...figured differently After selecting the preferred options in the OSD menu for each site click OK to save your entries and exit the Setup menus 9 4 7 Language Setup To open the Language menu click the Language entry in the left frame of the Setup window Choose the preferred on screen language from the dropdown list then click OK to save the selection and close the Setup menu 9 5 Connecting to a DVR...

Страница 74: ... than 80 Port No Enter the port number for the DVR The default DVR port number is 5445 ID Enter your login ID login name PASSWORD Enter the password associated with the login name The default login ID and password are Admin and 1111 3 After entering all fields in the Site Additions menu see above click OK to save your entries An entry for the DVR you added will appear in the site list frame below ...

Страница 75: ...pair of amplified speakers to the audio out connectors 9 5 2 Capture A still image of a screen can be captured in either Live mode or Search mode and saved as BMP or JPEG file To capture a still image of the screen click the Capture button A Capture menu will open In the Capture menu select the options you want then click OK An image of the screen will be saved at the location you specified By def...

Страница 76: ...ied in the Setup General menu 9 6 Remote playback and backup The UMS Multi Client can be used to search for and playback video clips in the DVR Video clips can then be backed up to a local USB drive or disk NOTE TheEventListmayprovidevaluableinformationonwhenalarmsandothereventsoccurred ToopentheEventList clickthe EventsList button 9 6 1 Remote playback To search for and recorded video from the DV...

Страница 77: ...light tan Click the date of the recorded video you want to find or play The date colored blue is the date date selected the timeline shows when data was recorded on that date TIMELINE Bar Displays a timeline for the date selected in the calendar frame Time spans when video is recorded are marked in blue To expand the display for an hour when video was recorded drag the marker to the hour you want ...

Страница 78: ... the UMS Multi Client connect to the DVR 2 Click the Remote playback button The client will change from Live mode to the Search mode 3 Select the DVR checkbox of the unit you want to see video from 4 In the calendar frame click the date when the video of interest was recorded 5 Drag the marker on the timeline to the time at which you want to play recorded video Marker To expand the hour within whi...

Страница 79: ... and click the MARK OUT button The time span between the MARK IN and MARK OUT times will be highlighted in dark green Mark In Mark Out 8 To backup the video clip click the BACKUP button The Backup menu window will open 9 In the Backup menu select the options you want then click OK 10 A pop up window will appear when the backup operation is complete Click OK to close the Backup operation NOTE Video...

Страница 80: ...se recordings 1 Click the Local playback button The playback window will open 2 In the directory frame select the site s you want to play recordings of The calendar will indicate which days have recorded video files on the local PC 3 Click the day of the recording you want to play then drag the marker to the time when video was recorded Click the 0 60 button above the timeline to expand the time s...

Страница 81: ...eration 1 Play the video file that contains the segment you want to save in AVI format See Local playback above 2 Play the video to determine the time where you want to start backing up a clip then stop the playback and click the MARK IN button 3 Continue playing the video to determine the time where you want to end the clip then stop the playback and click the MARK OUT button The time span betwee...

Страница 82: ...p up window will appear when the backup operation is complete Click OK to close the Backup operation NOTE Videobackupcantakeseveralminutestocomplete dependingonthenumberofchannelsselectedandthedurationoftheclip NOTE Ifyourmediaplayercannotplaythefilebacked upinAVIfileformat itprobablydoesn tusethecorrectCODEC Updateyour H 264CODECandretryplayingthefile ...

Страница 83: ...ple shown below the URL is the IP ADDRESS 192 168 5 3 If you are accessing your DVR remotely your DVR may be addressed as a port forwarded through the router or device that connects the network with the DVR to the Internet or through an established DDNS web service connection such as WWW OKDDNS COM Refer to WWW OKDDNS COM for more information 10 1 Connecting to the DVR with IE After your DVR is se...

Страница 84: ...he Custom Level button In the Settings list change the following settings from Disable to Prompt Download unsigned ActiveX controls Initialize and script ActiveX controls not marked as safe for scripting Click OK then click YES in the Warning window ...

Страница 85: ...sableUAC opentheControlPanel UserAccount UserAccountwindow clearthe Use User Account Control UAC to help protect your computer checkbox thenclick OK Acomputerrestartmayberequired 4 In the IE URL field enter the IP address assigned to your DVR Using the example shown above enter 192 168 5 3 5 If a message appears to load the Nadatel WebViewer click Install Follow the prompts to Install the program ...

Страница 86: ... the DVR timestamp When WebViewer is playing video it is the timestamp of the video frame CONNECT DISCONNECT Used to initiate a connection to a DVR or disconnect from a DVR SEARCH LIVE Used to switch between the search window and the live mode window CHANNEL SELECT Used to select and display one channel SPLIT SCREEN SELECT Used to select the screen split 2x2 3x3 4x4 PAUSE CAPTURE PAUSE use to free...

Страница 87: ... Webpage Dialog menu enter Server address For access across a local network WebViewer PC on the same subnet as the DVR use the DVR IP address For access from the internet use the DDNS URL if available or router modem IP address with forwarded port number Port Port number of the DVR default 5445 ID Username The default username for the DVR is Admin Password Password for the user ID For ID Admin the...

Страница 88: ...enus are similar to those in the DVR SETUP submenus refer to Section 3 for definitions To enter the Setup menus after connecting to your DVR click the Setup button To enter a submenu click the submenu name listed down the left side of the screen To exit the Setup menus click Viewer in the upper right corner of the screen 10 2 1 Setup Display Use the Display submenu to setup the sequential viewing ...

Страница 89: ...etup Record Use the Record submenu to setup the recording mode for each camera channel 10 2 3 Setup Device Use the Device submenu to setup the Device Alarm out PTZ and Spot Out configuration To enter the device submenus click the submenu entry under Device ...

Страница 90: ...84 www digiop com SECTION 10 WEBVIEWER Device Devicesubmenu Device AlarmOutsubmenu Device PTZsubmenu ...

Страница 91: ...ge submenu to setup the recording configuration of the DVR HDD 10 2 5 Setup System Use the System submenu to setup the system ID and access control Date Time Send Email configuration and NTP server access credentials To enter the System submenus click the submenu entry under System System Systemsubmenu ...

Страница 92: ...86 www digiop com SECTION 10 WEBVIEWER System Descriptionsubmenu System Date Timesubmenu System SendEmailsubmenu ...

Страница 93: ... System NTPsubmenu 10 2 6 Setup Security Use the Security submenu to setup the user IDs passwords and permissions To enter the Security submenus click the submenu entry under Security Security UserAuthenticationsubmenu Security UserPasswordsubmenu ...

Страница 94: ...ss subnet DNS DDNS configuration and ports assigned to the DVR Network Networksubmenu Network Portsubmenu 10 3 DVR Search In Search mode you can watch video recorded by your DVR backup video clips and capture still images from recorded video To switch to Search mode click the Search button on the Live mode display ...

Страница 95: ...the DVR timestamp When WebViewer is in search mode or playing video it shows the timestamp of the video frame DISCONNECT Used to initiate a connection to a DVR or disconnect from a DVR LIVE SEARCH Used to switch from the search mode window and the live mode window CHANNEL SELECT Used to select and display one channel SPLIT SCREEN SELECT Used to select the screen split 2x2 3x3 4x4 BACKUP CAPTURE BA...

Страница 96: ...1 Playing recorded video 1 Connect to the DVR see above 2 If WebViewer is in Live mode slick Search to open the Search window 3 In the calendar frame click the day when the video you want to play was recorded Sections of the timeline highlighted in red indicate that live video was recorded on that channel at that time Marker Recorded Video Available 4 On the timeline drag the marker to the time at...

Страница 97: ...s needed Select the Channel of the video from the dropdown list then click Ok to begin the backup operation A progress bar will appear showing the status of the backup Allow the backup operation to complete before continuing 5 To play the backed up video file open the file in an AVI file compatible video player 10 4 1 Capture A snapshot of the screen image can taken in live mode during pause in pl...

Страница 98: ...ensor motion and video loss Record Compression H 264 Multi Operation QUADPLEX Playback Record Network Backup Resolution D1 120 fps D1 120 fps D1 120 fps Half D1 120 fps Half D1 240 fps Half D1 240 fps CIF 120 fps CIF 240 fps CIF 480 fps Recording Quality Grade ECONOMY STANDARD HIGH SUPERIOR ULTRA Recording Mode Continuous Schedule Motion Sensor Manual Motion Detection Motion detection setup by gri...

Страница 99: ...twork Interface 10 100 1000 Base T Ethernet RJ 45 Dual Encoding for Network Streaming Yes CIF 120 100 fps Network Access Client Software 1 1 Live Search Backup PTZ camera control remote setup Web Viewer 1 1 Live Search Backup PTZ camera control Multi sites Monitoring System 1 n Live Search Backup PTZ camera control remote setup Features DLS Day Light Saving Yes Internal Beep By Alarm Motion Video ...

Страница 100: ...fer to the HDD compatibility list in Appendix C for recommended HDD models If installing an HDD use the following instructions OPENING THE DVR ENCLOSURE WILL VOID THE WARRANTY The HDD you install must be compatible with the DVR hardware Refer to the HDD compatibility list in this appendix CAUTION TheDVRmustbepoweredoffwheninstallinganHDD To install the HDD do the following 1 Power off the DVR and ...

Страница 101: ... lay it on a clean level surface 7 Remove the brackets from the HDD by removing the four HDD mounting screws 8 Attach the brackets to the new HDD using the four HDD mounting screws removed in the previous step 9 Set the HDD and bracket assembly into the HDD enclosure in the same position and orientation as the one removed 10 Reattach the brackets to the DVR chassis using the four bracket mounting ...

Страница 102: ...rveillance 250 GB 7200 RPM 8 MB ST3250318AS Barracuda 250 GB 7200 RPM 8 MB ST3160815AS Barracuda 160 GB 7200 RPM 8 MB HITACHI HDS722020ALA330 2 TB 7200 RPM 32 MB HDS721010KLA330 1 TB 7200 RPM 32 MB HDT721010SLA360 1 TB 7200 RPM 16 MB HDS721010CLA332 1 TB 7200 RPM 32 MB HDS721050CLA362 500 GB 7200 RPM 16 MB HDP725050GLA360 500 GB 7200 RPM 16 MB HDS721032CLA362 320 GB 7200 RPM 16 MB HDS721025CLA382 ...

Страница 103: ...VICE LOG APPENDIX B Device Log The following table is provided as an aid to setting up and logging the analog devices on your system Analog Camera Device Summary Channel Camera Model Audio Y N Location 1 2 3 4 5 6 7 8 9 10 11 12 13 14 15 16 ...

Страница 104: ...98 www digiop com APPENDIX C SETUP MENU COMPONENTS APPENDIX C DVR Setup Menu Components The following lists show the components in each SETUP menu tab submenu ...

Страница 105: ...99 H 264 DVR User Manual APPENDIX C SETUP MENU COMPONENTS ...

Отзывы: