13
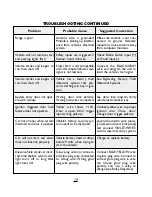
TROUBLESHOOTING CONTINUED
Problem
Range is poor.
Vehicle will not remote start
and parking lights flash.
Vehicle cranks and begins to
run, then shuts off.
Vehicle cranks and begins to
run, then shuts off.
Keyless entry does not oper-
ate with remote.
Ignition triggered door lock
feature does not operate.
Car horn honks when system
disarmed and door is opened.
Car will not start and alarm
does not function properly.
Diesel vehicle cranks at incor-
rect time (before wait-to-start
light turns off or long after
light turns off,.
Probable Cause
Antenna wire is grounded;
Module is picking up interfer-
ence from vehicle’s electrical
system.
Safety inputs are triggered. 3
flashes= hood, 4=brake.
Smart Start is not compatible
with this vehicle;Vehicle’s tach
signal is not learned.
Vehicle has a factory theft
deterrent system that pre-
vents starting w/o key in igni-
tion.
Wrong door lock polarity;
Wrong lock wires connected.
Yellow wire shows +12V;
Door is open; Door trigger
input wrong polarity.
Vehicle’s factory security sys-
tem needs to be disarmed.
Vehicle battery dead or drops
below 9 volts when trying to
start the vehicle.
Glow plug wire not connect-
ed; Glow plug wire connected
to wrong wire; Wrong glow
plug wire polarity.
Suggested Correction
Make sure antenna is not con-
nected to ground; Relocate
module or route antenna away
from computer modules.
Check Brake Switch Input (+)
or Hood Input (-).
Connect the BLACK/GRAY
wire, and program the unit to
learn the vehicle’s tach signal.
See Bypassing Factory Theft
Deterrent Systems.
See door lock diagram; Verify
vehicle lock/unlock wires.
Connect yellow wire to proper
ignition wire; Close door;
Change door trigger polarity.
Locate the disarm wire (usual-
ly located in driver’s kick panel)
and connect VIOLET/WHITE
wire to disarm factory system.
Charge or replace battery.
Connect BLUE/YELLOW wire
to glow plug wire; Connect to
correct glow plug wire in vehi-
cle; Check glow plug wire
polarity and use a relay to
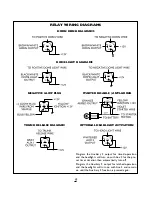
change (see Relay Diagrams).
Содержание 6150
Страница 15: ...15 INSTALLATION NOTES ...


