background image

25

PASTA FUNCTION


1 .  Place desired amount of water inside inner pot . Avoid adding more water 
 

than 10 cup water level to prevent spillage . 

2 .  Set inner pot into unit . Make sure inner pot sits directly in contact with  
 

heating plate by turning it slightly from right to left until seated properly .


Cover with lid to boil faster . 

3 .  Plug unit into appropriate electrical outlet . 
4 .  Encendido/Apagado Light will start blinking . 
5 .  Press Pasta Button and then press Encendido/Apagado Button to 
 

start boiling water . Both Pasta and Encendido/Apagado Button Lights


will be solid, indicating selected function has started . 

6 .  Once unit signal sounds, lift and remove lid carefully to avoid scalding 
 

and allow water to drip into inner pot . Add pasta to boiling water . Unit will 


cook pasta for 10 minutes . Do not cover with lid . To stir pasta, use paddle 


or another long, handheld utensil . 

7 .   Once it finishes, unit signal will sound, indicating that pasta is ready . It will 
 

automatically turn off, going back into the standby mode with the  


lights blinking . For softer pasta, keep pasta in hot water for a little longer . 


Filled pasta, like ravioli, may also need to be cooked for a longer 


period . Fresh pasta may need to be cooked for a shorter period .

NOTE: 

You can use the Steam Tray as a strainer to drain the water . 

NOTE:

 You can interrupt at any time by pressing Encendido/Apagado 

Button  . Unit will go back into standby mode with the Encendido/Apagado 
Button light blinking . Allow appliance to cool completely before cleaning . 
Disconnect plug from wall outlet when not in use .

STEAM COOKING FUNCTION

1 .   Place desired amount of water inside inner pot between the 4 and 
 

8 cups water level . 

2 .   Place foods to be steamed on steam tray .

3 .   Set inner pot into unit . Make sure inner pot sits directly in contact with 
 

heating plate by turning it slightly from right to left until seated properly . 


Cover with lid . 


WHEN USING AUTOMATIC STEAM COOKING MODE, DO NOT OPERATE 


UNIT UNCOVERED . STEAM IS GENERATED DURING USE . 

4 .  Plug unit into appropriate electrical outlet . 
5 .   Lights will start blinking . 
6 . Press Steam Cooking (Vapor) Button and then press Encendido/Apagado 
 

Button to start steam cooking process . Both Steam Cooking and Start 


Stop Button Lights will be solid indicating selected function has started . 


Place the steam tray on the inner pot when you hear the first signal . This 


signal indicates that the steam has started .  

NOTE:

 If you wish to turn foods inside steam tray, lift and remove lid carefully 

to avoid scalding and allow water to drip into steam tray . Use paddle or 
another long, handheld utensil to scoop and mix foods . When done, cover 
steam tray with lid . Use protection for your hands to avoid direct contact with 
steam being released by unit . 
7 .   Unit will signal every 15 minutes and turn off at one hour . It will then signal 
 

and go back into standby mode with the lights blinking . 

RCD628-UC-Revision B.indd   25

10/23/19   10:41 AM

Содержание RCD628B

Страница 1: ...ARROCERA DIGITAL MULTIFUNCIÓN MULTIFUNCTION DIGITAL RICE COOKER manual de uso y cuidado use and care manual RCD628B RCD628 UC Revision B indd 1 10 23 19 10 41 AM ...

Страница 2: ...rencia para cocinar a vapor 12 Mantenimiento y Limpieza 14 Información de Garantía 15 16 BIENVENIDO Felicitaciones por su compra de la Arrocera de Black Decker Hemos diseñado esta guía para asegurar un rendimiento óptimo del producto y garantizar su satisfacción completa Conserve este manual de uso y cuidado RCD628 UC Revision B indd 2 10 23 19 10 41 AM ...

Страница 3: ...a o sabiduria a menos que sean supervisadas o instruidas acerca del uso del aparato por una persona responsable de su seguridad Desenchufe el aparato del tomacorriente cuando no esté en uso y antes de limpiarlo Permita que el aparato se enfríe antes de instalarle o retirarle las piezas El aparato no está diseñado para funcionar a través de un reloj automático externo o con un sistema de control re...

Страница 4: ...l producto debe proporcionarse con un cable de alimentación corto para reducir el riesgo de enredarse o de tropezar con un cable más largo 2 Se encuentran disponibles cables separables o de extensión más largos que pueden ser utilizados si se emplea el cuidado debido 3 Si se utiliza un cable separable o de extensión más largo a La clasificación eléctrica del cable de alimentación o del cable de ex...

Страница 5: ...a 8 Cesta para cocinar al vapor 9 Soporte de la tapa 10 Escape de vapor A C E G I B D F H J A Botón para mantener caliente B Botón para cocinar arroz blanco C Botón para cocinar arroz integral D Botón para formar una capa de arroz tostado Raspa E Botón para cocinar quinua F Botón para cocinar sopas G Botón para cocinar pasta H Botón para cocinar sofritos I Botón para cocinar al vapor J Botón para ...

Страница 6: ...digitales suaves ANTES DE USAR LA ARROCERA Antes de utilizar por primera vez la Arrocera Multifunción siga las instrucciones que se describen a continuación 1 Retire todas las etiquetas y materiales de embalaje del producto 2 NO SUMERJA LA BASE O CARCASA EN AGUA NI EN NINGÚN OTRO LIQUIDO Lave la olla interior y la tapa con una esponja suave y agua caliente jabonosa Enjuague y séquelas bien NOTA Al...

Страница 7: ...apagará automáticamente al cabo de una hora y volverá al modo de espera Desenchufelo del tomacorriente cuando lo está usando FUNCIONES PARA COCINAR ARROZ BLANCO O INTEGRAL Si desea sofreír antes de cocinar arroz blanco o integral refiérase a la sección de la función de sofreír Cuando haya terminado de sofreír los ingredientes presione el botón de apagado encendido y siga las instrucciones que se i...

Страница 8: ...o utensilio de mano con mango largo para revolver el arroz Tape la olla interior después de revolver el arroz 8 SI AL PRINCIPIO SELECCIONÓ LA OPCIÓN DE FORMAR UNA CAPA DE ARROZ TOSTADO EN EL FONDO la unidad cambiará a dicha función de 27 a 35 minutos dependiendo en la cantidad de arroz Al terminar la olla emitirá un sonido la luz de la función de capa de arroz tostado se apagará y se encenderá la ...

Страница 9: ...es del botón de la función para cocinar quinua y de apagado encendido quedarán fijas para indicar que se ha iniciado la función IMPORTANTE Si usa la función de sofreír debe apagarla manualmente presionando el botón apagado encendido antes de cocinar la quinua Levante y quite la tapa con cuidado para evitar quemaduras por vapor y deje que el agua se escurra dentro de la olla interior Use la paleta ...

Страница 10: ...ínea de 8 tazas de agua para prevenir revosado 2 Coloque la olla interior dentro de la unidad Cerciórese de que la olla interior esté en contacto directo con la placa calefactora para ello mueva ligeramente la olla interior de un lado a otro para que quede bien asentada Tápela para que el agua hierva más rápido 3 Enchufe la unidad en un tomacorriente adecuado 4 Los botones comenzarán a parpadear 5...

Страница 11: ...tro utensilio de mano con mango largo para sacar y mezclar los alimentos Tape el accesorio cuando haya terminado Use protección para las manos para evitar entrar en contacto directo con el vapor que sale de la unidad 7 La unidad emitirá un sonido cada 15 minutos y se apagará al cabo de una hora La unidad emitirá otro sonido volverá al modo en espera y la luz de los botones parpadearán Compruebe ca...

Страница 12: ... Habichuelas o Judías 0 5 kg 2 1 2 tazas Enteros sin tallos 10 16 Tirabeques 0 5 kg 2 1 2 tazas Enteros sin tallos 12 13 Papas 0 5 kg 3 tazas Enteras 35 45 Calabacín o zapallo amarillo o verde 0 5 kg 2 1 2 tazas En rodajas gruesas 12 14 AVES Pechuga de pollo 700 g 3 1 2 tazas Enteras 26 30 MARISCOS Colas de langosta Grande 2 1 2 tazas Con caparazón 12 18 Camarones grandes 0 5 kg 2 1 2 tazas Pelado...

Страница 13: ... ARROZ PREVIAMENTE COCIDO 1 Añada el arroz temperatura ambiente a la olla interior 2 Coloque la olla interior dentro de la arrocera Cerciórese de que la olla interior esté en contacto directo con la placa calefactora para ello mueva ligeramente la olla interior de un lado a otro para que quede bien asentada Tape la olla 3 Enchufe la unidad en un tomacorriente adecuado 4 La luz de los botones apaga...

Страница 14: ...quela bien con un paño Aunque la olla interior es apta para colocarla en el lavaplatos automático recomendamos lavarla a mano 5 Tapa taza medidora y paleta lávelas en agua tibia jabonosa o colóquelas en el lavaplatos automático Enjuague y séquelas bien PRECAUCIÓN Manipule la tapa con extremo cuidado ya que al mojarse quedará resbalosa 6 Placa calefactora es posible que se adhieran granos de arroz ...

Страница 15: ... sin cargo alguno para el usuario final Esta Garantía incluye los gastos de transportación que se deriven de su cumplimiento Excepciones Esta Garantía no será válida cuando el producto A Se hubiese utilizado en condiciones distintas a las normales B No hubiese sido operado de acuerdo con el instructivo de uso que le acompaña C Cuando el producto hubiese sido alterado o reparado por personas no aut...

Страница 16: ...281 3882 2240 9870 El Salvador Sedeblack Calle San Antonio Abad Colonia Lisboa No 2936 San Salvador Depto de San Salvador Tel 503 2284 8374 Guatemala Kinal 17 avenida 26 75 zona 11 Centro comercial Novicentro Local 37 Ciudad Guatemala Tel 502 2476 7367 Honduras Serviteca San Pedro Sula B Los Andes 2 calle entre 11 12 Avenida Honduras Tel 504 2550 1074 México Articulo 123 95 Local 109 y 112 Col Cen...

Страница 17: ... and Cleaning 28 Warranty 29 WELCOME Congratulations on your purchase of the Black Decker Rice Cooker We have developed this use and care guide to ensure optimal performance and your satisfaction Save this use and care book and register your appliance online at www prodprotect com applica RCD628 UC Revision B indd 17 10 23 19 10 41 AM ...

Страница 18: ...e outlet Do not use appliance for other than intended use This appliance is not intended for use by persons including children with reduced physical sensory or mental capabilities or lack of experience and knowledge unless they have been given supervision or instruction concerning use of the appliance by a person responsible for their safety Unplug from outlet when not in use and before cleaning A...

Страница 19: ...repair or any questions regarding your appliance please call our Customer Service Line at 1 800 231 9786 US and Canada ELECTRICAL CORD 1 A short power supply cord is provided to reduce the risk resulting from becoming entangled in or tripping over a longer cord 2 Longer detachable power supply cords or extension cords are available and may be used if care is exercised in their use 3 If a long deta...

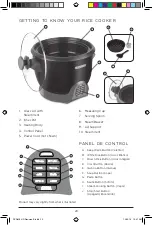
Страница 20: ...Cup 7 Serving Spoon 8 Steam Basket 9 Lid Support 10 Steam Vent A Keep Warm Button Calentar B White Rice Button Arroz Blanco C Brown Rice Button Arroz Integral D Crost Button Raspa E Quinoa Button Quinua F Soup Button Sopa G Pasta Button H Sauté Button Sofrito I Steam Cooking Button Vapor J Stop Start Button Apagado Encendido 9 6 7 8 10 1 2 3 4 A C E G I B D F H J RCD628 UC Revision B indd 20 10 23...

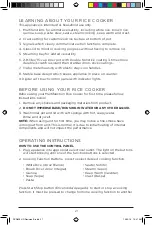
Страница 21: ...er for first time please follow instructions below 1 Remove any stickers and packaging materials from product 2 DO NOT IMMERSE BASE HOUSING IN WATER OR ANY OTHER LIQUID 3 Wash inner pot and lid with soft sponge with hot soapy water Rinse and dry well NOTE When using unit for first time you may notice a fine smoke haze coming out from unit This is normal It is due to initial heating of internal com...

Страница 22: ...cooking white rice or brown rice please refer to Sauté Function section Once you are done sautéing your ingredients follow instructions below Your Multifunction Rice Cooker allows you to choose whether or not you would like a crust on the bottom IF YOU WISH TO HAVE A CRUST ON THE BOTTOM PRESS THE CRUST BUTTON RASPA BEFORE PRESSING THE WHITE RICE OR BROWN RICE BUTTON THE CRUST LIGHT WILL BE SOLID I...

Страница 23: ...ll turn on Rice cooker will keep rice warm for up to 3 hours and then will turn off NOTE You can interrupt at any time cooking or keep warm modes by pressing Start Stop Button Encendido Apagado Unit will go back into standby mode with the Start Stop Button light blinking 9 Allow appliance to cool completely before cleaning Disconnect plug from wall outlet when not in use QUINOA FUNCTION 1 Place qu...

Страница 24: ... appliance to cool completely before cleaning Disconnect plug from wall outlet when not in use SOUP FUNCTION 1 Place soup ingredients and water inside inner pot 2 Set inner pot into unit Make sure inner pot sits directly in contact with heating plate by turning it slightly from right to left until seated properly Cover with lid WHEN USING SOUP COOKING MODE DO NOT OPERATE UNIT UNCOVERED STEAM IS GE...

Страница 25: ...agado Button Unit will go back into standby mode with the Encendido Apagado Button light blinking Allow appliance to cool completely before cleaning Disconnect plug from wall outlet when not in use STEAM COOKING FUNCTION 1 Place desired amount of water inside inner pot between the 4 and 8 cups water level 2 Place foods to be steamed on steam tray 3 Set inner pot into unit Make sure inner pot sits ...

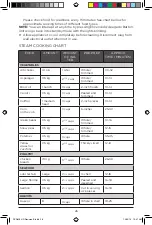
Страница 26: ...mmed 10 14 Broccoli 1 bunch 3 cups 2 inch florets 10 14 Carrots 0 5 kg 3 cups Peeled and trimmed 10 14 Coliflor 1 medium head 3 cups 2 inch pieces 10 14 Corn on the cob 4 3 cups 6 inches 25 30 Green beans 0 5 kg 2 1 2 cups Whole trimmed 10 16 Snow peas 0 5 kg 2 1 2 cups Whole trimmed 12 13 Potatoes 0 5 kg 3 cups Whole 35 45 Yellow squash or zucchini 0 5 kg 2 1 2 cups Thickly sliced 12 14 POULTRY C...

Страница 27: ...pagado Encendido Button Unit will go back into standby mode with lights blinking Allow appliance to cool completely before cleaning Disconnect plug from electrical outlet when not in use CRUST FUNCTION THIS FUNCTION SHOULD ONLY BE USED TO CREATE A CRUST FOR WHITE OR BROWN RICE WHICH HAS ALREADY BEEN COOKED 1 Place rice at room temperature in inner pot 2 Set the inner pot into rice cooker Make sure...

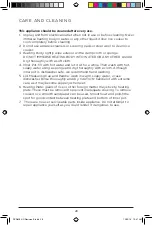
Страница 28: ...h hot soapy water using a sponge and dry thoroughly with a cloth Although inner pot is dishwasher safe we recommend hand washing 5 Lid Measuring Cup and Paddle wash in warm soapy water or use dishwasher Rinse thoroughly and dry CAUTION handle lid with extreme care as it may become slippery when wet 6 Heating Plate grains of rice or other foreign matter may stick to heating plate These must be remo...

Страница 29: ...accessories please call 1 800 738 0245 What does your warranty not cover Damage from commercial use Damage from misuse abuse or neglect Products that have been modified in any way Products used or serviced outside the country of purchase Glass parts and other accessory items that are packed with the unit Shipping and handling costs associated with the replacement of the unit Consequential or incid...

Страница 30: ...30 NOTAS NOTES RCD628 UC Revision B indd 30 10 23 19 10 41 AM ...

Страница 31: ...31 NOTAS NOTES RCD628 UC Revision B indd 31 10 23 19 10 41 AM ...

Страница 32: ...Ciudad Empresarial Huechuraba Santiago Chile Fono 562 2571 3700 Importado por Imported by SPECTRUM BRANDS CORP S A S Carrera 17 No 89 40 Bogotá Colombia Línea de atención al cliente 018000510012 BLACK DECKER and the BLACK DECKER logos and product names are trademarks of The Black Decker Corporation used under license All rights reserved BLACK DECKER y los logos y nombres de productos de BLACK DECK...

Отзывы: