background image

4

3

Product may vary slightly from what is illustrated.

How to Use

This product is for household use only.

$ "65 *0/

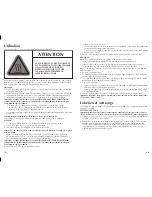
THIS OVEN GETS HOT. WHEN

IN USE, ALWAYS USE OVEN

MITTS OR POT HOLDERS

WHEN TOUCHING ANY OUTER

OR INNER SURFACE OF THE

OVEN

THIS OVEN GETS HOT WHEN 

IN USE. ALWAYS USE OVEN 

MITTS OR POT HOLDERS 

WHEN TOUCHING ANY 

OUTER OR INNER SURFACE OF 

THE OVEN.

Before first use, remove the slide rack and bake pan from oven. Wash in warm, sudsy water, 

rinse and dry with a dishtowel or paper towel. Replace slide rack in oven.

FOR TOASTING

1.  Open oven door and insert the slide rack into position. Do not use the bake pan for toasting.
2.  Set the temperature control to the TOAST ON position then set the TOAST/TIMER control 

to the desired setting (Light, Medium or Dark). For best results, select the medium setting for 

your first cycle then adjust lighter or darker to suit your taste.

Important: When using the TOAST/TIMER function, always turn the dial past 20 and then turn
back or forward to desired setting.


•  The on indicator light comes on and stays on during the toasting cycle.


•  When toasting is done, the signal bell sounds, the oven automatically shuts off and the  


  on indicator light goes off.

3.  To stop toasting at any time, turn the temperature control OFF.

Helpful Tip for Multiple Toasting Cycles

For best results, when making three or more consecutive batches of toast, allow a short cool 

down period between toasting cycles. 

FOR BAkING


•  When baking or cooking always preheat the oven for 5 minutes.

1.  Open oven door and insert slide rack into the oven.
2.  Turn the temperature control to the desired temperature setting.

Important:


You must set the timer or select Stay On for the oven to function.

3.  Set the timer to desired number of minutes including preheat time or to Stay On. The upper 

and lower heating elements cycle on and off to maintain the temperature.

4.  Watch for doneness (see “Cooking/Baking Guide”). 
5.  Once cooking cycle is finished:
  •  If the timer was on, the signal bell sounds, the On indicator light goes off and the oven  

    automatically turns off.
  •  If the timer was not on, turn the TIMER/TOAST selector from the Stay On position to the  

    Off position.
6.  Using oven mitt or pot holder, remove bake pan.

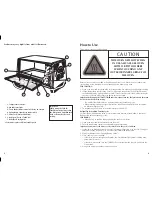
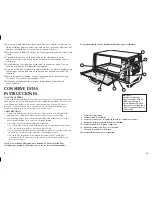
  1.  Temperature control
  2.  On indicator light
  3.  Toast shade/timer control with stay on feature
  4.  Swing-down crumb tray (under unit)
†  5.  Slide rack (Part# 168823-00)
†  6.  Bake pan (Part# 174334-00)
  7.  Bake/Broil rack guide
†Consumer replaceable/removable parts

Important:

When using the TOAST/

TIMER function, always turn

the dial past 20 and then turn

back or forward to desired

setting.

1

2

3

4

5

6

7

Содержание Toast-R-Oven Classic TRO964

Страница 1: ...Accessories Parts USA Canada Accesorios Partes EE UU Canadá Accessoires Pièces É U Canada 1 800 738 0245 Model Modelo Modèle TRO964 Register your product online at www prodprotect com applica for a chance to WIN 100 000 For US residents only Registre su producto en la Internet en el sitio Web www prodprotect com applica y tendrá la oportunidad de GANAR 100 000 solamente para los residentes de EE U...

Страница 2: ...d touch electrical parts resulting in a risk of electric shock Extreme caution should be used when using containers constructed of other than metal or glass Do not store any material other than manufacturer s recommended accessories in this oven when not in use Do not place any of the following materials in the oven paper IMPORTANT SAFEGUARDS SAVE THESE INSTRUCTIONS GROUNDED PLUG As a safety featu...

Страница 3: ...o stop toasting at any time turn the temperature control OFF Helpful Tip for Multiple Toasting Cycles For best results when making three or more consecutive batches of toast allow a short cool down period between toasting cycles For Baking When baking or cooking always preheat the oven for 5 minutes 1 Open oven door and insert slide rack into the oven 2 Turn the temperature control to the desired ...

Страница 4: ...en pull the crumb tray knob forward and then down A Wipe with a dampened cloth or paper towel and dry thoroughly To close pull the crumb tray knob forward swing the crumb tray closed and then push knob in to lock into place before operating the oven Exterior and Interior Surfaces Be sure the oven has cooled completely Wipe the top exterior walls and the interior with a damp cloth or sponge Do not ...

Страница 5: ... favor lea todas las instrucciones No toque las superficies calientes Utilice las asas o las perillas A fin de protegerse contra un choque eléctrico no sumerja el cable el enchufe ni ninguna pieza no removible del aparato Se debe tomar mucha precaución cuando el producto se utilice por o en la presencia de menores de edad Desconecte el aparato de la toma de corriente cuando no esté en uso y antes ...

Страница 6: ...ICO a El producto debe proporcionarse con un cable corto o uno desmontable para reducir el riesgo de enredarse o de tropezar con un cable largo b Se encuentran disponibles cables desmontables o de extensión más largos que es posible utilizar si se emplea el cuidado debido c Si se utiliza un cable desmontable o de extensión 1 El voltaje eléctrico del cable desmontable o del cable de extensión debe ...

Страница 7: ...para cocinar hornear 5 Al terminar de hornear Si usted programa el cronómetro la señal suena y la luz indicadora de funcionamiento y el horno se apagan automáticamente Si usted no ha programado el cronómetro gire el selector de tostar cronómetro TOAST TIMER a la posición de apagado OFF 6 Al terminar de cocinar use un guante para horno o una agarradera para retirar la bandeja para hornear Para asar...

Страница 8: ...a bandeja de hornear hornear al gusto VEGETALES Papas horneadas Medianas Hornee a 200 C 400 F Lave y pinche las de 1 h a 11 4 hora papas y colóquelas directamente sobre la parilla corrediza Papas fritas o aros Colocar en una Siga las indicaciones Voltee y supervise de cebolla sola capa según la del paquete para controlar el congelados capacidad de dorado supervise la la bandeja de cocción hornear ...

Страница 9: ... suivantes Lire toutes les directives Ne pas toucher aux surfaces chaudes Utiliser les poignées et les boutons Afin d éviter les risques de secousses électriques ne pas immerger le cordon la fiche ni toute autre pièce non amovible de l appareil Exercer une étroite surveillance lorsqu on utilise l appareil près d un enfant ou lorsque ce dernier s en sert Débrancher l appareil lorsqu on ne s en sert...

Страница 10: ... alimentation amovibles ou de rallonge plus longs et il faut s en servir avec prudence c Lorsqu on utilise un cordon d alimentation amovible ou de rallonge plus long il faut s assurer que 1 la tension nominale du cordon d alimentation amovible ou de rallonge soit au moins égale à celle de l appareil et que 2 lorsque l appareil est de type mis à la terre il faut utiliser un cordon de rallonge mis à...

Страница 11: ...épasser la marque 20 puis le tourner de nou veau jusqu au réglage souhaité 4 Surveiller la cuisson voir le guide de cuisson 20 19 5 Lorsque la cuisson est terminée Si vous avez réglé la minuterie la sonnerie se fait entendre le témoin de fonctionnement s éteint et le four s éteint automatiquement Si vous n avez pas réglé la minuterie tourner la minuterie sélecteur du degré de grillage à la positio...

Страница 12: ... recette LÉGUMES Pommes de terre De 1 à 5 moyennes Cuire à 200 C 400 F Laver et percer les de 1 h à 1 h 1 4 pommes de terre Les déposer directement sur la grille Frites rondelles Selon la capacité Selon les directives Étendre en une seule d oignons du plat de cuisson de l emballage couche sur le plat de congelées cuisson En surveiller la cuisson 3 Laver le plat de cuisson dans de l eau chaude savo...

Страница 13: ...et s éteignent s assurer qu il est réglé à la fonctionner pendant la cuisson fonction désirée Pendant le grillage seul l élément du haut fonctionne DÉPANNAGE NEED HELP For service repair or any questions regarding your appliance call the appropriate 800 number on the cover of this book Do not return the product to the place of purchase Do not mail the product back to the manufacturer nor bring it ...

Страница 14: ...re Ne pas retourner le produit où il a été acheté Ne pas poster le produit au fabricant ni le porter dans un centre de service On peut également consulter le site web indiqué sur la page couverture Garantie limitée de un an Valable seulement aux États Unis et au Canada Quelle est la couverture Tout défaut de main d oeuvre ou de matériau toutefois la responsabilité de la société Applica se limite a...

Страница 15: ...rramientas Ltda Av Apoquindo No 4867 Las Condes Santiago Chile Tel 562 263 2490 Colombia PLINARES Avenida Quito 88A 09 Bogotá Colombia Tel sin costo 01 800 7001870 Costa Rica Aplicaciones Electromecanicas S A Calle 26 Bis y Ave 3 San Jose Costa Rica Tel 506 257 5716 223 0136 Ecuador Servicio Master de Ecuador Av 6 de Diciembre 9276 y los Alamos Tel 593 2281 3882 El Salvador Calle San Antonio Abad ...

Страница 16: ...el interior marque sin costo 01 800 714 2503 Fabricado en la República Popular de China Impreso en la República Popular de China Fabriqué en République populaire de Chine Imprimé en République populaire de Chine R42006 8 4 23E S F 1200 W 120 V CAT NO EHB500 TYPE 1 160 W 120 V AC ONLY 60Hz 60Hz is a trademark of The Black Decker Corporation Towson Maryland USA Marca registrada de The Black Decker C...

Отзывы: