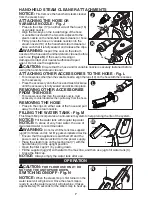
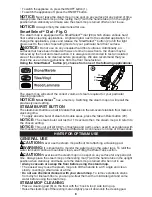
background image

9

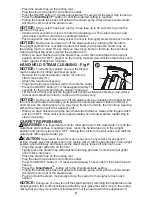
•  Place the steam mop on the resting mat.

•  Plug the steam mop electric cord into the outlet.

•  Press the ON/OFF button (1). It takes approximately 15 seconds for the steam mop to heat up.

•  Press the smartselect

tM

 button (2) until the required setting is reached.

•  Pulling the handle tube back will activate the steam pump. After a few seconds steam 

will start to come out of the steam head.

notIce:


If the system has been run dry it may take up to 30 seconds to prime the 

system on first use.

•  It takes a few seconds for steam to enter the cleaning pad. The steam mop will now 

glide easily over the surface to be sanitized/cleaned.

•  Push and pull the steam mop slowly across the floor to thoroughly steam clean each section.

notIce:


During use you may turn off the steam pump by returning the handle to 

the upright position, this convenient feature will allow you to place the steam mop on 

the resting mat for a short time so that you may move items or furniture, then continue 

cleaning without the need to switch the appliance off.

•  When you have finished using the steam mop, return the handle tube to the upright 

position and turn it ‘OFF’, place it on the resting mat and wait until the steam mop cools 

down (approximately five minutes).

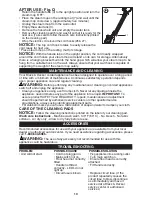
hand-heLd steaM cLeanInG - fig P

notIce:


To effectively sanitize an area, the lift and 

reach head with microfiber pad must be used.

•  Remove the hand-held steam cleaner (3) from the 

steam mop body (11).

•  Attach the required accessory.

•  Plug hand-held steam cleaner electric cord into the outlet.

•  Press the ON/OFF button (1). It takes approximately 15 

seconds for the hand-held steam cleaner to heat up.

•  Lift the lock off (24) and pull the trigger switch (25)to activate the steam pump. After a 

few seconds steam will start to come out of the accessory.

notIce:


During use you may turn off the steam pump by releasing the trigger switch, 

this convenient feature will allow you to place the hand-held steam cleaner down for a 

short time on the resting mat so you may move items or furniture, then continue cleaning 

without the need to switch the appliance off.

•  When you have finished using the hand held steam cleaner, release the trigger switch 

and turn it ‘OFF.’ Wait until it cools (approximately five minutes) before reattaching to 

steam mop body.

carPet refreshInG

WarnInG:

 It is important to monitor the water level in the water tank. To refill the

water tank and continue to sanitize/ clean, return the handle tube (4) to the upright 

position and turn the steam mop ‘OFF’. Unplug the unit from the wall outlet, and refill the 

water tank with supplied water jug.

cautIon:

 Never leave the steam mop in one spot on any surface for any period

of time. Always place the steam mop on the resting mat (7) with the handle tube in the upright 

position when stationary and make sure the steam mop is turned off when not in use.

•  Place the carpet glider (8) on the floor.

•  Lightly press the steam mop with attached cleaning pad down onto the carpet glider 

until it clicks into place.

•  Place the steam mop on the resting mat.

•  Plug the steam mop electric cord into the outlet.

•  Press the ON/OFF button (1). It takes approximately 15 seconds for the steam mop to 

heat up.

•  Press the  smartselect

tM

  button (2) to the Wood/Laminate setting.

•  Pulling the handle tube back will activate the steam pump. After a few seconds steam 

will start to come out of the steam head.

•  Push and pull the steam mop slowly across the carpet to thoroughly refresh each 

section.

notIce:


During use you may turn off the steam pump by returning the handle tube to the 

upright position, this convenient feature will allow you to place the steam mop on the resting 

mat so that you may move items of furniture with out the need to switch the appliance off.

25

24

1

P

Содержание BDH1850SM

Страница 1: ...l 1 800 544 6986 from 8 a m to 5 p m EST Mon Fri to speak with an agent Please have the catalog number available when you call Save this manual for future reference VEA EL ESPANOL EN LA CONTRAPORTADA INSTRUCTIVO DE OPERACIÓN CENTROS DE SERVICIO Y PÓLIZA DE GARANTÍA ADVERTENCIA LÉASE ESTE INSTRUCTIVO ANTES DE USAR EL PRODUCTO To register your new product call 1 800 544 6986 or visit www BlackandDec...

Страница 2: ...ug or extension cord in any way Read all of this manual carefully before using the appliance The intended use is described in this manual The use of any accessory or attachment or the performance of any operation with this appliance other than those recommended in this instruction manual may present a risk of personal injury Retain this manual for future reference Using your appliance Do not direc...

Страница 3: ... footwear Steam may escape from the appliance during use Care should be taken when using this appliance DO NOT touch any parts which may become hot during use After use Unplug the appliance and allow to cool down on resting mat before cleaning When not in use the appliance should be stored in a dry place Children should not have access to stored appliances Inspection and repairs Unplug the applian...

Страница 4: ...nce By using these accessories you will get the very best from your appliance A 4 Flexible hose and handle For convenient use of all accessories Variable steam jet nozzle For higher pressure steam bursts twist to change the spray pattern of the steam burst Small brush Blue For cleaning small hard surfaces Window Squeegee For cleaning glass doors and windows WARNING Do not use the window squeegee o...

Страница 5: ...handle tube 4 into the top end of the steam mop body 11 until it is firmly seated and clicks into place Attaching the steam head Fig C Slide the bottom end of the steam mop body 11 onto the steam head 5 until it clicks into place The steam head can be removed from the steam mop body by pressing the steam head release button 12 and pulling the steam mop body off the steam head Attaching the handhel...

Страница 6: ...ith attached cleaning pad down onto the carpet glider 8 until it clicks into place NOTICE Always place the steam mop on the resting mat 7 with the handle tube 4 in the upright position when stationary and make sure the steam mop is turned off when not in use Removing the carpet glider CAUTION Always wear suitable shoes when changing the carpet glider on your steam mop Do not wear slippers or open ...

Страница 7: ...emoving other accessories from the hose For accessories other than the variable nozzle twist accessory counterclockwise then pull away from the hose Removing the hose Press in the clips on either side of the hose and pull away from the steam nozzle Filling the water tank Fig M This Steam Mop incorporates an anti calcium system to help prolong the life of the system NOTICE Fill the water tank with ...

Страница 8: ...l the previously used setting Steam Burst button The steam burst button is a built in feature that aides in the removal of stubborn floor marks or stuck on grime To apply an extra burst of steam to trouble areas press the Steam Burst button 23 NOTICE The steam burst will last for 10 seconds then the steam mop will return to the chosen setting NOTICE This unit will kill 99 9 of bacteria and germs w...

Страница 9: ...essory NOTICE During use you may turn off the steam pump by releasing the trigger switch this convenient feature will allow you to place the hand held steam cleaner down for a short time on the resting mat so you may move items or furniture then continue cleaning without the need to switch the appliance off When you have finished using the hand held steam cleaner release the trigger switch and tur...

Страница 10: ...tch off and unplug the appliance Clean your appliance using a soft damp cloth Never let any liquid get inside the appliance never immerse any part of the appliance into a liquid IMPORTANT To assure product SAFETY and RELIABILITY repairs maintenance and adjustment should be performed by authorized service centers or other qualified service organizations always using identical replacement parts For ...

Страница 11: ... Tools Electric in the yellow pages of the phone directory or online at www blackanddecker com This warranty does not apply to accessories This warranty gives you specific legal rights and you may have other rights which vary from state to state Should you have any questions contact the manager of your nearest Black Decker Service Center This product is not intended for commercial use and accordin...

Страница 12: ...ès à l Internet composer le 1 800 544 6986 de 8 h à 17 h HNE du lundi au vendredi pour parler avec un agent Prière d avoir le numéro de catalogue sous la main lors de l appel Pour l achat d un filtre de rechange composer le 1 888 678 7278 CONSERVER CE MODE D EMPLOI POUR UN USAGE ULTÉRIEUR pour usage domestique seulement Merci d avoir choisi Black Decker Consulter le site Web www BlackandDecker com...

Страница 13: ...Le non respect des avertissements et des directives figurant ci dessous peut entraîner des risques de décharge électrique d incendie ou de blessures graves AVERTISSEMENT Lorsque des outils électriques sont utilisés des précautions de base en matière de sécurité notamment les suivantes doivent toujours être observées afin de réduire le risque d incendie de décharge électrique de blessures corporell...

Страница 14: ...ellés non scellés car l humidité provenant de la vapeur pourrait causer des dommages En outre sur les surfaces traitées à la cire ou sur certains planchers sans cire le lustre peut être enlevé par la chaleur et l action de la vapeur Il est toujours recommandé de tester un endroit isolé de la surface à nettoyer avant de procéder Nous recommandons également de consulter le mode d emploi et d entreti...

Страница 15: ... relativement à l utilisation de l appareil par une personne responsable de leur sécurité Les enfants doivent être supervisés afin de s assurer qu ils ne jouent pas avec l appareil Risques résiduels Des risques résiduels supplémentaires peuvent survenir au moment d utiliser l outil et peuvent ne pas figurer dans les avertissements de sécurité aux présentes Ces risques peuvent se poser en cas d uti...

Страница 16: ...reil dépend de l accessoire utilisé Les accessoires Black Decker sont conçus pour satisfaire à des normes de qualité élevées et pour améliorer le rendement de votre appareil L utilisation de ces accessoires permet de tirer pleinement avantage de l appareil Flexible et poignée Pour une utilisation pratique de tous les accessoires Tuyère à vapeur réglable Pour augmenter la pression des jets de vapeu...

Страница 17: ... PORTATIF Fig E Enfoncer le bouton de dégagement 13 et tirer sur le balai à vapeur portatif 3 pour l extraire du corps du balai à vapeur FIXATION D UNTAMPON NETTOYANT Fig F Des tampons nettoyants de rechange sont offerts auprès du détaillant Black Decker local nº de cat SMP20 Mettre le tampon nettoyant en microfibres 6 sur le plancher de manière à ce que le côté auto agrippant soit vers le haut So...

Страница 18: ...vapeur en le mettant sur la position ARRÊT Laisser refroidir le balai à vapeur environ cinq minutes Faire glisser le bouton de dégagement de la porte de parfum frais 9 pour ouvrir la porte Insérer la tablette de parfum frais dans la poche 29 comme le montre la figure I2 Fermer la porte 30 en appuyant fermement dessus de manière à entendre un déclic AVIS Toujours mettre le balai à vapeur sur le tap...

Страница 19: ...able tourner l accessoire dans le sens antihoraire puis le séparer du tuyau RETRAIT DUTUYAU Enfoncer les attaches des deux côtés du tuyau et séparer de la buse à vapeur REMPLISSAGE DU RESERVOIR D EAU Fig M La durée de vie du balai à vapeur est prolongée par un système contre l entartrage AVIS Remplir le réservoir d eau avec de l eau du robinet AVIS Dans les régions où l eau est très dure il est re...

Страница 20: ... Utiliser le cadran SmartSelectMC 2 pour choisir l une des applications suivantes Le balai à vapeur sélectionnera le bon volume de vapeur requis pour l opération de nettoyage particulière AVIS SmartSelectMC comporte une mémoire À la mise en marche le balai à vapeur se trouve au dernier réglage utilisé BOUTON DE JET DE VAPEUR Fig O Le bouton de jet de vapeur est une fonction intégrée qui aide à eff...

Страница 21: ... à la verticale Cette fonction pratique permet de mettre le balai à vapeur sur le tapis de repos pour un moment afin de déplacer des objets ou des meubles puis de reprendre le nettoyage sans devoir éteindre l appareil Après avoir terminé d utiliser le balai à vapeur remettre la poignée à la verticale puis éteindre l appareil en le mettant sur la position ARRÊT le mettre sur le tapis de repos et le...

Страница 22: ...le balai à vapeur en le mettant sur la position ARRÊT Mettre le balai à vapeur sur le tapis de repos 7 et le laisser refroidir environ cinq minutes Débrancher le balai à vapeur de la prise murale Vider le réservoir d eau 3 Enlever le tampon nettoyant 6 et le laver afin qu il soit prêt à être utilisé la prochaine fois S assurer de suivre les directives de nettoyage imprimées sur le tampon nettoyant...

Страница 23: ...utiliser le produit et le faire réparer dans un centre de réparation Black Decker ou un centre de réparation autorisé Le disjoncteur s est Réarmer le disjoncteur Si le déclenché produit fait déclencher de façon répétée le disjoncteur arrêter immédiatement d utiliser le produit et le faire réparer dans un centre de réparation Black Decker ou un centre de réparation autorisé Cordon d alimentation ou...

Страница 24: ... acheté à la condition que le magasin soit un détaillant participant Tout retour doit se faire durant la période correspondant à la politique d échange du détaillant Une preuve d achat peut être requise Prière de vérifier la politique de retour du détaillant au sujet des délais impartis pour les retours ou les échanges La deuxième option est d apporter ou d envoyer le produit en port payé à un cen...

Страница 25: ...ne acceso a Internet llame al 1 800 544 6986 de lunes a viernes de 8 a m a 5 p m hora del Este para hablar con un agente Cuando llame tenga a mano el número de catálogo Para comprar un filtro de repuesto llame al 1 888 678 7278 Conserve este manual para futuras consultas SÓLO PARA USO DOMÉSTICO Gracias por elegir Black Decker Visite www BlackandDecker com NewOwner para registrar su nuevo producto ...

Страница 26: ...or tenga una ranura para clavija más ancha y la otra menos ancha Si el enchufe no encaja por completo en el cable prolongador voltéelo Si aún así no encaja obtenga un cable prolongador adecuado Si el cable prolongador todavía no encaja por completo en el tomacorriente comuníquese con un electricista calificado para instalar el tomacorriente adecuado No altere el enchufe de la herramienta ni el cab...

Страница 27: ...dera o lámina sin impermeabilizar ya que la humedad del vapor podría provocar daños Tampoco en superficies que se han tratado con cera o en algunos pisos que no requieren cera la acción del calor y el vapor puede eliminar el brillo Siempre se recomienda hacer una prueba en un área aislada de la superficie a limpiar antes de proceder Le recomendamos también que revise las instrucciones de uso y cui...

Страница 28: ...uso del artefacto Se debe supervisar a los niños para asegurarse de que no jueguen con el artefacto Riesgos residuales Al utilizar la herramienta pueden presentarse riesgos residuales adicionales que tal vez no estén incluidos en las presentes advertencias de seguridad Estos riesgos puede deberse al uso indebido al uso prolongado etc Aún con la aplicación de las normas de seguridad correspondiente...

Страница 29: ...nto del aparato depende del accesorio utilizado Los accesorios Black Decker están diseñados según normas de alta calidad e ideados para mejorar el rendimiento del aparato Al utilizar estos accesorios usted obtendrá lo mejor del aparato Manguera flexible y mango Para un cómodo uso de todos los accesorios Boquilla de inyección variable de vapor Para ráfagas de vapor de mayor presión gírela para camb...

Страница 30: ...DOR DE VAPOR DE MANO FIG E Empuje firmemente el botón de liberación 13 y tire del limpiador de vapor de mano 3 separándolo del cuerpo del trapeador de vapor INSTALACIÓN DE UNA ALMOHADILLA DE LIMPIEZA FIG F Puede obtener almohadillas de limpieza de repuesto del distribuidor Black Decker nº cat SMP20 Coloque una almohadilla de limpieza de microfibra 6 sobre el piso con el lado tipo velcro hacia arri...

Страница 31: ...ndo no esté en uso EXTRACCIÓN DEL DESLIZADOR PARA ALFOMBRAS PRECAUCIÓN Siempre use calzado adecuado al cambiar el deslizador para alfombras del trapeador de vapor No use pantuflas ni calzado que exponga los dedos de los pies Devuelva el mango a la posición vertical y apague el trapeador de vapor Coloque el trapeador de vapor sobre la estera de apoyo y espere hasta que se enfríe aproximadamente cin...

Страница 32: ...scuche un clic EXTRACCIÓN DE OTROS ACCESORIOS DE LA MANGUERA Para accesorios distintos de la boquilla variable gire el accesorio hacia la izquierda y luego tire de este separándolo de la manguera EXTRACCIÓN DE LA MANGUERA FIG L Oprima los sujetadores de cualquiera de ambos lados de la manguera y tire de la boquilla de vapor para separarla LLENADO DELTANQUE DE AGUA FIG M Este trapeador de vapor inc...

Страница 33: ...ial SmartSelectTM 28 que muestra diversas aplicaciones de limpieza para superficies de piso duras Una luz brillará junto a la aplicación seleccionada Para cambiar la aplicación oprima y suelte el botón SmartSelectTM 2 hasta que la luz se encienda junto al modo de funcionamiento correcto para la superficie de piso dura específica ADVERTENCIA No lo utilice sobre pisos de madera o lámina sin impermea...

Страница 34: ...go de agua antes de utilizar el trapeador de vapor LIMPIEZA CON VAPOR Coloque una almohadilla de limpieza 6 sobre el piso con el lado tipo velcro hacia arriba Levante el trapeador de vapor para separarlo de la estera de apoyo y presiónelo levemente sobre la almohadilla de limpieza Coloque el trapeador de vapor sobre la estera de apoyo Enchufe el cable eléctrico del trapeador de vapor en el tomacor...

Страница 35: ...por sobre la estera de apoyo 7 con el tubo del mango en posición vertical cuando esté inmóvil y asegúrese de que el trapeador de vapor esté apagado cuando no esté en uso Coloque el deslizador para alfombras 8 sobre el piso Empuje con suavidad hacia abajo el trapeador de vapor con la almohadilla de limpieza instalada sobre el deslizador para alfombras hasta que encaje en su lugar y se escuche un cl...

Страница 36: ...líquido IMPORTANTE Para garantizar la SEGURIDAD y la CONFIABILIDAD del producto las reparaciones el mantenimiento y el ajuste deben realizarse en los centros de mantenimiento autorizados o en otras organizaciones de mantenimiento calificadas utilizando siempre piezas de repuesto idénticas En el caso de marcas difíciles puede utilizar una solución suave de jabón y agua para humedecer el paño Cuidad...

Страница 37: ...tros de servicio de Black Decker cuentan con personal altamente capacitado dispuesto a brindar a todos los clientes un servicio eficiente y confiable en la reparación de herramientas eléctricas Si necesita consejo técnico reparaciones o piezas de repuesto originales de fábrica póngase en contacto con el centro de servicio de Black Decker más cercano a su domicilio Para ubicar su centro de servicio...

Страница 38: ...el directorio telefónico o en línea en www blackanddecker com Esta garantía no se aplica a los accesorios Esta garantía le otorga derechos legales específicos y es posible que tenga otros derechos que varían de un estado a otro En caso de que tenga alguna pregunta comuníquese con el gerente del centro de mantenimiento de Black Decker más cercano a usted Este producto no está diseñado para uso come...

Страница 39: ...in cargo alguno para el cliente incluyendo la mano de obra esta incluye los gastos de trasportación erogados para lograr cumplimiento de esta garantía en los domicilios diversos señalados Para hacer efectiva esta garantía deberá presentar su herramienta y esta póliza sellada por el establecimiento comercial donde se adquirió el producto Nos comprometemos a entregar el producto en un lapso no mayor...

Страница 40: ... de Occidente S A de C V Av La Paz No 1779 Col Americana S Juaréz Guadalajara Jalisco Tel 01 33 38 25 69 78 Herramientas y Equipos Profesionales Av Colón 2915 Ote Col Francisco I Madero Monterrey Nvo León Tel 01 81 83 54 60 06 Htas Portátiles de Chihuahua S A de C V Av Universidad No 2903 Col Fracc Universidad Chihuahua Chihuahua Tel 01 614 413 64 04 Fernando González Armenta Bolivia No 605 Col Fe...

Отзывы: