background image

SRP-350II 

Rev. 1.02 

- 34 - 

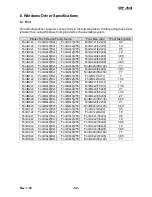
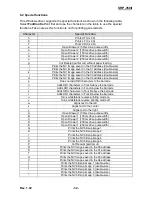
6-2 Special functions 

 
This Windows driver supports the special functions as shown in the following table. 
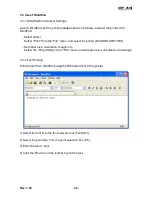
Select 

FontControl

 font first and use the characters in the table to use the special 

functions. Take care as this function is not for printing general texts. 
 

Character 

Special Function 

Prints HT (0 x 09) 

Prints LF (0 x 0A) 

Prints CR (0 x 0D) 

Open Drawer 2 (50ms drive pulse width) 

Open Drawer 2 (100ms drive pulse width) 

Open Drawer 2 (150ms drive pulse width) 

Open Drawer 2 (200ms drive pulse width) 

Open Drawer 2 (250ms drive pulse width) 

Cut Receipt (partial cut) without paper feeding 

Prints the NV Image saved in the 00 address (double-size) 

Prints the NV Image saved in the 01 address (double-size) 

Prints the NV Image saved in the 02 address (double-size) 

Prints the NV Image saved in the 03 address (double-size) 

Prints the NV Image saved in the 04 address (double-size) 

Does not add HRI characters to the barcode 

Adds HRI characters in Font A above the barcode 

Adds HRI characters in Font A below the barcode 

Adds HRI characters in Font B above the barcode 

Adds HRI characters in Font B below the barcode 

Turns white/black reverse printing mode on 

Turns white/black reverse printing mode off 

Aligns text to the left 

Aligns text to the center 

Aligns text to the right 

Open Drawer 1 (50ms drive pulse width) 

Open Drawer 1 (100ms drive pulse width) 

Open Drawer 1 (150ms drive pulse width) 

Open Drawer 1 (200ms drive pulse width) 

Open Drawer 1 (250ms drive pulse width) 

Prints the NV bitmap image 1 

Prints the NV bitmap image 2 

Prints the NV bitmap image 3 

Prints the NV bitmap image 4 

Prints the NV bitmap image 5 

Cut Receipt (partial cut) 

Prints the NV Image saved in the 00 address 

Prints the NV Image saved in the 01 address 

Prints the NV Image saved in the 02 address 

Prints the NV Image saved in the 03 address 

Prints the NV Image saved in the 04 address 

Prints the NV bitmap image 1 (double-size) 

Prints the NV bitmap image 2 (double-size) 

Prints the NV bitmap image 3 (double-size) 

Prints the NV bitmap image 4 (double-size) 

Prints the NV bitmap image 5 (double-size) 

Содержание SRP-350II

Страница 1: ...Windows Driver Manual SRP 350II Thermal printer Rev 1 02 http www bixolon com ...

Страница 2: ...lor 16 5 1 5 Image Rotation 17 5 1 6 Crop Function 17 5 2 Document Settings 18 5 2 1 Send Command 18 5 2 2 Cash Drawer Internal Beep 19 5 2 3 Line Feed 19 5 2 4 Cut 19 5 3 NV Image 20 5 4 Barcode 21 5 4 1 1d Barcode 22 5 4 2 2d Barcode 23 5 5 Utilities 24 5 5 1 VMSM 25 5 5 2 Special Font Edit Utility 25 5 5 3 Journal Viewer 26 5 5 4 Text Macro 27 5 5 5 Image Macro 28 5 5 6 NV Image Download 31 6 W...

Страница 3: ...d or user manual content may be changed without prior notice 2 Operating System OS Environment The following operating systems are supported for usage Microsoft Windows XP 32bit 64bit Microsoft Windows Server 2003 32bit 64bit Microsoft Windows Vista 32bit 64bit Microsoft Windows Server 2008 32bit 64bit Microsoft Windows Server 2008R2 64bit Microsoft Windows 7 32bit 64bit Microsoft Windows 8 32bit ...

Страница 4: ... Installation 4 1 Installing on Windows XP Server 2003 4 1 1 Via Serial Port or Parallel Port 1 Double click the Windows Driver installation file 2 Click Next 3 Select BIXOLON SRP 350II and a COM or LPT port to be used and then click Next ...

Страница 5: ...OS Control Panel Printers and Faxes 6 In the Ports tab click Configure Port Pass this step if you selected a LPT port 7 Match the communication settings to those of the printer The communication settings of the printer can be performed by conducting a self test Pass this step if you selected a LPT port ...

Страница 6: ...SRP 350II Rev 1 02 6 8 Click Print Test Page and check printing status Proper installation of the driver is indicated if the test page is printed normally ...

Страница 7: ...SRP 350II Rev 1 02 7 4 1 2 Via USB Port 1 Double click the Windows Driver installation file 2 Click Next 3 Select BIXOLON SRP 350II and USB and then click Next ...

Страница 8: ...n The printer driver will be installed automatically 6 Open the printer properties window in the Windows OS Control Panel Printers and Faxes 7 Click Print Test Page and check printing status Proper installation of the driver is indicated if the test page is printed normally ...

Страница 9: ...Installing on Windows VISTA Server 2008 7 8 4 2 1 Via Serial Port or Parallel Port 1 Double click the Windows Driver installation file 2 Click Next 3 Select BIXOLON SRP 350II and a COM or LPT port to be used and then click Next ...

Страница 10: ...l Panel Hardware and Sound Device and Printers 6 In the Ports tab click Configure Port Pass this step if you selected a LPT port 7 Match the communication settings to those of the printer The communication settings of the printer can be performed by conducting a self test Pass this step if you selected a LPT port ...

Страница 11: ...SRP 350II Rev 1 02 11 8 Click Print Test Page and check printing status Proper installation of the driver is indicated if the test page is printed normally ...

Страница 12: ...SRP 350II Rev 1 02 12 4 2 2 Via USB Port 1 Double click the Windows Driver installation file 2 Click Next 3 Select BIXOLON SRP 350II and USB and then click Next ...

Страница 13: ...nter driver will be installed automatically 6 Open the printer properties window in the Windows OS Control Panel Hardware and Sound Device and Printers 7 Click Print Test Page and check printing status Proper installation of the driver is indicated if the test page is printed normally ...

Страница 14: ...Driver Settings The following functions can be configured after installing the Windows driver 5 1 Layout 1 Open the Printer Properties window for the corresponding OS 2 Click the Preferences button in the General tab 3 Click Paper Tab ...

Страница 15: ...Save button after specifying the paper width length and a paper name If the specified paper name already exists on the system you can update the paper width length Valid Paper Width 25 4 mm 72 0 mm Valid Paper Length 25 4 mm 3276 0 mm You can choose the new paper size on the Paper Size combo box after adding a paper size Delete button Deletes the paper size selected in the list Save button Adds a ...

Страница 16: ...llows flexible paper length according to the data length Ticket Ticket print in fixed length even the print data is short 5 1 3 Copies Copies are printed by specifying the copy count The copy count is set to 1 by default Set this value bigger than 1 to set the number of copies to print The value should be within the range of 1 to 255 5 1 4 Color The Color is set to Monochrome by default Select Col...

Страница 17: ...ont is not supported The color type will be changed to Monochrome mode automatically if this function is used in the color mode 5 1 6 Crop Function This function crops the upper and lower end of the printing area by the specified number It helps reduce the margin at the top and bottom when there is excessive margin The value should be within the range of 1 to 99 ...

Страница 18: ...nd send it to the printer The Send Commands function allows for the addition of desired commands at the start or end of the print content Start Doc Addition of command at the beginning of the document Start Page Addition of command at the beginning of the page End Page Addition of command at the end of the page End Doc Addition of command at the end of the document For more information on the hexa...

Страница 19: ... beep sound when printing tick Beep sound before printing or Beep sound after printing and then click OK 5 2 3 Line Feed Set the number of line feeds between 0 and 99 for adding blank lines at the end of printing 5 2 4 Cut Paper can be cut at the end of each page or each document job Page Job No Cut No Cut Paper is not cut after printing Page Job No Cut Partial Cut Paper is cut at the end of each ...

Страница 20: ...ning and or end of the document and beginning and end of each page Also there are two commands for NV Image printing Take care of selecting one of the two commands because NV images cannot be printed depending on the selected command NV graphics FS p NV bit image GS L Start Doc Insert NV image at the top of the document Start Page Insert NV image at the top of the page End Page Insert NV image at ...

Страница 21: ...SRP 350II Rev 1 02 21 5 4 Barcode 1 Open the Printer Properties window for the corresponding OS 2 Click the Preferences or Printing Preferences button in the General tab 3 Click Barcode Tab ...

Страница 22: ...20 40 60 80 Numeric 0 9 Barcode4 JAN8 EAN 20 40 60 80 Numeric 0 9 Barcode5 Code39 20 40 60 80 Numeric 0 9 Symbols Letters A Z Barcode6 ITF 20 40 60 80 Numeric 0 9 Barcode7 Codabar 20 40 60 80 Numeric 0 9 Symbols Letters A D Barcode8 Code93 20 40 60 80 ASCII CODE 0 127 Barcode9 Code128 20 40 60 80 ASCII CODE 0 127 Detailed settings for one dimensional barcode Select a Font Name and Type of one dime...

Страница 23: ...mes Font Name Type Symbology Size Point 2D Code1 PDF417 9 5 2D Code2 QR Code 9 5 Detailed settings for two dimensional barcode Select a Font Name and Type of two dimensional barcode and then click Properties The width height size and error compensation level can be configured depending on the type of two dimensional barcode from this window as shown in the following picture QR Code PDF417 ...

Страница 24: ...SRP 350II Rev 1 02 24 5 5 Utilities 1 Open the Printer Properties window for the corresponding OS 2 Click the Preferences or Printing Preferences button in the General tab 3 Click Utilities Tab ...

Страница 25: ...mand assign the defined printer command to a specific ASCII character and send it to the printer The range of ASCII code that the command can be assigned is from 0x20 to 0x7F and the command can be easily assigned using this utility 1 Click Special Font Edit Utility 2 Select an ASCII code character and enter the print command All values should be entered in hexadecimal number format 3 Click Apply ...

Страница 26: ...ocument in a file and the saved file can be viewed by using this utility 1 Tick Enable Journal to run Journal Viewer and then click Journal Viewer 2 Click Search to set search condition and then enter Start Date and End Date 3 Click OK to search the files created within the specified period 4 Select the file to print from the list and click Print to send the data stored in the file to the printer ...

Страница 27: ...is function can be used only when using Device Fonts and it has no effect when using True Type Fonts Detailed instructions are shown below 1 Tick Enable Text Macro to run Text Macro and then click Text Macro 2 Click Add Item to enter the text to change in Change Text enter the text to place in Replace Text and click OK ...

Страница 28: ...replace certain text with a specified image for printing This function is applicable only when using Device Fonts and it has no effect when using TrueType Fonts Detailed instructions are shown below 1 Tick Enable Image Macro to run Image Macro and then click Image Macro ...

Страница 29: ...SRP 350II Rev 1 02 29 2 Click Add Image select a bitmap file bmp and click Open 3 Enter the name to be added to the list select a dithering type and click OK ...

Страница 30: ...SRP 350II Rev 1 02 30 4 Click Add Text Key and set the image to replace the text key Enter the text in Change Text and select the image to replace the corresponding text in Replace Image ...

Страница 31: ...SRP 350II Rev 1 02 31 5 Click OK 5 5 6 NV Image Download Refer to the NV Image manual contained in the CD for details ...

Страница 32: ...ntB1x1 255 FontB1x1 9x17 7 FontB1x2 FontB1x2 Ext FontB1x2 255 FontB1x2 9x34 13 5 FontB2x1 FontB2x1 Ext FontB2x1 255 FontB2x1 18x17 7 FontB2x2 FontB2x2 Ext FontB2x2 255 FontB2x2 18x34 13 5 FontB2x4 FontB2x4 Ext FontB2x4 255 FontB2x4 18x68 27 FontB4x2 FontB4x2 Ext FontB4x2 255 FontB4x2 36x34 13 5 FontB4x4 FontB4x4 Ext FontB4x4 255 FontB4x4 36x68 27 FontB4x8 FontB4x8 Ext FontB4x8 255 FontB4x8 36x136 ...

Страница 33: ... Page 1252 Character size dot 12 x 24 double height Sizes point 19 2 FontA1x2 Ext IBM expansion Character code support Code Page 437 Character size dot 12 x 24 double height Sizes point 19 3 FontA1x2 255 Buyer exclusive code support User Code page Character size dot 12 x 24 double height Sizes point 19 ...

Страница 34: ...rs in Font A above the barcode r Adds HRI characters in Font A below the barcode s Adds HRI characters in Font B above the barcode t Adds HRI characters in Font B below the barcode u Turns white black reverse printing mode on v Turns white black reverse printing mode off w Aligns text to the left x Aligns text to the center y Aligns text to the right A Open Drawer 1 50ms drive pulse width B Open D...

Страница 35: ... instead of printing character 6 2 FontControl font functions Font Name Special Functions Font Size point dot FontControl Open Drawer 1 2 Cut receipt Cut receipt without paper feeding Justification Left Center Right Output HT Output LF Output CR Barcode Printing Print NV Graphic Data 9 5 12x24 ...

Страница 36: ...r BIXOLON SRP 350II using Windows driver with Visual Basic Sample codes contained in the CD 7 1 1 Windows Driver Selection The following example code explains how to select BIXOLON SRP 350II Windows driver For Each prnPrinter In Printers If prnPrinter DeviceName BIXOLON SRP 350II Then Set Printer prnPrinter Exit For End If Next ...

Страница 37: ...ze 9 5 Printer FontName FontA1x1 Printer Print FontA1x1 Font Printer EndDoc 7 1 3 Barcode Printing The following example code explains how to print the barcode JAN8 EAN Print Bar Code Printer FontSize 20 Printer FontName Barcode4 Printer Print 1234567 Printer EndDoc The following example code explains how to print the 2 D barcode PDF417 Print Two dimensional Codes Printer FontSize 9 5 Printer Font...

Страница 38: ...he printer BIXOLON SRP 350II Set paper size orientation margin etc Select the Page Setting from File menu and set paper size orientation and margin 7 2 2 Text Printing Print the text from WordPad using the Windows driver of the printer 1 Select the font from the font selection box FontA1x1 2 Select the point size from the point selection box 9 5 3 Enter the text to print 4 Click the Print icon in ...

Отзывы: