background image

NAVIGATION 


19 

4 Browsing the Map 

When in Free Navigation or Route Navigation it is possible to browse the map so that you 
can look at parts of the map which are currently not shown. 
To move the map around use the stylus (if provided) or your finger to press and hold on a 
point on the map, then drag the map in the opposite direction you want to look at. E.g. to 
view the map above the currently shown section, press on the screen and move the stylus 
(if provided) or your finger down, the map will then re-draw to show the new section of map. 
You can also change the zoom level of the map to be shown more detail or a larger 

section of the map. In order to zoom simply tap on the 

 and 

. Each tap will zoom the 

map one level. 
You can tap on roads or Point of Interest icons shown on the map to be given more 
information relating to that point. 

After moving the map from the starting location you will see the following icon appear 

Tapping on this icon will return you to your current or last known GPS position. 
 

5 Navigation 

There are two modes of navigation; Free navigation and Route Navigation. 
 
5.1 Free navigation 
In free navigation the unit does not have a planned route for you to follow, so simply plots 
your GPS position on the map and then follows your movement as you drive. The unit 
shows you the current time and date, as well as your current position in latitude and 
longitude co-ordinates. 
 
5.2 Route Navigation 
In route navigation the unit directs you via the map and with spoken directions to your 
chosen destination. In order to plan a route you need to have a valid GPS signal, this can 
be easily checked by looking at the GPS reception screen on the free navigation screen. If 
the icon is greyed out then there is no valid signal, if the icon is white with green signal 
waves then you have a valid GPS signal and navigation is possible. 
From the Free Navi Menu screen select 

Go to

, this allows you to enter your destination. 


6 Go to 

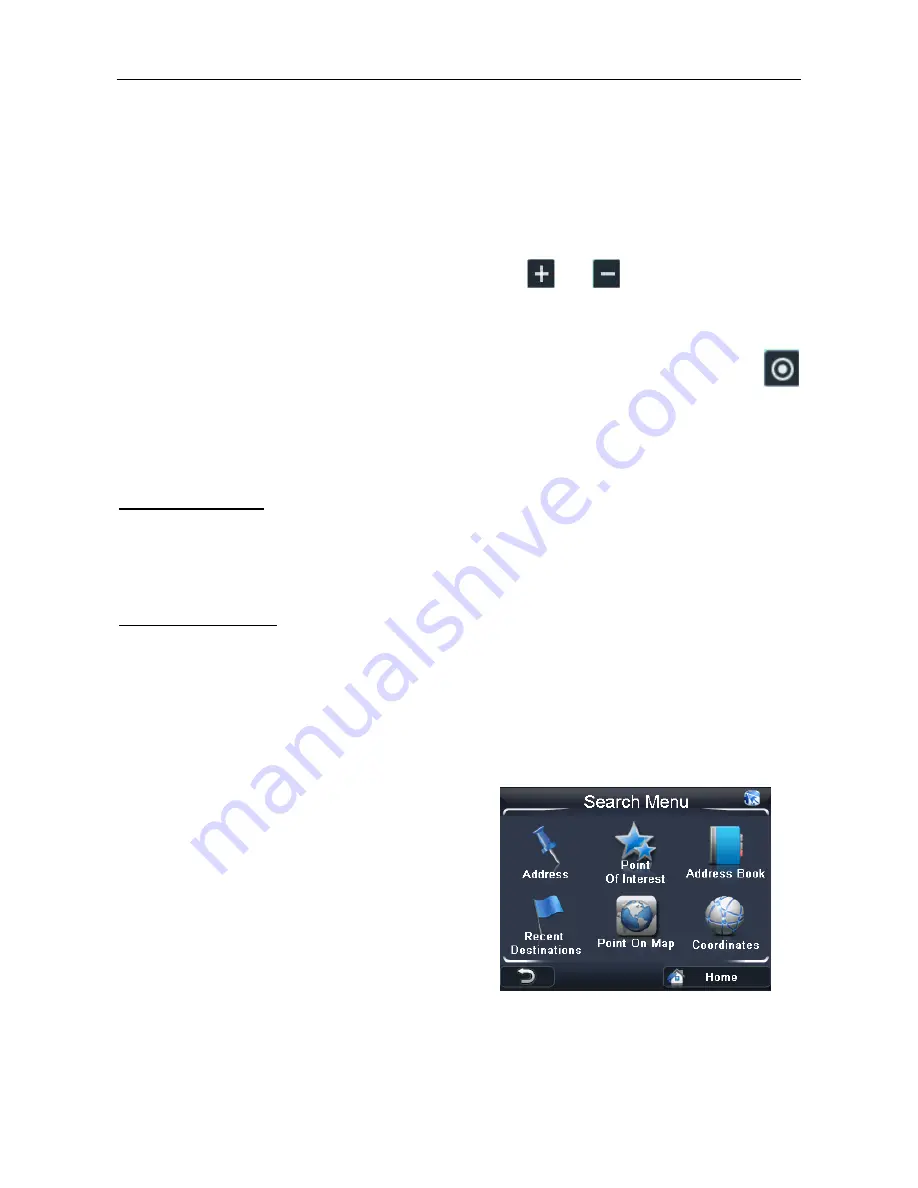
Tapping this opens up the Search menu screen, 
from here you can enter a destination to 
navigate too in several different ways. Each will 
be described in turn in the pages that follow. 
 

Содержание R350

Страница 1: ...de R350 2nd edition www binatonegps com Binatone Navigation software Binatone Helpline for UK only Monday to Friday from 9 00am to 5 00pm Tel 0845 345 9677 Please note that all calls are charged at lo...

Страница 2: ...ce in case you later need to transport the unit Keep your sales till receipt which is your guarantee Before you can use the unit you ll need to fully charge the battery as described on page 6 please a...

Страница 3: ...n mounting the PND in your car make sure that it does not obscure your view or impede the operation of any driving controls Prohibited Areas Do not operate your PND in hospitals or near any electrical...

Страница 4: ...rt Guide 06 Position of the Controls 06 Charging the Battery 07 SD Memory Card 07 Car Adaptor 07 Turning the Sat Nav Unit On Off 08 Turning the Sat Nav Unit Off Sleep Mode 08 System Reset 08 Windscree...

Страница 5: ...g an Entry from the Address Book 24 6 4 Selecting a Recent Destination 24 6 5 Selecting a Point on the Map 24 6 6 Entering a set of Co ordinates 25 6 7 To Navigate Directly Home 26 7 Map Options 26 7...

Страница 6: ...6 10 2 Detour 36 10 3 Cancel Route 37 10 4 Go to 37 10 5 Route Information 37 10 6 Map Options 37 10 7 Settings 37 Frequently asked questions 38 The map contains an error POI s are missing 38 I am exp...

Страница 7: ...Charge Indicator Displays the battery charging status Red charging Green fully charged 3 On Off button Turn On the unit when it is Off or in Sleep mode Turn the unit to Off or put into Sleep mode dur...

Страница 8: ...tery level If you have a MicroSD memory Card you may install it refer to the picture below Switch the unit off first before installing or removing the MicroSD card When installing it can only be fitte...

Страница 9: ...to turn the unit Off There is a 10 second timer which starts to count down if there is no selection made within 10 seconds the unit will turn off automatically Note If the unit is not to be used for...

Страница 10: ...ug on the end of the ball mount at the end of the car mount and then push down firmly until it clicks in to place The bracket can only be fitted one way C Fitting the Unit Slide the unit into the bott...

Страница 11: ...MAIN MENU 10 Starting Up Press the On Off button on the top until the following screens are displayed When you press MENU the following screens will be displayed...

Страница 12: ...e un mute the speaker is shown when un muted is shown when muted Clicking or can release the mute status Press to confirm and exit Backlight Press Backlight to change the brightness of the screen You...

Страница 13: ...tion This function calibrates the unit to respond to your screen taps You will need to use this function only if the unit begins to respond inconsistently to your screen taps After selecting follow th...

Страница 14: ...to view the next picture in the list 6 Full screen Press to enlarge the picture so that it fills the whole screen You can now use the stylus to scroll around the picture To return back to the above s...

Страница 15: ...ng also the strength of these signals This page gives your current position in degrees longitude and latitude your current speed and the status of your position i e Fixed 3D or Fixed Invalid etc The c...

Страница 16: ...ugh the main features of the system 1 1 GPS connection Your navigation device uses GPS technology for navigation The device receives signals from a number of GPS satellites in order to determine your...

Страница 17: ...ting needs For more information on free navigation mode see page 19 In order to enter destinations and access the many settings of the navigational software tap Menu This will then take you to the Fre...

Страница 18: ...between 2D 3D view 3 GPS reception Shows the current status of the GPS signal Shown greyed out if you do not have a valid signal and green if you do Tap to enter the GPS status screen see page 31 4 Ti...

Страница 19: ...euvre and the distance to the manoeuvre Tap to replay the voice instruction 14 Current road Shows the name of the road you are currently on 15 Menu button Tap to access the navigation options Only whe...

Страница 20: ...to your current or last known GPS position 5 Navigation There are two modes of navigation Free navigation and Route Navigation 5 1 Free navigation In free navigation the unit does not have a planned...

Страница 21: ...Enter the name of the country you are looking for and tap Tap to accept or double tap the country name Now the screen will change to show either a keyboard if no previous city has been entered which...

Страница 22: ...tically entered in to the Address Search screen You can continue entering address information in order to narrow down your destination even further UK ROI Version Tap on the Road field to enter a road...

Страница 23: ...ct a point on the map to navigate to without having to scroll the map to the area you wish to select around Place the cursor on the point you would like to navigate to and tap You will be taken direct...

Страница 24: ...19 to exit from the map view back to the previous screen tap You also have the option of selecting a point from this map to navigate to this can be used to exactly pin point your location Place the cu...

Страница 25: ...ill then change to show the Route Plan screen see page 34 Tap to go back to the Search Menu screen Tap to view the location on the map and once in the map view you can browse the map see page 19 to ex...

Страница 26: ...i e if there is more than one POI at that point In this case you can use the arrows to scroll between the multiple points Tap to go back to the Search Menu screen Tap to confirm the point The screen...

Страница 27: ...ne using the Set Home Address found in the Settings menu see page 29 7 Map Options Allows you to set the map preferences to your liking it allows you to set the way the map looks and behaves during na...

Страница 28: ...ctions While you are currently navigating a planned route and are on a major road or motorway the unit will show you information about the approaching junctions along the planned route You will be sho...

Страница 29: ...activated the box will be shown with a tick 7 6 Simulation Speed This option allows you to change the speed at which a simulation of a route is carried out You can set the speed between 50 300 Mph Kp...

Страница 30: ...s speed camera locations the unit contains information about the speed limit of many roads When activated the unit will show you the speed limit for the road you are on with a fixed speed limit icon i...

Страница 31: ...be logged with the following information Viewing a trace record Select the trace record you want to view The currently selected trace record will be highlighted orange Then use the button to view the...

Страница 32: ...ss You can then change the way the address is shown or add further information Note Changing the address does not change the location of the address book entry just the way the name is shown Tel You c...

Страница 33: ...y or night mode by tapping either or to make your selection Automatic When selected allows you to set a start and end time when the time is between these two times the unit will be set to Day mode At...

Страница 34: ...u require that the unit is locked to 4 or more satellites and is referred to as a 3D fix The fix status will be shown above the circle on the right Inactive means not fixed active means that a 3D fix...

Страница 35: ...tings screen without saving 8 12 Calibration This option allows you to calibrate the screen so that it responds accurately to your screen taps You will need this function only if the unit begins to re...

Страница 36: ...it is highlighted orange and then tap The waypoint destination will be removed from the list Navigating using waypoints When the unit calculates the route it will calculate the route from your curren...

Страница 37: ...l roads NOTE the Route options default to the above each time the unit is switched on 10 Route Navigation Menu While navigating or simulating a route tapping the button will take you to the Route Navi...

Страница 38: ...nned on a new screen As well as showing you your start and destination locations it will show you the distance between these two locations as planned by the unit and the estimated time it will take to...

Страница 39: ...POl s are missing If you detect an error in the map data e g a street is missing completely we would like to inform our map data provider Please let us know via our help line 0845 345 9677 I am exper...

Страница 40: ...in GPS high sensitivity receiver 64 channels Memory 128MB DDR2 Built in Display 3 5 colour TFT touch screen Weight 0 122 kg Input Method Touch Expansion Slot MicroSD card Speaker Built in 1 0W loud s...

Страница 41: ...ype of equipment GPS Model Name R350 series Country of Origin China Brand Binatone complies with the essential protection requirements of Article 3 1 b of R TTE Directive 1999 5 EC and the following s...

Отзывы: