background image

Bettis P/N 127073E

Revision “A”

Page 19 of 37

3.4.8

Refer to assembly drawing page 2 of 2 Detail "D".  Install o-ring seal (4-70) into the seal
groove in the outboard end of piston rod (3-40).

3.4.9

Install two split ring halves (3-50) into the outer most groove in piston rod (3-40) and
retain by installing the recessed area of piston (3-30) over the two split halves (3-50).

3.4.10 Install two split ring halves (3-50) into the piston rod, in back of the piston and retain with

retainer ring (3-60).

3.4.11 Coat two tie bars (3-20) with lubricant and install by carefully pushing tie bars through

piston (3-30) and rod T-seal (4-50).

3.4.12 Install two tie bar o-ring seals (4-80) onto the inboard end of tie bars (3-20) and into the

o-ring grooves provided.

3.4.13 Insert the tie bars through inner end cap (3-10) and screw hex nuts (3-90) onto inboard end

of the tie bars.  NOTE:  Screw the tie bars through the hex nuts (3-90) until one complete
thread is exposed.

3.4.14 Refer to assembly drawing page 2 of 2 Detail "E". Install two tie bar o-ring seals (4-80) onto

the outboard end of tie bars (3-20) and into the o-ring grooves provided.

3.4.15 Apply lubricant to one o-ring seal (4-40) and install into the outer diameter o-ring groove of

outer end cap (3-80).

3.4.16 Apply lubricant to the bore of cylinder (3-70).

3.4.17 Install lubricated cylinder (3-70) over piston (3-30) and onto inner end cap (3-10).  When

installing the cylinder over the piston seal tilt cylinder 15

°

 to 30

°

 degrees to piston rod.

CAUTION:

If needed, when installing the cylinder, hammer on the end of the cylinder
only with a non metallic object.

3.4.18 Install outer end cap (3-80) over tie bars (3-20) and into cylinder (3-70).  NOTE:  The

pressure inlet port should be positioned in the same position as recorded in section 2.2
step 2.2.1.

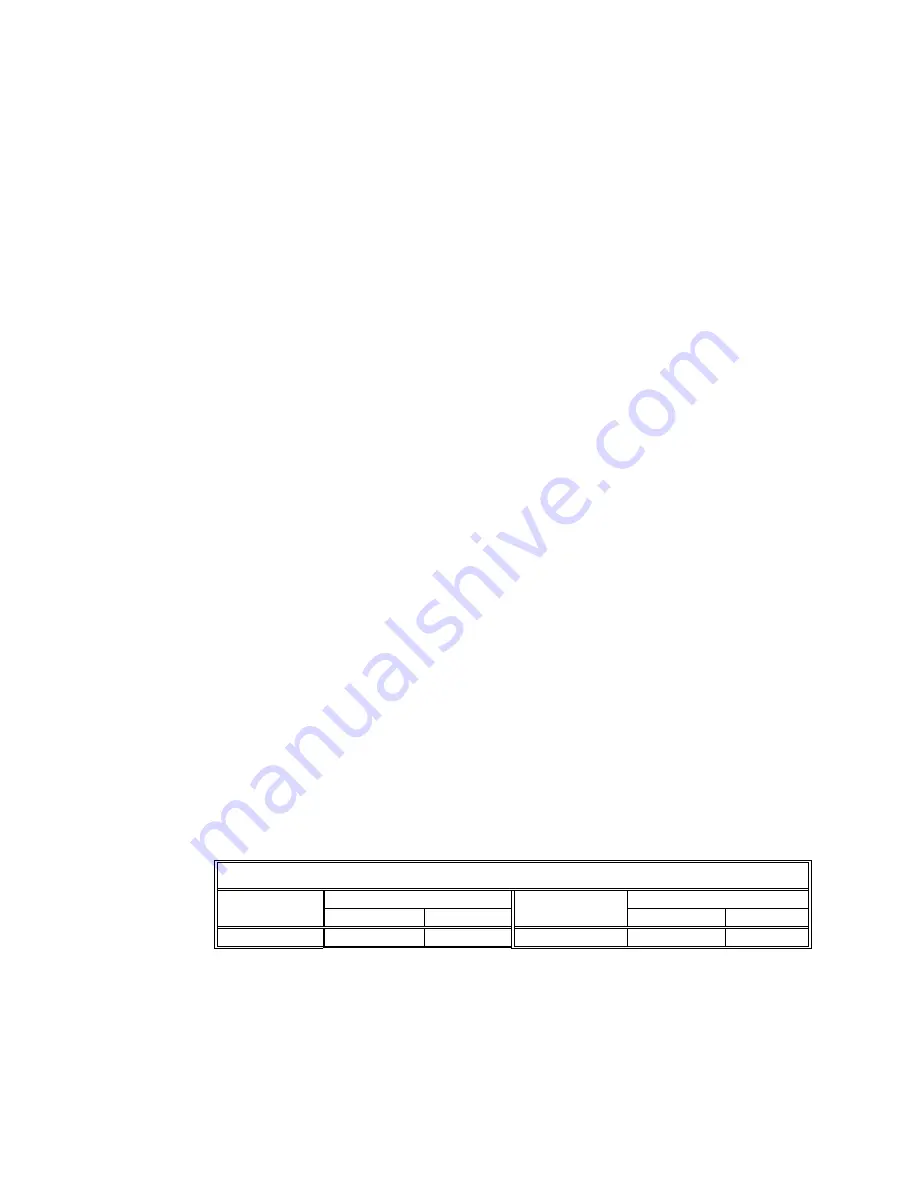
3.4.19 Install tie bar nuts (3-90) onto tie bars (3-20).  Torque tighten tie bar nuts, alternately in 100

foot pound increments, until a final lubricated torque, as listed in the following table, has
been achieved.

TIE BAR NUTS

TORQUE (±5 %)

TORQUE (±5 %)

HOUSING

MODEL

FT-lb

N-m

HOUSING

MODEL

FT-lb

N-m

G2

120

163

G3

150

203

3.4.20 Install lockwashers (3-140) onto socket cap screws (3-130) ).

Содержание G01 SR Series

Страница 1: ...ENGLISH LANUAGE BETTIS SERVICE INSTRUCTIONS FOR MODELS G01 THROUGH G10 SPRING RETURN PNEUMATIC ACTUATORS WITH M11 HYDRAULIC OVERRIDE PART NUMBER 127073E REVISION A DATE December 2001...

Страница 2: ...Through G5 M11 Hydraulic Override Cylinder Reassembly 20 3 6 G7 through G10 M11 Hydraulic Override Cylinder Reassembly 20 3 7 Actuator Testing 21 SECTION 4 0 FIELD CONVERSIONS 4 1 Fail Mode Reversal...

Страница 3: ...that are to be worked on 1 1 5 This procedure should only be implemented by a technically competent technician who should take care to observe good workmanship practices 1 1 6 Numbers in parentheses i...

Страница 4: ...e WARNINGS CAUTIONS and NOTES contained in this procedure WARNING This procedure should not supersede or replace any customer s plant safety or work procedures If a conflict arises between this proced...

Страница 5: ...6 1 and 1 6 2 should not be used without prior written approval of Bettis Product Engineering 1 6 1 All temperature services 50 F to 350 F 45 5 C to 176 6 C use Bettis ESL 5 lubricant ESL 5 lubricant...

Страница 6: ...disassembled separate to the actuator refer to Section 5 Module Removal And Installation 2 1 4 To ensure correct re assembly that is with Pneumatic Power Module or Spring Module on same end of Drive M...

Страница 7: ...tilt the cylinder 15 to 30 degrees with respect to actuator centerline 2 2 7 Remove cylinder 3 70 from inner end cap 3 10 CAUTION Do not use pipe wrench to remove tie bars 2 2 8 TIE BAR REMOVAL 2 2 8...

Страница 8: ...e retainer for outboard split ring halves 3 50 2 2 10 2 Slide piston 3 30 toward the inner end cap 3 10 until the out board split ring halves are exposed enough for removal Remove outboard split ring...

Страница 9: ...oke 1 70 2 3 8 Remove position indicator assembly 1 140 from top of yoke 1 70 2 3 9 Remove spring pin 1 100 from top of yoke 1 70 2 3 10 Remove hex cap screws 1 110 with lockwashers 1 115 from housing...

Страница 10: ...ps 2 3 23 through 2 3 25 and continue disassembly at step 2 3 26 2 3 23 Refer to assembly drawing page 2 of 2 Detail B Use Bettis tool part numbers 117368 G8 G10 117369 G5 G7 117370 G3 G4 or 123616 G2...

Страница 11: ...M11 hydraulic override cylinder removal from spring cartridge refer to Section 5 step 5 1 2 5 1 Unscrew and remove hex cap screws 7 80 with lockwashers 7 90 from outer end cap 7 70 2 5 2 Remove outer...

Страница 12: ...omplete film of lubricant Coat all seals with a complete film of lubricant before installing into seal grooves NOTE The parts and seals used in the actuator will be assembled using lubricant as identi...

Страница 13: ...9 40 will be facing to the outside of guide block 1 30 3 2 10 Install second spherical washer 9 40 over threaded end of extension rod assembly 9 50 NOTE The spherical side of the washer will go on th...

Страница 14: ...nstall guide bar 1 90 into either side of housing 1 10 by inserting through the housing through guide block and then insert the guide bar into the other side of housing 1 10 3 2 23 Refer to assembly d...

Страница 15: ...ent 3 2 32 2 Install and tighten hex cap screws 1 120 with lockwashers 1 115 3 2 33 Install thrust bearing 2 110 onto position indicator 1 140 3 2 34 Install o ring seal 2 100 onto position indicator...

Страница 16: ...2 3 2 47 Tighten both stop screw nuts 1 190 securely 3 3 PNEUMATIC POWER MODULE REASSEMBLY NOTES 1 For early model G2 and G3 actuators with double nuts on the power module use section 3 4 for reassem...

Страница 17: ...11 Apply lubricant to two sets of rod T seal components 4 50 NOTE The T seal is composed of one rubber seal and two split skive cut back up rings 3 3 11 1 Install two sets of rod T seals 4 50 into the...

Страница 18: ...non metallic object 3 3 22 Install outer end cap 3 80 over tie bars 3 20 and into cylinder 3 70 NOTE The pressure inlet port should be positioned in the same position as recorded in section 2 2 step...

Страница 19: ...er ring facing outboard side of inner end cap 3 10 3 4 4 Install piston rod 3 40 through inner end cap 3 10 NOTE The piston rod end with retainer grooves to be on the outboard side of inner end cap 3...

Страница 20: ...g page 2 of 2 Detail E Install two tie bar o ring seals 4 80 onto the outboard end of tie bars 3 20 and into the o ring grooves provided 3 4 15 Apply lubricant to one o ring seal 4 40 and install into...

Страница 21: ...c override end cap 7 70 3 5 6 Install hydraulic ram cover 7 10 into the hydraulic override end cap 7 70 by screwing the ram cover into the end cap until the ram cover bottoms out into the end cap NOTE...

Страница 22: ...hydraulic cylinder assembly flange opening 3 6 16 Install the outer end cap 7 70 assembled piston rod 7 20 with piston 7 50 onto the open end of the hydraulic cylinder assembly and over the vent tube...

Страница 23: ...ired the above leakage test must be performed again SECTION 4 FIELD CONVERSIONS 4 1 FAIL MODE REVERSAL CW TO CCW OR CCW TO CW 4 1 1 Remove Spring Module per Section 5 3 4 1 2 Remove Pneumatic Power Mo...

Страница 24: ...ECT 5 1 3 Remove all the piping from the M11 override cylinder end cap 7 70 5 1 4 M11 Hydraulic override cylinder removal For models G01 through G5 use step 5 1 5 and for G7 through G10 use step 5 1 6...

Страница 25: ...y 5 10 5 2 2 M11 Hydraulic override cylinder installation For models G01 through G5 use step 5 2 3 and for G7 through G10 use step 5 2 4 5 2 3 G01 through G5 M11 override cylinder installation 5 2 3 1...

Страница 26: ...is to be removed it should be removed from the drive Module prior to the Pneumatic Power Module removal or disassembly 2 Review Section 2 1 General Disassembly before proceeding with Spring Module Di...

Страница 27: ...t hole and push on the piston rod so as to move the spring cartridge tension rod hex nut out of it s cast hex seat 5 3 10 Unscrew the spring cartridge tension rod from the Drive Module The tension rod...

Страница 28: ...Spring Module 5 10 and rotate the tension rod nut until initial thread engagement is achieved NOTE Confirm initial thread engagement of rod extension 9 50 to tension rod 5 4 5 2 After confirming init...

Страница 29: ...nder installation 5 4 12 1 Insert M11 hydraulic override cylinder assembly into spring cartridge outer end 5 4 12 2 Install lockwashers 7 80 on to eight hex cap screws 7 100 5 4 12 3 Install eight hex...

Страница 30: ...g a male square drive extension go through outer end cap 3 80 and unscrew piston rod 3 40 from extension rod assembly 1 50 NOTE When removing power module from housing 1 10 be careful not to loose o r...

Страница 31: ...retainer nut assembly 1 60 from the guide block 1 30 CAUTION When removing rod extension assembly from guide block be careful not to drop one of the spherical washers inside the housing 5 7 3 Remove r...

Страница 32: ...ly SECTION 6 ACTUATOR SUPPORT INFORMATION 6 1 M11 HYDRAULIC OVERRIDE SYSTEM FLUID VOLUME TABLE ACTUATOR SIZE G01 G2 G3 G4 G5 G7 G8 G10 APPROX VOLUME Quarts 1 6 1 8 2 0 3 6 10 2 9 7 15 9 27 0 FLUID FOR...

Страница 33: ...N A N A 896 1000 3 Lbs N A N A N A N A N A N A N A N A 44 Dia Power Kg N A N A N A N A N A N A N A N A 3 Lbs N A N A N A N A N A N A N A N A 48 Dia Power Kg N A N A N A N A N A N A N A N A 3 Lbs N A...

Страница 34: ...re Head Pipe Plug 12 1 1 Breather Assembly Socket 13 3 4 2 Vent Check Assembly Open End 3 8 Sq 1 Tension rod Male Drive 6 4 G2 TOOL STYLE AND WRENCH SIZE ITEM NO WRENCH SIZE ITEM QTY LOCATION OR DESCR...

Страница 35: ...Open End or Adjustable 12 1 1 Breather Assembly Open End 13 3 4 2 Vent Check Assembly Open End 3 8 Sq 1 Tension rod Male Drive 6 6 G4 TOOL STYLE AND WRENCH SIZE ITEM NO WRENCH SIZE ITEM QTY LOCATION O...

Страница 36: ...lug Open End or Adjustable 12 1 1 Breather Assembly Open End 13 3 4 2 Vent Check Assembly Open End 3 4 1 Tension rod Male Drive 6 8 G7 TOOL STYLE AND WRENCH SIZE ITEM NO WRENCH SIZE ITEM QTY LOCATION...

Страница 37: ...End or Adjustable 12 1 1 Breather Assembly Open End 13 3 4 2 Vent Check Assembly Open End 3 4 1 Tension rod Male Drive 6 10 G10 TOOL STYLE AND WRENCH SIZE ITEM NO WRENCH SIZE ITEM QTY LOCATION OR DES...

Страница 38: ...Revision A Page 37 of 37 ECN DATE REV BY DATE Released December 2001 A COMPILED B Cornelius 17 December 2001 CHECKED B Cornelius 17 December 2001 APPROVED R Smith 17 December 2001 Signatures on file B...

Страница 39: ......

Страница 40: ......

Страница 41: ......

Страница 42: ......

Страница 43: ......

Страница 44: ......

Страница 45: ......

Страница 46: ......

Страница 47: ......

Страница 48: ......

Страница 49: ......

Страница 50: ...BETTIS M11 MANUAL HYDRAULIC OVERRIDE SYSTEM OPERATING INSTRUCTIONS FOR HD T AND G SERIES PNEUMATIC AND HYDRAULIC ACTUATORS PART NUMBER 126858 REVISION F RELEASE DATE 18 September 2007...

Страница 51: ...hat the pump cover to manifold o ring is still seated in it s seal groove located in the pump cover 6 1 3 Install the pump cover back down on top of the manifold 6 1 4 Install the four socket cap scre...

Страница 52: ...FILLING INSTRUCTIONS 3 1 Double Acting Actuator M11 System fluid Filling 3 3 2 Spring Return Actuator M11 System fluid Filling 5 SECTION 4 0 M11 DISASSEMBLY INSTRUCTIONS 4 1 M11 Pressure Release Inst...

Страница 53: ...icate the bubble number reference number used on the Bettis Assembly Drawing WARNING Do not use Teflon tape on M11 system threads 1 1 4 Use a non hardening thread sealant on all system threads CAUTION...

Страница 54: ...xon Univis J13 or HVI 13 Hydraulic Fluid 1 5 BETTIS REFERENCE MATERIALS 1 5 1 Bettis M11 System Assembly drawing part number 127247 1 5 2 M11 with auto reset module uses additional drawing part number...

Страница 55: ...s follows 3 1 1 2 Pneumatic and Hydraulic T series actuators Apply pneumatic or hydraulic pressure to the inlet port located in the outer end cap of the actuators power cylinder placing the actuator i...

Страница 56: ...d area of the hydraulic override cylinder install pipe plug into the vacant port hole NOTE Use pipe dope on the bleed pipe plug 3 1 2 7 When hydraulic fluid appears at the vacant bleed plug port hole...

Страница 57: ...handle 3 1 3 6 Stop pumping the M11 pump handle when hydraulic fluid appears at both vacant pipe plug ports located in the actuator s hydraulic override cylinder 3 1 3 7 Apply pipe dope onto pipe plug...

Страница 58: ...th vacant pipe plug port located in the actuator s hydraulic override cylinder 3 2 1 6 Apply pipe dope onto pipe plug threads and install into the vacant pipe plug port as follows 3 2 1 6 1 G Series A...

Страница 59: ...port left vacant in step 3 1 15 3 2 2 5 Start pumping the hydraulic fluid into the system with the M11 pump handle 3 2 2 6 Stop pumping the M11 pump handle when hydraulic fluid appears as follows 3 2...

Страница 60: ...0 NOTE When removing the pump hose tube fitting there will be a loss of fluid pressure G T Series actuators there is 250 psi pressure and HD Series actuator there is 33 psi pressure 4 2 M11 RESERVOIR...

Страница 61: ...rawing sheet 2 To remove the check valve 20 40 from the manifold 20 10 move the pump handle to the up position and using a fast motion move pump handle down Be ready to catch the check valve as pullin...

Страница 62: ...ve one retainer ring 40 140 from auto reset lower pivot pin 40 130 located on the back side of auto reset bracket 40 110 4 3 17 Remove flat washer s 40 150 from auto reset lower pivot pin 40 130 locat...

Страница 63: ...10 and pump rod 20 50 must be free of deep scratches pitting corrosion and blistering or flaking coating CAUTION Parts that reflect any of the above listed characteristics should be replaced with new...

Страница 64: ...y 10 10 over the lubricated center bar assembly 10 30 and into the cylinder 10 20 5 2 7 Install thread seal 10 80 and countersink washer 10 75 onto center bar assembly 10 30 5 2 8 Install and tighten...

Страница 65: ...ld 20 10 NOTE When installing the manifold cover be careful in keeping the o ring seal 25 60 in its seal groove 5 3 15 Install four cap screws 20 110 through pump cover 20 20 and into manifold 20 10 5...

Страница 66: ...the control valve 20 190 5 3 29 Install the control knob 20 320 onto the control valve 20 190 5 3 30 Retain the control knob 20 320 on the control valve 20 190 with one socket cap screw 20 180 lockwa...

Отзывы: