7
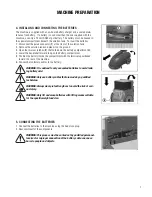
4. INSTALLING AND CONNECTING THE BATTERIES
The machine is supplied with an on-board battery charger and a sealed main-
tenance free battery. If a battery is used other than the one supplied with the
machine, use only a 12 volt AGM or gel battery. The battery must be housed in
the special compartment beneath the solution tank. To insert the batteries:
1. Disconnect the quick connector (
1
) at the front of the solution tank.
2. Remove the solution tank and place it on the ground.
3. Open the two rear latches (
2
) that hold down the battery compartment lid.
4. Lower the handlebar forward to open the battery compartment.
5. Position the battery inside the compartment with the terminals positioned
toward the rear of the machine.
6. Connect Betco factory cables to the battery.
WARNING: It is advised to only use sealed batteries to avoid leak-
ing battery acid.
WARNING: Only use battery cables that are made by a qualified
technician.
WARNING: Always wear protective gloves to avoid the risk of seri-
ous injury.
WARNING: Only lift and move batteries with lifting means suitable
for the specific weight and size.
5. CONNECTING THE BATTERIES
1. Connect the batteries to the machine using the Anderson plug.
2. Reassemble all of the components.
WARNING: This process must be carried out by qualified personnel.
Incorrect or improper connection of the battery cable can cause
harm to people and objects.
MACHINE PREPARATION
Содержание Genie B
Страница 19: ...19 ...
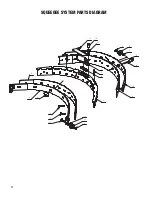
Страница 22: ...22 SQUEEGEE SYSTEM PARTS DIAGRAM 5 18 7 1 8 16 15 11 2 3 6 4 17 17 2 12 9 10 11 12 11 14 13 ...
Страница 24: ...24 SQUEEGEE YOKE PARTS DIAGRAM 13 2 5 1 10 7 3 11 14 8 6 12 4 9 ...
Страница 32: ...32 ELECTRIC SYSTEM PARTS DIAGRAM 4 7 2 1 6 3 5 ...
Страница 36: ...36 ACCESSORIES DIAGRAM 5 6 4 2 1 3 7 13 Pad 14 Pad Medium Brush STD General Brush Heavy Brush 8 Clutch Plate ...
Страница 38: ...38 ...
Страница 39: ...39 ...


