background image

USER HANDBOOK 1.0 | DC2115, ET2115 

Berghof Automation GmbH | Harretstrasse 1 | 72800 Eningen | www.berghof.com 
21-0099-82-00-00-003 | 270010900_Anwenderhandbuch_DC-ET2115_EN.docx  


65


10.2. ET2115 Ethernet Terminal 


Ethernet Terminal 

ET2115 

Display 

WXGA 

Across diagonals 

15.6" 

Item no. 

222002100, 222002600 

Resolution 

1366 x 768 pixels 

Colours 

TFT: 16.7 M 

CPU 

CPU 

i.MX6 800 MHz / single core 

Dimensions and weight 

Dimensions (WxHxD) 

425 x 280 x 55 mm 

Weight 

approx. 3 kg 

Operating conditions 

Operating temperature 

0 °C to 55 °C (front and rear of the device; in compliance with installa-

tion requirements) 

Relative humidity 

max. 85%, non-condensing 

Transport and storage 

Operating temperature 

–20 °C to +70 °C 

Relative humidity 

max. 85%, non-condensing 

Operation 

Installation 

Removable securing clips 

Certification 

to product standards EN 61010-2-201, EN 61131-2 

Touch operation 

Touch resistive 

Shock resistance 

Vibration 

sinusoidal (EN 60068-2-6) test: Fc 10…150 Hz, 10 m/s² 

Shock 

15 G (approx. 150 m/s²), 11 ms duration, sinusoidal half-wave (EN 

60068-2-27)  

Test: Ea 

EMC, protection rating 

Emitted interference 

EN 61131-2 

Resistance to interference 

EN 61131-2, industrial zone 

Protection class 

III 

Insulation resistance 

EN 61131-2; 500 V DC test voltage 

Содержание DC2115

Страница 1: ...USER HANDBOOK 1 0 DC2115 ET2115 Dialog Controller Ethernet Terminal ...

Страница 2: ...in other countries EtherCAT is a registered trademark and patented technology licensed from Beckhoff Automation GmbH Germany CiA and CANopen are registered trademarks belonging to CAN in Automation e V ARM and Cortex are registered trademarks belonging to ARM Limited PROFINET is a registered trademark belonging to PROFIBUS Nutzerorganisation e V Modbus is a registered trademark belonging to the Mo...

Страница 3: ...mation GmbH Harretstrasse 1 72800 Eningen www berghof com 21 0099 82 00 00 003 270010900_Anwenderhandbuch_DC ET2115_EN docx 3 Change log Version Date Description 0 8 17 11 2016 Draft 0 9 19 12 2016 Preliminary version 1 0 20 01 2017 First version ...

Страница 4: ... ET2115 14 3 2 Scope of delivery and accessories 15 3 3 Product features 15 4 INSTALLATION 17 4 1 Preparation for installation 17 4 2 Installation 19 5 CONNECTION 21 5 1 Power supply 21 5 1 1 Connecting the power supply to the DC2115 22 5 1 2 Connecting the power supply to the ET2115 23 5 2 Data connections 24 5 2 1 Block circuit diagram DC2115 24 5 2 2 Block circuit diagram ET2115 25 5 2 3 Digita...

Страница 5: ...51 6 3 3 Real time clock with buffer battery DC2115 51 6 3 4 microSD card 52 6 4 Troubleshooting 53 6 4 1 No network connection 53 6 4 2 In error stop mode DC2115 53 7 MAINTENANCE UPKEEP 54 7 1 Maintenance 54 7 2 Cleaning 55 7 3 Chemical resistance 55 7 3 1 Resistance of the touch screen 55 7 3 2 Resistance of the front diaphragm 56 8 UNINSTALLATION 59 8 1 Uninstallation 59 9 DISPOSAL 61 10 TECHNI...

Страница 6: ...tomation GmbH Harretstrasse 1 72800 Eningen www berghof com 21 0099 82 00 00 003 270010900_Anwenderhandbuch_DC ET2115_EN docx 6 12 CUSTOMER SERVICES ADDRESSES 75 12 1 Customer services 75 12 2 Addresses 75 13 APPENDIX 76 13 1 List of figures 76 ...

Страница 7: ...ies to the following devices DC2115 Dialog Controller ET2115 Ethernet Terminal It contains information on the following topics Applications Safety Mechanical design Electrical design Connections Start up Upkeep and maintenance Decommissioning Disposal Always keep this user handbook available alongside the product 1 2 Symbols and visual depictions The following symbols and visual depictions will be...

Страница 8: ...serious injury or death Non compliance with the safety features may result in death or serious injury Take preventive measures CAUTION Possible minor injuries Non compliance with the safety features may result in minor injuries Take preventive measures NOTE Possible damage to property Non compliance with the safety features may result in damage to property Take preventive measures Further informat...

Страница 9: ...dular automation system for industrial control applications within the medium to high performance range It extends the communications capabilities to include EtherCAT Profinet Modbus and others The automation system is designed for use within overvoltage category I IEC 364 4 443 systems for con trolling and regulating machinery and industrial processes in low voltage installations in accordance wi...

Страница 10: ...n stored or transported in cold weather or under conditions or large fluctuations in temperature do not start to operate it until it has acclimatised to room temperature for the place it is used If condensation is present wait at least 12 hours before starting to operate the device 1 8 Unpacking Or receipt of the device a check must be made that it is complete and undamaged 1 Check the packaging f...

Страница 11: ...ll types of failure must be considered at the system level and the associated preventative measures identified If necessary request information from your automation system provider 2 1 Safety instructions The device may be operated only when it is in good working order Exposed sharp edges pose an injury risk If you discover damage to the front glass of the device do not continue to operate the dev...

Страница 12: ...s an input device with a display for connection to a control system for ma chines or systems The terminal shows the CODESYS Web visualisation or CODESYS Target visualisation irrespective of whether the visualisation originates from a Berghof PLC control unit or some other CODESYS control unit The Ethernet Terminal ET2115 can be connected via Ethernet interfaces the Controller DC2115 can be con nec...

Страница 13: ... X6 EtherCAT ETH1 2 LEDs PWR Run Stop Error X8 CAN bus 3 LEDs Power digital I O X9 RS 232 RS 485 4 Earth connection X11 Debug interface do not use this it is for use only by Berghof Service Engineers X1 Power supply digital inputs output S1 Function button do not use this it is for use only by Berghof Service Engineers X2 Analogue inputs S2 Terminating resistor CAN 120 Ohm X3 USB 2 0 S3 Terminatin...

Страница 14: ...14 3 1 2 Overview ET2115 Fig 2 Overview ET2115 rear view Item Designation Item Designation 1 Display 15 6 inch X8 Debug interface do not use this it is for use only by Berghof Service Engineers 2 Earth connection X100 Power supply X3 USB 2 0 S1 Function button do not use this it is for use only by Berghof Service Engineers X4 Ethernet ETH0 LED LEDs PWR Run Stop Error ...

Страница 15: ...ent Processor In its the basic configuration the device is equipped with an 800 MHz ARM CPU with a Cortex A9 core Ethernet 1 Ethernet interface with 10 100 Mbit s The Ethernet interface is used for standard Ethernet connections TCP IP and UDP IP protocols permit flex ible connections to visualisation software higher level control units and to the IT infrastructure EtherCAT DC2115 The second Ethern...

Страница 16: ...t and read on a real time clock with battery back up microSD card DC2115 The standard commercial microSD card interface SDHC up to max 32 GB allows data to be written to memory cards or read from memory cards Summary of features DC2115 ARM CPU with CortexTM A9 single core 800 MHz optional dual or quad core User program and data memory RAM 256 MB onboard User program memory flash 256 MB onboard 2 U...

Страница 17: ... allow sufficient air circulation it must be ensured that the device has a clear space of at least 20 mm all round at the rear The max ambient temperature inside the control cabinet must not exceed 55 C in operation The support material for the installation cut out must be flat sufficiently stable and be from 1 to 4 mm thick NOTE Damage to the device Installation on uneven support material can lea...

Страница 18: ...w berghof com 21 0099 82 00 00 003 270010900_Anwenderhandbuch_DC ET2115_EN docx 18 Fig 4 Installation cut out Cut a rectangular installation cut out in the support material Height 260 mm Width 402 mm Max Corner radius 3 0 mm Thickness of the support material Optimally 2 0 3 0 mm Max 4 0 mm ...

Страница 19: ...installation cut out Requirements The securing clips must not be attached to the device 1 Making sure the alignment is correct push the device evenly into the installation cut out NOTE Damage to the device If installation is performed carelessly the device can fall out of the installation cut out or be damaged Do not tilt the device Restrain the device against falling until the securing clips have...

Страница 20: ...5_EN docx 20 2 Make sure the device lies flush all round Fig 6 Inserting the securing clips rear view 3 Secure the device with 2 securing clips Insert the securing clips into the cover at diagonally opposite points and tighten the screws finger tight Fig 7 Tightening the securing clips 4 Insert the remaining 6 securing clips and tighten all 8 screws equally ...

Страница 21: ... supply Before connecting the device ensure that the external power supply meets the required specifications type K to 61131 2 External power supply 24 V DC Supply voltage 24 V DC SELV 15 20 Ripple current propor tion Max 5 The direct voltage level must not fall below 20 4 V Power consumption ET2115 Total max 0 6 A at 24 V DC peak current 1 2 A DC2115 Total max 0 8 A at 24 V DC peak current 1 2 A ...

Страница 22: ...ng to the following table Fig 8 Power supply DC2115 connector X1 with power LED Power supply connector X1 Pin Designation Assignment 1 8 I O digital inputs and outputs see Digital inputs and outputs DC2115 9 L0 24 V Power supply 24 V DC 15 20 PLC internal processing max 1 2A 10 L1 24 V I O Feed to digital output max 2 A for 0 5 A per output for I O 11 M0 GND 12 L0 24 V Power supply 24 V DC 15 20 P...

Страница 23: ...k on the device switch off all power feeds includ ing peripherals Connect the power supply to connector X100 according to the following table Fig 9 Power supply connector X100 Power supply connector X100 Pin Designa tion Assignment 9 L0 24 V Power supply 24 V DC 15 20 max 0 6 A peak current 1 2 A 11 GND M0 GND The following counterparts have been tested for the SL SMT 3 5 Weidmüller connector and ...

Страница 24: ...5 Berghof Automation GmbH Harretstrasse 1 72800 Eningen www berghof com 21 0099 82 00 00 003 270010900_Anwenderhandbuch_DC ET2115_EN docx 24 5 2 Data connections 5 2 1 Block circuit diagram DC2115 Fig 10 Block circuit diagram DC2115 ...

Страница 25: ...2115 ET2115 Berghof Automation GmbH Harretstrasse 1 72800 Eningen www berghof com 21 0099 82 00 00 003 270010900_Anwenderhandbuch_DC ET2115_EN docx 25 5 2 2 Block circuit diagram ET2115 Fig 11 Block circuit diagram ET2115 ...

Страница 26: ...ive switching inputs of type 1 or 3 IEC 61131 2 They are designed for nominal input voltages of 24 V The input signals are transmitted internally on a cyclical basis for process data processing An open input is interpreted as static 0 The inputs also have a common refer ence potential GND The following counterparts have been tested with the S2C SMT 3 5 Weidmüller connector and are ap proved for us...

Страница 27: ...threshold Yes electronic voltage limitation typ 7 A The current is limited electronically Activation of short circuit protection results in thermal overload and tripping of thermal overload protection Permissible limits based on cold state max 10 000 short circuits overall duration max 500 hours Status under unclear operating conditions Logical 0 If the supply voltage is insufficient and at bootin...

Страница 28: ...onnection cables Cables over 30 m in length must be shielded Cable cross section within the control cabi net 0 14 1 5 mm 26 16 AWG Aim for connector limits to UL specifications Field wiring according to regulations and standards Comply with all local regulations and the stipula tions of DIN EN 61131 2 Rated load voltage 24 V DC SELV Delay time 1 ms Applies for transitions from 0 to 1 and 1 to 0 Si...

Страница 29: ...099 82 00 00 003 270010900_Anwenderhandbuch_DC ET2115_EN docx 29 Fig 14 Circuit diagram of the principles of positive switching input Fig 15 Operating ranges of the digital inputs type 1 3 negative switching Item Designation Item Designation 1 ON range 3 Transition range 2 Signal noise ratio 1 V 4 OFF range ...

Страница 30: ...he control panels or to the M on the control unit GND and AGND are already connected within the control unit via a special filter AGNDs may not be connected directly to the equipotential bonding conductor PE of the machine or system Long cables and wires with a small cross section lead to voltage drops and deviations in PT100 0 measurements due to resistance of the lead These unavoidable deviation...

Страница 31: ...at ing mode AI PT 250 ms In operating mode AI PT calculations are carried out after the millisecond sampling rate A new val ue is available in the user program every 250 ms Digital filtering Possible filter set tings Time range for averaging Time range for averaging Operat ing mode AI PT 0 1 ms 0 25 s 10 10 ms 2 5 s 100 100 ms 25 s 1 000 1 000 ms 1 s 250 s If filtering is active an average is calc...

Страница 32: ...itched on or off Max errors at 25 C 0 8 2 C Temperature coeffi cient 40 ppm K 0 4 mV K Digital resolution 24 bit Data format in the user program 32 bit real floating point number in millivolts mV Maximum permissible permanent overload Max 30 V compared to AGND 30 V max voltage at AI channel Value of least signifi cant bit 1 2 µV Output of digital value in case of overload If a voltage of 10 V is a...

Страница 33: ...nd PT1000 acc to EN 60751 Platinum sensors of accuracy classes AA A B and C may be used Measuring range 40 to 200 C Measuring current RMS 0 3 mA Conversion time 250 ms Max errors at 25 C 2100 ppm 0 5 C Temperature coeffi cient 50 ppm K 0 012 C K Digital resolution 24 bit Data format in the user program 2 32 bit real floating point number in Ohms Ω and degrees Celsius C Linearisation The value in d...

Страница 34: ...e input Only use the corresponding AGND for each voltage input Do not connect AGNDs from different channels AGNDs from different channels must always be connected separately to the connector X1 Do not connect to the common GND The required connections can already be found on the circuit board Cables to the analogue sensors encoders should be connected as directly as possible avoid the use of termi...

Страница 35: ...Cables to the PT100 0 sensors should be connected as directly as possible avoid the use of terminals and terminal blocks Only connect PT100 0 sensors to AI U T channels 2 wire measurement Resistance can result in a measurement error which in the case of long cables with a small cross section can be up to 10 If the temperature of the sensor is known this deviation can be subtracted by the software ...

Страница 36: ...er has one 10 100 Base T RJ 45 port for connection to the network Fig 19 Ethernet interface X4 Assignment of Ethernet interface connector X4 Pin Assignment Pin Assignment 1 TX 5 NC 2 TX 6 RX 3 RX 7 NC 4 NC 8 NC LEDs LED Colour Meaning to IEEE 802 3 clause 25 LNK RCV Yellow Link Data Receive Flashing Connection active data transfer in pro gress Off no connection established SPEED Green On 100 Mbit ...

Страница 37: ...ces with RJ 45 connections for networking The Ethernet interface X6 can be used as the EtherCAT master Fig 20 EtherCAT interface X6 Assignment of EtherCAT interface connector X6 Pin Assignment Pin Assignment 1 TX 5 NC 2 TX 6 RX 3 RX 7 NC 4 NC 8 NC LEDs LED Colour Meaning to IEEE 802 3 clause 25 LNK RCV Yellow Link Data Receive Flashing Connection active data transfer in pro gress Off no connection...

Страница 38: ...ferred can render the USB stick unusable Open files which cannot be accessed due to removal of the USB stick can block the device Therefore ensure that all operations are complete before removing the USB stick NOTE Damage to property and malfunctions due to data loss The USB interface is protected against overloading 0 5 A In the event of a short circuit during operation the control unit may trigg...

Страница 39: ...98 Maximum Baud rate 1 MBit s Lowest adjustable Baud rate 50 kBit s Contacts Electrically isolated Assignment to CiA303 Fig 22 CAN interface X8 Assignment of CAN interface connector X8 Pin Assignment Pin Assignment 1 CAN_H 5 NC 2 CAN_L 6 NC 3 ISO GND 7 ISO GND 4 NC 8 NC If the CAN interface is located at the start or end of the CAN bus topology Set switch S2 to ON in order to switch on the 120 Ω t...

Страница 40: ...both interfaces 115 kBd Fig 23 RS 232 RS 485 interface X9 Pin assignment for RS 232 RS 485 interface connector X9 Pin Assignment software interface Pin Assignment software interface 1 RS 232 RX COM 1 5 RS 485 Tx Rx COM 2 2 RS 232 TX COM 1 6 NC 3 NC 7 reserved 4 RS 485 Tx Rx COM 2 8 ISO GND The RS 485 interface is soft terminated in the dialogue controller with 560 Ω If the interface is located at ...

Страница 41: ...atuses for logical 1 A B 0 2 V and logical 0 A B 0 2 V Undriven bus The bus termination must be as asymmetric as possible to ensure the greatest possible signal noise ra tio to reduce the symmetrical signal noise ratio In order to achieve the necessary voltage difference between the signals a suitable resistor network must be used as the line termination The necessary size of the resistors is gove...

Страница 42: ... on the device switch off all power feeds includ ing those to any connected peripherals sensors and programmable de vices etc with independent power supplies NOTE Damage to property Before connecting the power supply ensure that all cabling and the polari ty of all the connections are correct Switching on The device does not have an on off switch The device starts automatically when the system is ...

Страница 43: ...ply ensure that all cabling and the polari ty of all the connections are correct 1 Supply the device with power 24 V After the start the current IP address and network mask of the DC2115 are shown at the top right of the dis play 2 Connect the device to a programming computer using a network cable X4 and network switch 3 Open a web browser on the programming computer 4 Enter the IP address of the ...

Страница 44: ...of web interface settings 6 Click on the Network link The Network Configuration page is displayed Fig 27 Network Configuration page 7 Check the network settings and make any changes in the text boxes if required DC20XX configuration ETH0 X4 ETH1 X5 8 Save the settings by clicking on Save 9 Additional settings can also be viewed and or modified on the web configuration page for example system time ...

Страница 45: ...by clicking on Reboot Module The device is now configured and ready for use 6 2 2 DC2115 OnScreen config NOTE Damage to property Before connecting the power supply ensure that all cabling and the polari ty of all the connections are correct 1 Supply the device with power 24 V After the start the current IP address and network mask of the DC2115 are shown at the top right of the dis play Fig 28 Mai...

Страница 46: ... IP address network mask gateway 4 Press the Next button The page with the summary of the network settings appears Fig 30 Summary of the network settings 5 To change other settings or to correct the changes press the Back button 6 If no settings were changed press OK The main screen of the device will appear or Press the Save button The settings will be saved and the device automatically restarts ...

Страница 47: ...s before it can be used NOTE Damage to property Before connecting the power supply ensure that all cabling and the polari ty of all the connections are correct 1 Supply the device with power 24 V After the start the current network settings are displayed server IP IP address and network mask Fig 31 Start page with network settings 2 Press the Configuration button A page with further information ap...

Страница 48: ...the network settings of the device appears Fig 33 Network settings of the device 4 If necessary press the Edit button and change the network settings as required IP address network mask gateway 5 Press the Next button The page with the settings for the server IP and Lifeguard appears Fig 34 Setting the server IP 6 If necessary press the Edit button and change the server IP as required ...

Страница 49: ... on the controller version press the Change button to change the Lifeguard setting CODESYS V2 Berghof VNC LG CODESYS V3 Ping LG 9 Press the Next button to skip the following pages with until the page with the summary of the net work settings appears Fig 36 Summary of the network settings 10 If no settings were changed press OK The main screen of the device will appear or Press the Save button The ...

Страница 50: ...y error mes sages Location of the operating status LEDs The Run Stop and Error LEDs display the system status Fig 37 Location of the operating status LEDs LED Meaning 1 PWR green Shows that the power supply to the electronics is correct 2 Run Stop yel low green red Shows the system statuses 3 Error red Shows the device has been stopped due to an error Meaning of the LED displays System statuses ar...

Страница 51: ...se Press Change to maintenance mode CODESYS PLC CP1131 P Press quickly Change between PLC run and stop mode Press and hold Stop the PLC with resetting of variables cold re set 6 3 3 Real time clock with buffer battery DC2115 Setting the date and time The time can be set via the web configuration page or via the CODESYS V3 library Changing the battery The battery is not designed to be changed by th...

Страница 52: ...move a microSD card only when the device is switched off NOTE Loss of data microSD cards do not have their own write protection system Ensure that no data is deleted or overwritten by accident Inserting a microSD card 1 Switch the device off 2 Insert the microSD card into the microSD card slot 3 Switch the device on again The microSD card is now ready for data transfer read write and copy Path med...

Страница 53: ...address has been duplicated Check the network settings on the PC The subnet and the subnet mask settings must be the same as those for the controller Check the firewall anti virus programs on the PC Check the Lifeguard settings 6 4 2 In error stop mode DC2115 1 Log in to the device via a web browser 2 Determine the cause of the fault Diagnostics PLC Log System Log 3 Correct the fault 4 Restart the...

Страница 54: ...r Failures or malfunctions may result in uncontrolled and unpredictable opera tional behaviour Do not insert connect undo or touch any connections whilst the device is in operation Before starting any work on the device switch off all power feeds includ ing those to any connected peripherals sensors and programmable de vices etc with independent power supplies If the device is used correctly it sh...

Страница 55: ...id faults due to inadvertent activation switch the device off before cleaning the front panel Clean the surfaces using only a dry lint free cloth 7 3 Chemical resistance 7 3 1 Resistance of the touch screen The active area of the touch screen is resistant to the following chemicals when exposed to them for a period of up to an hour at a temperature of max 21 C Domestic and industrial chemicals Det...

Страница 56: ...rect sunlight Keep these substances away from the front diaphragm Protect the display against direct sunlight The front diaphragm Autoflex EB is based on a polyester film with biaxial alignment It is highly resistant to solvents In accordance with the standard DIN 42 115 part 2 the front diaphragm is resistant to the following chemi cals without any evident change or damage Application for more th...

Страница 57: ...oride 30 Formic acid methane acid 50 Hydrochloric acid 10 Hydrogen peroxide 25 Isophorone Methyl ethyl ketone butanone Nitric acid 10 Tetrahydrofuran Formaldehyde 37 in water Linseed oil Paraffin oil Petrol Silicone oil Turpentine substitute Universal brake fluid e g Castrol Girling Dibasic ester 6 Skydrol 500B4 Lixtop Potassium ferrocyanide Tetrachloro ethylene perchloro ethylene Toluene Triaceti...

Страница 58: ...com 21 0099 82 00 00 003 270010900_Anwenderhandbuch_DC ET2115_EN docx 58 Application of 24 hours at 50 C Top Job Jet Dry Gumption Fantastic Formula 409 Grape juice Milk Ariel Persil Wisk Lenor Downey Ajax Vim Domestos Vortex Windex Application of less than 1 hour Glacial acetic acid pure acetic acid ...

Страница 59: ...he device and its peripherals from the power supply 2 Unplug all connector connectors and cables NOTE Damage to the device If uninstallation is performed carelessly the device can fall out of the installation cut out or be damaged Do not tilt the device Secure the device against falling especially when taking it out of the in stallation cut out Fig 39 Undoing the screws 3 Undo equally the screws o...

Страница 60: ...ningen www berghof com 21 0099 82 00 00 003 270010900_Anwenderhandbuch_DC ET2115_EN docx 60 Fig 40 Removing the securing clips 4 Remove the 8 securing clips Fig 41 Pushing the device out of the installation cut out 5 Push the device evenly forwards out of the installation cut out ...

Страница 61: ...nd of the device s life cycle you can return it to the manufacturer for a set fee The manufactur er will then deal with the recycling of the device Disposal in accordance with regional regulations Dismantle the device and disassemble it completely into its component parts Send the metal parts for metal recycling Sort the electronic parts circuit boards drives etc Dispose of the electronic scrap in...

Страница 62: ... and weight Dimensions WxHxD 425 x 280 x 55 mm Weight approx 3 kg Operating conditions Operating temperature 0 C to 55 C front and rear of the device in compliance with installa tion requirements Relative humidity max 85 non condensing Transport and storage Operating temperature 20 C to 70 C Relative humidity max 85 non condensing Operation Installation removable securing clips Certification to pr...

Страница 63: ...age Protection rating IP20 front IP65 Power supply 24 V power Supply voltage 24 V DC 15 20 SELV max ripple component 5 Power consumption Max 0 8 A peak current 1 2 A at 24 V DC Power consumption dig Out puts Depending on the output load max 2 A continuous rating Protection against reverse po larity Yes Ethernet interfaces No type of interface 1x 10 100 Base T Connection system RJ45 EtherCAT interf...

Страница 64: ...clock yes with battery back up microSD card slot 1x microSD card I O Digital IN 4x Digital OUT 4x 0 5 A Analogue IN 4 x universal analogue inputs 10 V 10 V 2 x PT100 PT1000 Resolution 24 bit 2x 10 10 V PT100 PT1000 with 2 wire 2x 10 10 V or return lead for 3 wire Battery Type Panasonic VL2020 or similar Lifespan 10 years depending on the operating temperature Storage 1 year without voltage any lon...

Страница 65: ...5 C front and rear of the device in compliance with installa tion requirements Relative humidity max 85 non condensing Transport and storage Operating temperature 20 C to 70 C Relative humidity max 85 non condensing Operation Installation Removable securing clips Certification to product standards EN 61010 2 201 EN 61131 2 Touch operation Touch resistive Shock resistance Vibration sinusoidal EN 60...

Страница 66: ...g IP20 front IP65 Power supply 24 V power Supply voltage 24 V DC 15 20 SELV max ripple component 5 Power consumption Max 0 8 A peak current 1 2 A at 24 V DC Protection against reverse po larity Yes Ethernet interface No type of interface 1x 10 100 Base T Connection system RJ45 Protocols TCP IP USB interface No type of interface 1x host USB 2 0 USB connector port A Number of insertion withdrawal cy...

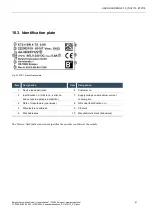
Страница 67: ...ate Item Designation Item Designation 1 Device type description 6 Customer no 2 Identification no Article no serial no and version as delivered condition 7 Supply voltage und maximum current consumption 3 Date of manufacture year week 8 QR code Identification no 4 Manufacturer s address 9 CE mark 5 Mac addresses 10 Manufacturer s mark trademark The Version field delivered version specifies the ex ...

Страница 68: ... Harretstrasse 1 72800 Eningen www berghof com 21 0099 82 00 00 003 270010900_Anwenderhandbuch_DC ET2115_EN docx 68 10 4 Identification The characteristics of the device can be decoded from the identification key Fig 43 Identification key ET2115 and DC2115 ...

Страница 69: ...1 0099 82 00 00 003 270010900_Anwenderhandbuch_DC ET2115_EN docx 69 11 Standards and certificates 11 1 Standards Applicable directives EMC directive 2014 30 EU Applicable standards PLC standard EN 61131 2 2008 4 Safety provisions DIN EN 61010 2 201 Emitted interference residential areas DIN EN 61000 6 3 ...

Страница 70: ...HANDBOOK 1 0 DC2115 ET2115 Berghof Automation GmbH Harretstrasse 1 72800 Eningen www berghof com 21 0099 82 00 00 003 270010900_Anwenderhandbuch_DC ET2115_EN docx 70 11 2 UL certificate Fig 44 UL certificate ...

Страница 71: ...03 270010900_Anwenderhandbuch_DC ET2115_EN docx 71 The devices are authorised to use the following mark Fig 45 cULus authorisation The devices have been awarded cULus authorisation according to standard UL 61010 2 201 NRAQ 7 Link http database ul com cgi bin XYV cgifind new LISEXT 1FRAME index html UL File Number E242595 ...

Страница 72: ...NDBOOK 1 0 DC2115 ET2115 Berghof Automation GmbH Harretstrasse 1 72800 Eningen www berghof com 21 0099 82 00 00 003 270010900_Anwenderhandbuch_DC ET2115_EN docx 72 11 3 Declaration of conformity 11 3 1 ET2115 ...

Страница 73: ...USER HANDBOOK 1 0 DC2115 ET2115 Berghof Automation GmbH Harretstrasse 1 72800 Eningen www berghof com 21 0099 82 00 00 003 270010900_Anwenderhandbuch_DC ET2115_EN docx 73 11 3 2 DC2115 ...

Страница 74: ...licence The firmware of the devices contains der free software Parts of this software are available under the follow ing OpenSource licences amongst others GNU General Public License GPL GNU Lesser General Public License LGPL Mozilla Public License MPL FreeType License FTL The source code of the free software may be requested from Berghof Customer Service within three years pf delivery of the devi...

Страница 75: ... Harretstr 1 72800 Eningen Germany T 49 7121 894 183 F 49 7121 894 100 e mail support controls berghof com www berghof com 12 2 Addresses CAN in Automation international manufacturer and user organisation for CAN users in automation CAN in Automation e V CiA Am Weichselgarten 26 91058 Erlangen headquarters can cia de www can cia de EtherCAT Technology Group ETG Headquarters Ostendstraße 196 90482 ...

Страница 76: ...hing 29 Fig 16 Analogue inputs X2 30 Fig 17 Example connection Voltage input 34 Fig 18 Example connection Temperature measurement 35 Fig 19 Ethernet interface X4 36 Fig 20 EtherCAT interface X6 37 Fig 21 USB interfaces X3 and X5 DC2115 38 Fig 22 CAN interface X8 39 Fig 23 RS 232 RS 485 interface X9 40 Fig 24 RS 485 switchable terminating resistor 40 Fig 25 login window 43 Fig 26 List of web interf...

Страница 77: ...USER HANDBOOK 1 0 DC2115 ET2115 Berghof Automation GmbH Harretstrasse 1 72800 Eningen www berghof com 21 0099 82 00 00 003 270010900_Anwenderhandbuch_DC ET2115_EN docx 77 ...

Отзывы: