22
Dismounting
6005437_a – 30.05.2022
7.
Dismounting
☞
Move the device into a position where the distance to the
ceiling console is no more than 1150 mm.
D
WARNING!
Risk of death due to electric shock!
Touching live parts can cause an electric shock, burns or
death.
☞
Disconnect all poles of the power supply for the device.
☞
Ensure that the voltage supply is and remains
disconnected while the following work is in progress.
D
WARNING!
Danger of injuries through improper handling!
Taking the device down requires a great deal of physical
exertion due to its size and weight. If the device falls down,
serious injuries are possible.
☞
At least three persons are required to take the device
down.
☞
Ensure stable footing when taking the device down.
☞
Ensure that no other people are in the working area.
D
ATTENTION!
Danger of property damage through improper handling!
Taking the device down requires a great deal of physical
exertion due to its size and weight. If the device falls, the
device, kitchen furnishings and other objects could be
damaged.
☞
Protect the hood body against damage and scratches
(e.g. using a blanket).
☞
Cover the cooled hob.
☞
Keep the installation area clear.
7.1
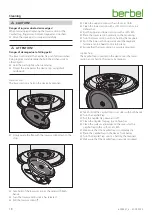
Dismounting the hood body
☞
Set the device down on a suitable surface (e.g. trestle).
☞
Unscrew the lock nuts on the ceiling console’s cover.
☞
Deposit the cover on the body.
☞
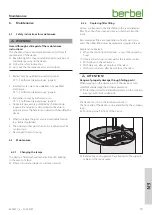
Pull out the Wieland plug.
☞
Remove the screws from the cable anchor.
☞
Deposit the mains cable with the Wieland plug on the
body.
If present:
☞
Remove any accessory connection cables.
☞
Have two persons hold the body.
☞
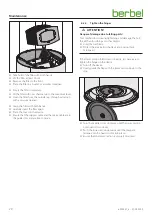
Have a third person unscrew the lock nuts (counter nuts)
for the support cable on the fastening sleeves.
☞
Unscrew the fastening sleeves from the screwed end and
loosen the support cable.
☞
Deposit the support cable on the body.
☞
Secure all moving parts on the hood body.
☞
Set the body down on a clean, solid surface or in the
packaging.
7.2
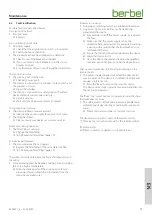
Dismounting the ceiling mounting plate
☞
Remove the nuts and the washers from the slots in the
ceiling mounting plate.
☞
Unscrew the nuts from the lock holes in the ceiling
mounting plate.
☞
Rotate the ceiling mounting plate.
☞
Remove the ceiling mounting plate.
☞
Set the ceiling mounting plate down on a clean, solid
surface or in the packaging.
☞
Remove the nuts and the washers from the lock holes.
The device is dismounted.
Содержание Skyline Round BIH 60 SKR
Страница 26: ...26 6005437_a 30 05 2022 ...
Страница 27: ...27 6005437_a 30 05 2022 ...
Страница 28: ...6005437_a 30 05 2022 ...


