Introduction
12
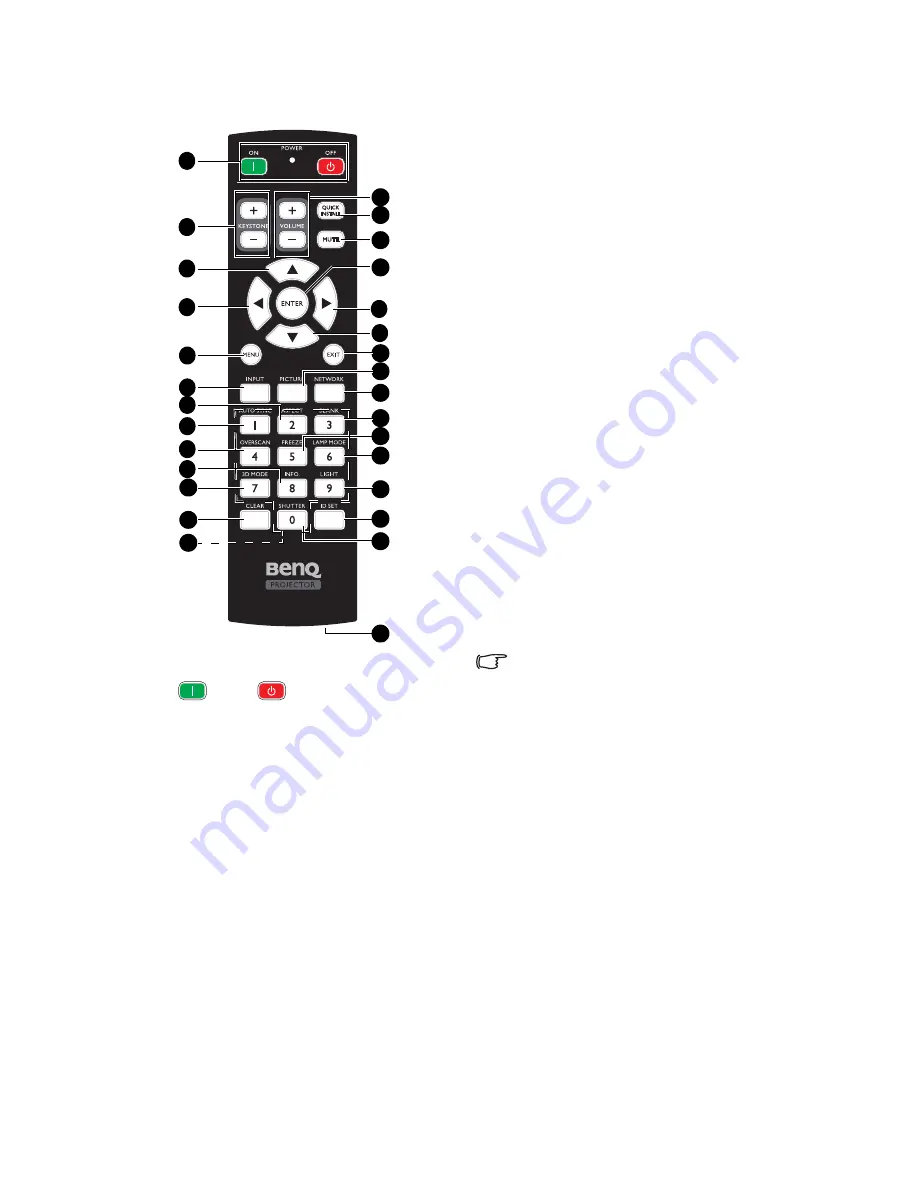
Remote Control
1.
ON /
OFF
Toggles the projector between standby
mode and on.
2.
K/KEYSTONE-
Manually corrects distorted images
resulting from an angled projection.
3.
Arrow keys (
▲
Up,
▼
Down,
◄
Left,
►
Right
)
When the On-Screen Display (OSD)
menu is activated, the #3 keys are used
as directional arrows to select the
desired menu items and to make
adjustments. See
"Using the menus" on
page 31
for details.
4.
MENU
Turns on the On-Screen Display (OSD)
menu. Goes back to previous OSD
menu, exits and saves menu settings.
5.
INPUT
Selects an input source for display. See
"Switching input signal" on page 35
for
details.
6.
ASPECT
Selects the display aspect ratio.
7.
AUTO SYNC
Automatically determines the best
picture timings for the displayed image.
8.
OVERSCAN
Press to select overscan mode.
9.
INFO.
Press to display
INFORMATION
menu.
10. 3D MODE
Press to display 3D setup menu.
11. CLEAR
Clear remote ID SET assigned to all
projectors.
Press
CLEAR
and
ID SET
for five
seconds. The LED blinks three times
then the ID setting is cleared.
12. Numeric buttons
Enters numbers in network settings.
Numeric buttons 1, 2, 3, 4 cannot be
pressed when asked to enter password.
13. /VOLUME -
Increases/decreases the projector
volume.
14. QUICK INSTALL
Displays the
Quick Install
OSD menu.
15. MUTE
Toggles projector audio between on and
off.
16. ENTER
Selects an available picture setup mode.
Activates the selected On-Screen
Display (OSD) menu item.
17. EXIT
Goes back to previous OSD menu, exits
and saves menu settings.
18. PCITURE
Press to display
Picture
menu.
4
5
11
16
17
23
13
1
2
3
3
6
14
10
20
15
18
12
19
21
22
24
25
3
3
7
8
9
26


