background image

Overview

1

Overview

About this book

This book provides you the main information about various 
components in your Joybook and demonstrates how to use 
them. The following are the major chapters of this book.
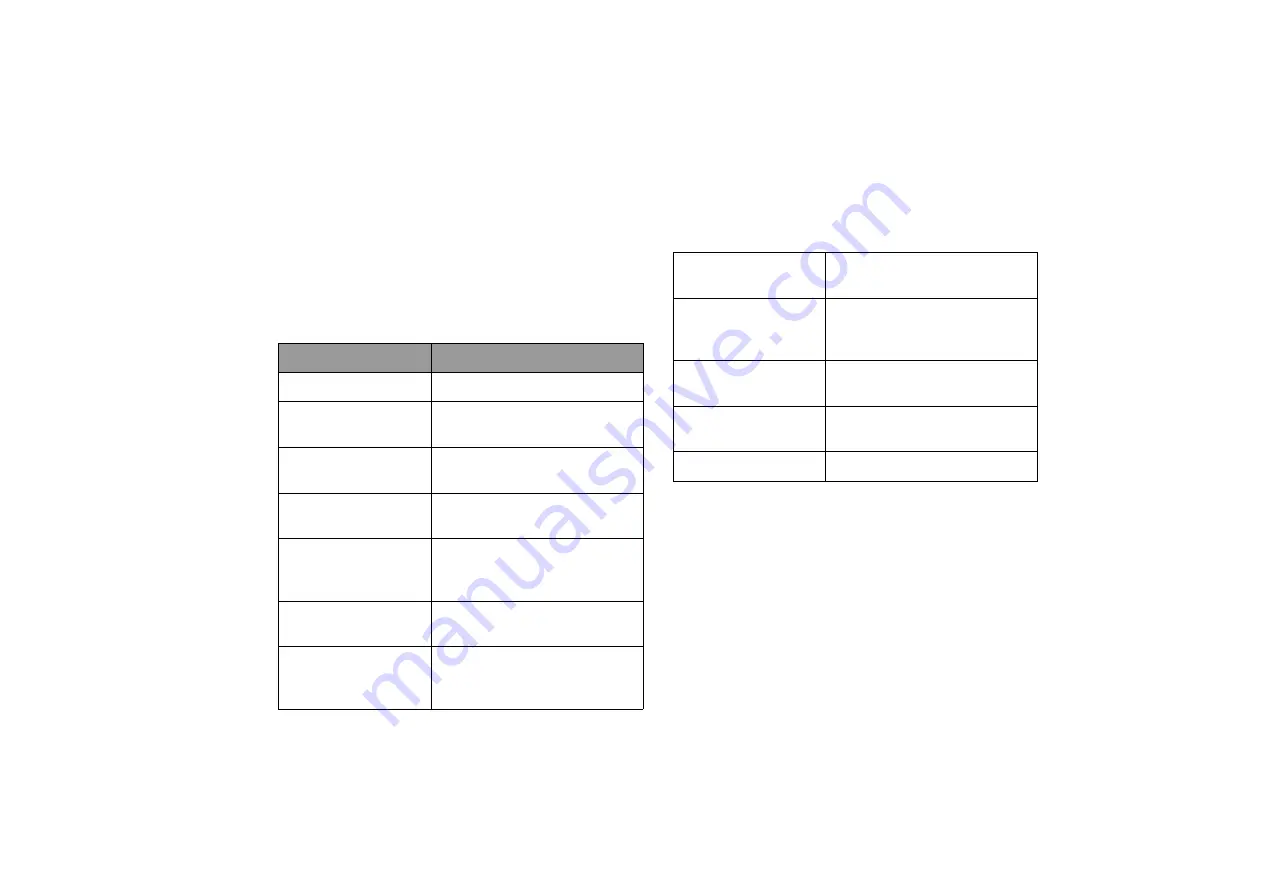
Chapter title

Description

Overview

Introduction to this book

Getting started

Information about beginning to 
use your Joybook

Touring your Joybook

Introduction to the hardware 
components of your Joybook

Getting started with 
Windows Vista

Basic information about 
Windows Vista

Using your Joybook

Basic and advanced 
information about operating 
your Joybook

Using BIOS setup

Information about how to use 
the BIOS setup utility

Recovering your 
system using 
QDataTrove

Information about using system 
backup and restore tools

Installing additional 
memory

Information about how to add 
additional RAM memory

FAQ and 
troubleshooting

Information about frequently 
asked questions and 
troubleshooting

Cleaning and battery 
maintenance

Information about cleaning and 
battery maintenance

Service and support

Information about Joybook 
service and support

Appendix

Important safety information

Содержание DHS500

Страница 1: ...Joybook S57 Series User Manual...

Страница 2: ...on makes no representations or warranties either expressed or implied with respect to the contents hereof and specifically disclaims any warranties merchantability or fitness for any particular purpos...

Страница 3: ...o a wireless network 29 Using Bluetooth select models only 31 Connecting to a Bluetooth device 31 Sending a file to a Bluetooth device 35 Using the HDMI output port 37 When connecting to an HDMI capab...

Страница 4: ...ng an Application and Driver DVD 55 Protecting your Joybook from viruses and other security threats 56 Installing additional memory 57 FAQ and troubleshooting 62 General 62 Battery and power 62 Connec...

Страница 5: ...Basic information about Windows Vista Using your Joybook Basic and advanced information about operating your Joybook Using BIOS setup Information about how to use the BIOS setup utility Recovering yo...

Страница 6: ...tart menu In this book the steps needed to reach a menu are shown in condensed form for example Start Help and Support Icon Symbol Item Meaning Warning Information mainly to prevent the damage to comp...

Страница 7: ...your dealer immediately Save the packaging in case you need to ship your Joybook for service Getting your Joybook ready for use 1 Installing the battery pack Close the lid of your Joybook if open Tur...

Страница 8: ...tly lift up the latchless lid that allows you to open the case easily The battery pack is shipped with low charge from the factory You can still use your Joybook while the battery is charging Power sy...

Страница 9: ...Vista Ultimate Installing other operating systems that have not been tested is not recommended and may not only void your warranty but also affect the functionality of your Joybook The actual operati...

Страница 10: ...N by connecting a network cable to the LAN port of your Joybook Connect a telephone line to the modem port of your Joybook and dial up to the Internet or send a fax Pay attention to the plug direction...

Страница 11: ...A interface to the E SATA port of your Joybook Connect an external display device such as a monitor or projector to the 15 pin D sub video jack of your Joybook with a VGA cable To switch to the extern...

Страница 12: ...ector AV receiver or any compatible device Connect USB peripherals to the USB ports of your Joybook Insert an ExpressCard 34 module or ExpressCard 54 module to further expand the capabilities of your...

Страница 13: ...ollowing the direction indicated on the card to exchange files Connect an earphone to the audio output jack to output sounds Connect a microphone to the microphone input jack to record sounds Use the...

Страница 14: ...ages record videos and chat online For details refer to Using the built in webcam on page 42 2 LCD Liquid Crystal Display panel 3 Bluetooth button Enables disables the Bluetooth function For details r...

Страница 15: ...AN WLAN function For details refer to Using built in wireless connectivity select models only on page 29 8 Power button Turns your Joybook on or off 9 Indicators Refer to Indicators on page 19 for det...

Страница 16: ...ly cover the vents and block the airflow 2 DVD Super Multi drive varying by model The type of the optical drive varies by model and the support of disc types depends on the optical drive that comes wi...

Страница 17: ...ybook power is off or it can t be opened using the ejection button insert a pointed object like an opened paper clip into the tray ejection hole next to the ejection button to release the disc tray 4...

Страница 18: ...e headset or external speaker for playing the Joybook audio 2 Microphone input jack Connects to a microphone for recording sounds This jack is for 3 5mm analog audio plugs It accepts both mono and ste...

Страница 19: ...characterized by its 34 mm width and the ExpressCard 54 module is characterized by its 54 mm width You can use an ExpressCard to further expand the capabilities of your Joybook Insert an ExpressCard i...

Страница 20: ...m port RJ 11 connector Accepts an analog telephone line for use with the internal modem To reduce the risk of fire ensure that your phone cable is of adequate capacity and approved for use with your l...

Страница 21: ...tely to connect your Joybook to an HDMI capable device For details about the connection refer to Using the HDMI output port on page 37 HDMI version is specific to the device not the cable being used W...

Страница 22: ...hillips head screwdriver is required For more information about adding additional memory the limit of maximum memory or the types of BenQ certified memory modules for your Joybook refer to Installing...

Страница 23: ...es in blue when the Joybook is accessing data in the hard disk or optical drive 1 2 3 4 5 6 7 5 Bluetooth indicator When Bluetooth is turned on it lights up in blue When Bluetooth is turned off the li...

Страница 24: ...ue When the system is in Sleep mode it flashes slowly in amber When the system is off or in Hibernation mode the light goes off 2 Battery indicator When the battery is charging it lights up in amber W...

Страница 25: ...able How to connect to another computer over a network and share files How to connect with a network or shared printer How to connect to the Internet How to register Windows and other packaged softwar...

Страница 26: ...bility Center Windows Mobility Center is a convenient location where you can quickly access your Joybook s settings such as brightness volume battery status and wireless network etc To open Windows Mo...

Страница 27: ...ick functions as an external mouse does To move the pointer place your finger with slight pressure on the touchpad and move in the direction as desired 1 2 3 No Component Function 1 Touchpad Moves the...

Страница 28: ...nd then use your finger on the touchpad to drag Tap twice quickly and hold the item and then move your finger on the touchpad to drag Display the contextual menu Click once The touchpad is a pressure...

Страница 29: ...the keyboard and then press the desired hotkey The appearance of the keyboard legend may vary depending on the country region of your purchase Function hotkey Description Function hotkey Description...

Страница 30: ...ke sure an external display device such as a monitor or projector has been connected to your Joybook properly before using this hotkey combination Fn F9 Activates or deactivates the touchpad Fn F10 Ac...

Страница 31: ...s key shortcuts and other keys You can access features of the Windows operating system quickly using Windows key combinations To use the shortcut combinations press and hold the Windows key and then p...

Страница 32: ...ain Minimize buttons Shift M Cancels minimization of all windows CapsLock Capitalizes all text entered Prt Sc Copies a bitmap image of the current entire screen to your clipboard which can be inserted...

Страница 33: ...ireless network service area 2 Enable WLAN by following one of the methods below a Press the WLAN button b Press the Fn F2 hotkey combination a few times until WLAN is ON When WLAN is turned on you wi...

Страница 34: ...entication you may have to undergo another authorization process and enter username and password For details please consult your network administrator For more information refer to Start Help and Supp...

Страница 35: ...ooth is ON When Bluetooth is turned on you will see the following on screen display c Double click the icons varying by your use and settings in the notification area located at the lower right corner...

Страница 36: ...ch the Bluetooth wizard 4 If your Bluetooth device is already turned on and discoverable place a check mark in the My device is set up and ready to be found checkbox and then click Next 5 Please wait...

Страница 37: ...lect the Bluetooth device that you want to add and then click Next 7 Refer to the documentation that came with your Bluetooth device to determine if there is a pre defined passkey If not you can selec...

Страница 38: ...etooth device is now connected to your Joybook Click Finish to complete The Bluetooth code is used for pairing and identifying Bluetooth devices The code entered on your device and another device with...

Страница 39: ...Bluetooth connectivity to transfer data wirelessly between your Bluetooth device and Joybook 1 After your Joybook is connected to a Bluetooth device right click the Bluetooth icon in the notification...

Страница 40: ...e will be sent to the location you specified 4 Click Finish to complete The example shown above is specifically for connecting to a mobile handset To connect to other types of Bluetooth devices refer...

Страница 41: ...io or video device Also refer to the documentation that came with your device for instructions 3 If you connect your Joybook to an HDMI capable LCD TV or projector the image will be displayed on your...

Страница 42: ...lecting Digital Output Device HDMI under the Playback tab and then click Set Default OK 3 Then the sound will be output to your connected HDMI capable LCD TV If you want to switch the audio output bac...

Страница 43: ...encounter situations like a blank or flickering screen To fix the problem refer to the documentation that came with your TV or try to adjust the screen refresh rate of your Joybook by following the s...

Страница 44: ...r Joybook may not fit into the connected HDMI capable TV due to different aspect ratio You can resize the desktop if you want to fill the screen 1 Switch the image to the LCD TV by pressing the Fn F8...

Страница 45: ...3 Select DTV HDMI 3 Scaling Options Drag the slider to adjust the desktop size and then click Apply OK To view a picture on your widescreen LCD TV check the proper aspect ratio of the picture to avoi...

Страница 46: ...eos and chat online Activating WebCam Companion 3 To launch WebCam Companion 3 select Start All Programs ArcSoft WebCam Companion 3 WebCam Companion 3 Utility You can install a free instant messaging...

Страница 47: ...r right corner Application Help or pressing the F1 key Switching to different modules On the top left corner of the Main screen in any module there are two icons that allow you to switch to another mo...

Страница 48: ...Booth module provides you with the pose detection function that detects your movement and take pictures automatically once you hold the pose To activate this function click You can manually take a pi...

Страница 49: ...so click Auto in each setting and the program will set the calculated values automatically Available settings may vary by module When the settings are complete you are ready to use Magic i Visual Effe...

Страница 50: ...to optimize system performance To run BIOS setup press the F2 key immediately when the BenQ logo appears on the screen during system startup The logo shows up on the screen for only a few seconds so...

Страница 51: ...n of the menu provides Help information about the current menu selected When a menu item is highlighted more detailed information is given Keyboard instructions for moving around and making selections...

Страница 52: ...t is not available the system will try the next boot device a Use or to select a device b Press Enter and then press or to select a device from the list c Press Enter to confirm your selection Hard Di...

Страница 53: ...inished with your settings you must save and exit so that the new settings can take effect Save Changes and Exit saves the changes you have made and exits BIOS setup After finishing with your settings...

Страница 54: ...back up all bundled applications and drivers into a disc For details refer to Creating recovery discs or Application and Driver DVD on page 54 QDataTrove works on factory installed Windows operating s...

Страница 55: ...system into a single file QDataTrove allows you to back up your system drive C drive into a single image file by saving it as a Windows Imaging Format WIM file It makes an exact copy of your entire sy...

Страница 56: ...ta System Restore By default restore points are created at specific intervals and before significant system events such as before installing a new software Should your system become unstable or encoun...

Страница 57: ...s states by restoring from a list of restore points if available 1 Click the button to select Restore from a Restore Point 2 A System Restore wizard then appears on the screen Follow the step by step...

Страница 58: ...age and a disc that includes applications and drivers that are bundled with your Joybook 1 Click the button to select Create Factory Recovery CD DVD 2 Select a disc type from the Disc Category drop do...

Страница 59: ...a safe place for future use Creating an Application and Driver DVD You can use QDataTrove to create a disc that includes applications and drivers that are bundled with your Joybook 1 Click the button...

Страница 60: ...ck e mail for viruses However we would still recommend that you back up your data regularly on CDs DVDs or other external storage device since the anti virus software may not be able to intercept all...

Страница 61: ...fer to the product information from http www BenQ com 1 Shut down your Joybook completely Disconnect the power adapter and turn over your Joybook To find out the types of BenQ certified memory modules...

Страница 62: ...forward to unlock the battery 1 and while still holding the retainer remove the battery from its compartment 2 3 The memory cover is secured with 2 screws Use a screwdriver to remove the screws To se...

Страница 63: ...nserting pay attention to the direction of the memory module Ground yourself to your Joybook with professional grounding equipment like an anti static wristband or touch the metal surface on the insid...

Страница 64: ...Gently push the free edge downwards until the module locks into place 7 Replace the memory cover 8 Use a screwdriver to secure the cover with the screws If the memory module is not installed properly...

Страница 65: ...mpartment and push it downwards until it snaps into place Connect the power adapter When you start the Joybook it will automatically test and configure the new memory It is recommended that you go int...

Страница 66: ...twork LAN that uses high frequency radio waves rather than wires to communicate and transmit data among nodes It is a flexible data communication system implemented as an extension to or as an alterna...

Страница 67: ...Joybook or the AC power cord may be defective Consult your BenQ dealer for help and maintenance What should I do if the battery gets hot in my Joybook Take the battery out and let it cool down for a...

Страница 68: ...e right and then click OK If the situation persists press the Fn F2 hotkey combination to disable WLAN to reduce interference of different network connection modes I have a problem setting up wireless...

Страница 69: ...n Windows launches 1 Press R to display the Run dialog box 2 Type msconfig in the Open field The system configuration utility will appears 3 Click the Startup tab and then uncheck any task that is unw...

Страница 70: ...gmentation in Windows Vista 1 Close all running software programs 2 Right click the hard disk s icon and select Properties 3 Click the Tools tab and then the Defragment Now button 4 Click the Defragme...

Страница 71: ...al drive The inserted CD or DVD is not bent or badly scratched If you hear the noise from the optical drive when the disc plays the optical drive might be deformed and the Joybook needs to be repaired...

Страница 72: ...do not obstruct the vent For example do not use the Joybook in bed where a blanket may inadvertently cover the vent and block the airflow Why does my Joybook seem to turn off itself after a certain pe...

Страница 73: ...onitor after system reboot connect the Joybook to a standard VGA monitor and wait until you can see things properly on that VGA monitor Then connect the target display to the Joybook again How can I j...

Страница 74: ...ces of extreme heat Do not incinerate Exposure of battery to extreme heat may result in an explosion 8 Do not use power adapters other than the one provided with the Joybook 9 Do not place the battery...

Страница 75: ...ips You can access Contact us to directly contact BenQ Customer Service for answers and advice to your questions You can also obtain the information about the BenQ service stations in your country Joy...

Страница 76: ...use your Joybook in environments where the temperature is below 5 C or above 35 C Otherwise system performance will be adversely affected 9 Do not use your Joybook near water for example near a bathtu...

Страница 77: ...here are no service parts inside Replace the unit if it is damaged or exposed to excess moisture Safety information about the modem Caution Never connect telephone wiring during a lightning storm Ther...

Страница 78: ...499 750 599 is herewith confirmed to comply with the requirements set out in the Council Directive on the Approximation of the Laws of the Member States relating Electromagnetic Compatibility 2004 108...

Страница 79: ...Urz dzenie nale y wymieni je li zostanie uszkodzone lub nara one na oddzia ywanie nadmiernej wilgoci 7 Nigdy nie nale y instalowa kabli telefonicznych podczas burzy z wy adowaniami atmosferycznymi Rom...

Страница 80: ...me Rabljen akumulator odstranite skladno z navodili proizvajalca 4 Adapter spojite na primeren vir napajanja Napetostne zahteve so navedene na ohi ju izdelka in ali njegovi embala i 5 V primeru da je...

Страница 81: ...t servisa centr 7 Nekad nelietojiet un neveiciet telefona l nijas piesl gumu negaisa laik Hrvatski 1 Pridr avajte se svih uputa i upozorenja u vezi sa sustavom 2 Ne postavljajte ra unalo u podru je j...

Страница 82: ...Appendix 78 Memo...

Отзывы: