44
Double N+ Wireless Router
sections
table of contents
1
2
3
4
5
7
8
9
10
6
UsINg THe Web-baseD aDVaNCeD UseR INTeRfaCe
setting WPa/WPa2-Personal (PsK)
1�
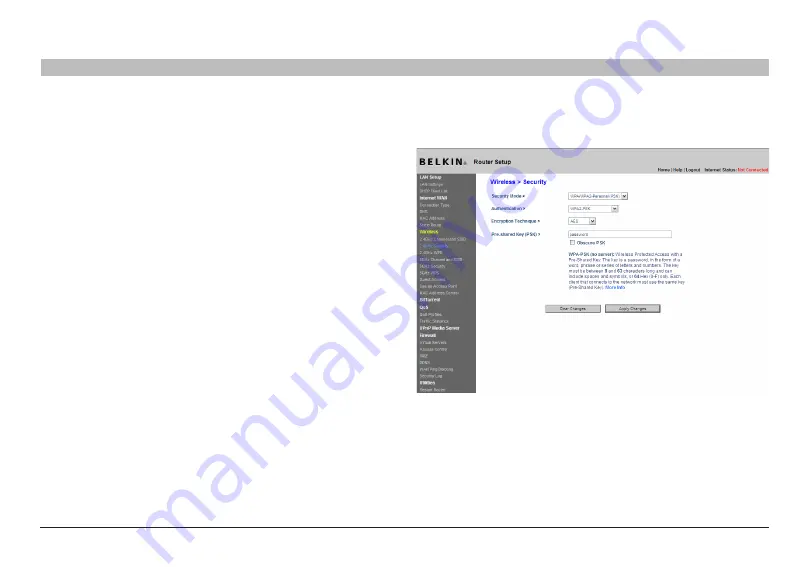
After you’ve set up your Router, go to the “Security” page under
“Wireless” and select “WPA/WPA2-Personal (PSK)” from the “Security
Mode” drop-down menu .
2�
For “Authentication”, select “WPA-PSK”, “WPA2-PSK”, or “WPA-
PSK + WPA2-PSK” . This setting will have to be identical on the wireless
clients that you set up . “WPA-PSK + WPA2-PSK” mode will allow the
Router to support clients running either WPA or WPA2 security .
3�
For “Encryption Technique” will auto-fill depending on the
authentication type above . This setting will have to be identical on the
wireless clients that you set up .
4�
Enter your pre-shared key (PSK) . This can be from eight to 63
characters and can be letters, numbers, or symbols . This same key must
be used on all of the wireless clients that you set up . For example, your
PSK might be something like: “Smith family network key” . Click “Apply
Changes” to finish . You must now set all wireless clients to match these
settings .
IMPoRTaNT
: Make sure your wireless computers are updated to work
with WPA2 and have the correct settings to get proper connection to the
Router .


