background image

33

32

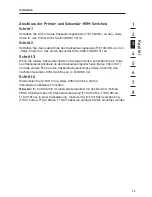
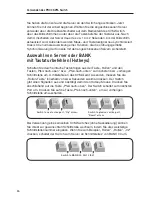
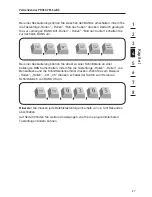
Verwenden des PRO3 KVM-Switch 

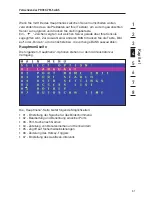
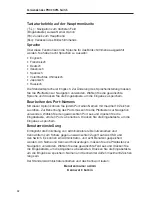
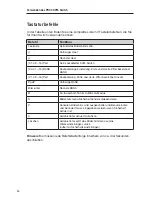
Tastaturbefehle auf der Hauptmenüseite

(       ):: Navigation zum nächsten Feld 
(Eingabetaste): Auswahl einer Option 
(F3): Zurück zum Hauptmenü 
(Esc): Verlassen des Bildschirmmenüs 

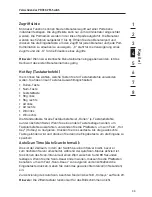
Sprache

Über diese Funktion kann die Sprache für das Bildschirmmenü ausgewählt 
werden. Sie haben acht Sprachen zu Auswahl:
•  Englisch 
•  Französisch 
•  Deutsch 
•  Italienisch 
•  Spanisch 
•  Vereinfachtes Chinesisch 
•  Japanisch 
•  Russisch
Die Standardsprache ist Englisch. Zur Änderung des Spracheinstellung müssen 
Sie die Pfeiltasten zur Navigation verwenden. Wählen Sie die gewünschte 
Sprache und drücken Sie die Eingabetaste, um die Eingabe zu speichern.

Bearbeiten des Port-Namens

Mit dieser Option können Sie jedem Port einen Namen mit maximal 10 Zeichen 
zuordnen. Zur Benennung des Ports müssen Sie die Pfeiltasten zur Navigation 
verwenden. Wählen Sie den gewünschten Port aus und drücken Sie die 
Eingabetaste, um den Port zu benennen. Drücken Sie die Eingabetaste, um die 
Eingabe zu speichern.

Benutzereinstellung

Ermöglicht die Einrichtung von Administratoren-/Benutzernamen und 
Kennwörtern zum Schutz gegen unerwünschten Zugriff auf das OSD und 
den Switch. Es können ein Administrator- und acht Benutzer gespeichert 
werden. Um Name und Kennwort hinzuzufügen, müssen Sie die Pfeiltasten zur 
Navigation verwenden. Wählen Sie das gewünschte Feld aus und drücken Sie 
die Eingabetaste, um die Angaben zu bearbeiten. Drücken Sie die Eingabetaste, 
um die Eingabe zu speichern. Namen und Kennwörter dürfen maximal 8 Zeichen 
lang sein.
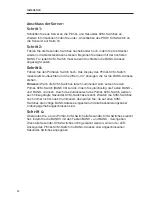
Der Standard-Administratorennamen und das Kennwort lauten:

Benutzername: admin 

Kennwort: belkin

Содержание F1DA116Z

Страница 1: ...OmniView PRO3 KVM Switch User Manual F1DA104Zea F1DA108Zea F1DA116Zea UK FR DE NL ES IT ...

Страница 2: ...rs to the PRO3 KVM Switch 16 Connecting Multiple PRO3 KVM Switches Daisy Chaining 20 Powering Up the Systems 25 4 Using your PRO3 KVM Switch 26 Selecting a Server or BANK Using Hot Key Commands 26 Selecting a Server Using Direct Access Port Selectors 28 Selecting a BANK Using Scroll Buttons 28 AutoScan Mode 29 On Screen Display OSD 30 Keyboard Hot Key Command Shortcuts 34 Sun Combo and Mac Key Map...

Страница 3: ... chained together easily to enable management of up to 256 PS 2 and or USB servers from a single console The PRO3 KVM Switch also comes with an unparalleled Belkin 3 Year Warranty This User Manual will provide details about your new PRO3 KVM Switch from installation and operation to troubleshooting in the unlikely event of a problem For quick and easy installation please refer to the Quick Install...

Страница 4: ...urity Allows you to specify user names and passwords to prevent unauthorized users from accessing the OSD and KVM Switch Dedicated Daisy Chain Port Up to 16 KVM switches can be daisy chained together using dedicated ports so you can easily expand your KVM configuration as your server environment grows On Screen Display OSD The OSD feature simplifies server management by allowing you to assign indi...

Страница 5: ...es that there is no server connected to that port 7 Segment LED Display When daisy chaining multiple PRO3 KVM Switches together the 7 segment LED display serves as a quick indicator of the selected BANK Flash Upgrade Flash upgradeable firmware allows you to install the latest firmware on your PRO3 KVM Switch This enables your KVM Switch to maintain consistent compatibility with the latest devices ...

Страница 6: ...4 Overview Equipment Requirements Cables Connecting the PRO3 KVM Switch to a server requires a Belkin Dual Port Micro Cable Kit Belkin Dual Port Micro Cable Kits F1D9400 XX PS 2 style F1D9401 XX USB style ...

Страница 7: ...5 1 2 3 4 5 6 7 8 section 5 Overview Belkin PRO3 Daisy Chain Cable F1D108 CBL Note Product codes and availability may vary F1D108 CBL ...

Страница 8: ...or VistaTM Microsoft DOS 5 x and above Red Hat Linux 8 x and above Novell NetWare 5 x Mac OS X and above with USB support SunTM SolarisTM 8 x and above Keyboards PS 2 compatible USB compatible Supports 101 102 104 key keyboards Mice PS 2 and USB compatible mice with PS 2 adapter having 2 3 4 or 5 buttons PS 2 and USB compatible wireless or optical mice Monitors CRT LCD with VGA support ...

Страница 9: ...Overview Unit Display Diagrams Front View of the PRO3 KVM Switch F1DA108Zea AutoScan button LED for selected port identification 7 segment LED for selected BANK identification Direct access port selector Manual BANK scroll buttons ...

Страница 10: ...rams Back View of the PRO3 KVM Switch Daisy chain out Bank select DIP Switch DC power jack SCSI 50 dual host ports Flash upgrade portand DIP select switch Console VGA PS 2 mouse keyboard ports USB mouse keyboard ports Daisy chain in ...

Страница 11: ...Resolution Up to 1920x1440 75Hz Keyboard Input PS 2 miniDIN6 USB Type A Mouse Input PS 2 miniDIN6 USB Type A Monitor Port VGA HDDB15 female CPU Ports SCSI 50 Daisy Chain Ports DB25 female Flash Upgrade Port RJ11 Direct Port Selectors 4 8 and 16 respectively for 4 8 and 16 port models Operating Temp 32 to 104 F 0 40 C Storage Temp 4 to 140 F 20 60 C Humidity 0 80 RH non condensing Warranty 3 years ...

Страница 12: ... Belkin recommends that the length of the cables between the PRO3 KVM Switch and the connected servers does not exceed 25 feet 7 6m For USB Servers USB signals can be transmitted up to 15 feet 4 5m between the PRO3 KVM Switch and server Beyond that length the probability of USB signal failure is likely and may cause the device to fail Note The Belkin OmniView CAT5 Extender F1D084 may be used to ex...

Страница 13: ...et the PRO3 KVM Switch s face flush with the ends of the rails or to extend the PRO3 KVM Switch past the front of the rails Please follow these simple steps to achieve the desired adjustment Step 1 Determine how far you would like the PRO3 KVM Switch to protrude from the rack Select a bracket hole scheme Step 2 Attach the bracket to the side of your PRO3 KVM Switch using the Phillips screws provid...

Страница 14: ...itch is now mounted securely into the bracket and you are ready to connect the console Optional Bracket Installation F1DA104Zea The PRO3 4 Port KVM Switch can be installed into a 19 inch server rack using an optional OmniView Rack Mount Kit F1D005 Step 1 Attach the rack mount bracket to your 4 Port PRO3 KVM Switch using the Phillips screws provided Refer to diagram below Step 2 Mount the 4 Port PR...

Страница 15: ...hes Daisy Chaining in this User Manual Your PRO3 KVM Switch is now mounted securely to the rack and you are ready to connect the console Note for Belkin PRO3 Generation 1 Series Owners F1DA104Tea F1DA108Tea and F1DA116Tea Installation for the PRO3 KVM Switch has changed Please follow this installation manual completely to ensure proper installation Failure to do so may result in keyboard or mouse ...

Страница 16: ...ing a USB Keyboard you must also connect a USB mouse to the console Step 1 Connect the VGA monitor cable to the HDDB15 female port on the back of the PRO3 KVM Switch in the Console section Refer to diagram below Step 2 Connect the PS 2 or USB keyboard cable to the keyboard port on the back of the PRO3 KVM Switch in the Console section Refer to diagram below ...

Страница 17: ...put devices when connecting to the console Using a combination of USB and PS 2 input devices will result in a 2 second delay between operation of each input device Step 4 Attach the power adapter to the DC power jack labeled 12VDC 1A located on the rear panel of the PRO3 KVM Switch Only use the power adapter supplied with the unit Refer to diagram below Your PRO3 KVM Switch is now installed and yo...

Страница 18: ... server is powered off Step 2 Using the Belkin Dual Port Micro Cable Kit for PS 2 F1D9400 XX connect the VGA connector to the monitor port on your server Refer to diagram below Step 3 Connect the PS 2 mouse and keyboard connectors to the mouse and keyboard ports on the server Refer to diagram below ...

Страница 19: ...Step 4 Connect the Belkin Dual Port Micro Cable Kit for PS 2 to the desired host ports on the PRO3 KVM Switch Refer to diagram below Step 5 Power up your server Step 6 Repeat Steps 1 through 5 for each additional PS 2 server you wish to connect ...

Страница 20: ... Make sure your server is powered on Step 2 Using the Belkin Dual Port Micro Cable Kit for USB F1D9401 XX connect the VGA connector to the monitor port on your server Refer to diagram below Step 3 Connect the USB connector to an available USB port on the server Refer to diagram below ...

Страница 21: ...B driver if necessary Step 5 Repeat Steps 1 through 4 for each additional USB server you wish to connect Note We recommend that you attach the Belkin Dual Port Micro Cable USB Kit directly to a free USB port on your server Note When a USB Cable Kit is connected to a Sun server the Server Interface Module emulates the Sun keys using a set of key combinations called combo keys Refer to the table on ...

Страница 22: ...gh 15 are referred to as secondary KVM switches Note Your PRO3 KVM Switch is backward compatible with Belkin OmniView PRO3 KVM Switches with standard cabling F1DA104Tea F1DA108Tea F1DA116Tea In a daisy chain configuration the PRO3 KVM Switch with micro cabling F1DA104Zea F1DA108Zea F1DA116Zea must be designated as the primary KVM switch Refer to the diagram below Note A Daisy Chain Cable F1D108 CB...

Страница 23: ...ON ON ON BANK 0 PRIMARY default ON ON OFF ON ON ON BANK 1 SECONDARY ON ON ON OFF ON ON BANK 2 SECONDARY ON ON OFF OFF ON ON BANK 3 SECONDARY ON ON ON ON OFF ON BANK 4 SECONDARY ON ON OFF ON OFF ON BANK 5 SECONDARY ON ON ON OFF OFF ON BANK 6 SECONDARY ON ON OFF OFF OFF ON BANK 7 SECONDARY ON ON ON ON ON OFF BANK 8 SECONDARY ON ON OFF ON ON OFF BANK 9 SECONDARY ON ON ON OFF ON OFF BANK 10 SECONDARY ...

Страница 24: ...igned a unique BANK address Step 2 Place all primary and secondary KVM switches in the desired location Step 3 Connect the console monitor keyboard and mouse to the console ports of the primary switch BANK 00 Refer to Connecting the Console to the PRO3 KVM Switch on page 14 cable 1 cable 2 cable 3 Primary unit BANK 00 Secondary unit BANK 01 Secondary unit BANK 02 Secondary unit BANK 03 ...

Страница 25: ...ts connect one end of the Daisy Chain Cable F1D108 CBL to the Daisy Chain In port on the first secondary KVM switch and the other end to the Daisy Chain Out port of the next secondary KVM switch for example BANK 01 Step 4 Repeat Step 3 for additional PRO3 KVM Switches you wish to daisy chain together Note Your PRO3 KVM Switch is backward compatible with Belkin OmniView PRO3 KVM Switches with stand...

Страница 26: ...K address Note If the PRO3 KVM Switches do not enumerate correctly reset the primary KVM switch BANK 00 by simultaneously pressing the BANK and BANK buttons You can also reset the primary KVM switch to detect newly added secondary KVM switches If the KVM switches still do not enumerate correctly check that all KVM switches have the correct BANK address assigned to them and that all daisy chain cab...

Страница 27: ...itch emulates both a mouse and keyboard on each port and allows your server to boot normally The server connected to Port 1 will be displayed on the monitor Check that the keyboard monitor and mouse are working normally Check all occupied ports to verify that all servers are connected and responding correctly If you encounter an error check your cable connections for that server and reboot If the ...

Страница 28: ...erver or BANK Using Hot Key Commands Switch to the next or previous port with simple keyboard hot key sequences using the Scroll Lock key and either the Up or Down arrow keys To send commands to the PRO3 KVM Switch the Scroll Lock key must be pressed twice within two seconds The PRO3 KVM Switch will beep confirming that it is in hot key mode Next press the Up arrow key and the PRO3 KVM Switch will...

Страница 29: ...ext BANK With a daisy chain switch configuration you can switch directly to any port on any BANK by pressing Scroll Lock Scroll Lock BANK address and port number For example if you press Scroll Lock Scroll Lock 03 05 the server on BANK 03 Port 5 will become active Note You will have approximately five seconds to complete each hot key sequence See page 33 for instructions on how to change the hot k...

Страница 30: ...ch will allow you to switch between the daisy chained PRO3 KVM Switches Pressing both buttons simultaneously will reset the PRO3 KVM Switch The BANK button will take you to the next BANK For example when you are at the primary switch BANK 00 and want to check servers on BANK 02 pressing the BANK button will take you to BANK 02 As a default the first active server will be displayed on the console m...

Страница 31: ...put from the console keyboard and mouse will not be transmitted to the server in focus Cancel AutoScan to regain control of the server To activate the AutoScan function press the AutoScan button on the PRO3 KVM Switch You can also activate AutoScan on your keyboard by pressing Scroll Lock Scroll Lock A To disable AutoScan press any button on the front panel or any key on the keyboard Note There is...

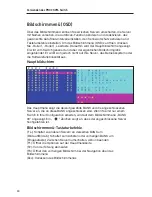
Страница 32: ...ch and does not affect the function of your server operating system or software function Main OSD Page The main OSD menu displays the current selected BANK and connected servers to that BANK If you have only one PRO3 KVM Switch in your configuration the OSD menu will display BANK 00 A symbol indicates that the connected server is powered up OSD Keyboard Commands Navigate to different servers in th...

Страница 33: ...sole To select a different BANK press the Page Up or Page Down key to select the next BANK or the previous BANK Main Menu Page The following Main Menu options are available only to the administrator The Main Menu page allows you to 01 Set the language for the OSD 02 Edit the naming of individual ports 03 Search for a port by its name 04 Assign user names and passwords 05 Access security settings 0...

Страница 34: ...t This option allows you to name each port with up to 10 characters To name the port use the arrow keys to navigate to the desired server port and then press Enter to select and name the port Press Enter again to save the entry User Setting This option allows you to specify an administrator user name and passwords to prevent unauthorized users from accessing the OSD and KVM Switch One administrato...

Страница 35: ...ptions to choose from Scroll Lock Number Lock Caps Lock Left Crtl Right Ctrl Left Alt Right Alt Left Win Right Win The default key for all hot key commands is Scroll Lock see Keyboard Hot Key Command Shortcuts on the next page To designate a different key to initiate hot key commands use the arrow keys to navigate to the Hot Key field and then press Enter to select and save the entry AutoScan Time...

Страница 36: ... second digit specifies BANK 01 02 16 port Daisy Chain Third and fourth digit specifies number PgUP Previous BANK PgDown Next BANK B Turn on off beep while in AutoScan mode S Enable disable OSD security P Turns console screen Off and prompts for user name and password if security is enabled A Administrator activates AutoScan Delete Administrator sets the OSD back to factory default values except f...

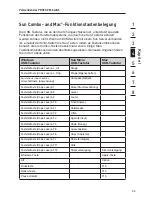
Страница 37: ...lled combo keys Some Mac keys are also mapped Please refer to the table below Windows USB Keyboard Sun Micro USB Keyboard Mac USB Keyboard Caps Lock L_Alt Stop Caps Lock L_Ctrl Props Caps Lock L_Shift Application Compose Caps Lock 1 Mute Caps Lock 2 Volume down Caps Lock 3 Volume up Caps Lock F3 Find Caps Lock F1 Front Caps Lock F2 Open Caps Lock F4 Again Caps Lock F5 Undo Caps Lock F8 Cut Caps Lo...

Страница 38: ... Warning We strongly recommend that you update your firmware only if you are experiencing mouse and keyboard problems with your PRO3 KVM Switch as reconfiguring software may lead to unexpected operational problems Please contact Belkin Technical Support if you need assistance To update the firmware you will need the following items 1 A separate server running Windows 2000 XP or Vista This server m...

Страница 39: ...tch is always the most current version on the market with the latest features and enhancements See the Updating Firmware section in this User Manual Q Does the PRO3 KVM Switch support Microsoft IntelliMouse A The PRO3 KVM Switch supports USB and PS 2 mice from Microsoft Logitech Kensington etc and Belkin Please contact Belkin Technical Support for compatibility issues you may experience Q How does...

Страница 40: ...use the PRO3 KVM Switch to switch video signals only A No the PRO3 KVM Switch must be connected to both the video and keyboard mouse ports on your servers The PRO3 KVM Switch detects the power from the PS 2 and USB ports on your servers in order to function Q Can I use the PRO3 KVM Switch on my Sun server that supports USB A Yes the PRO3 KVM Switch works with any USB capable server Q Does the PRO3...

Страница 41: ...ion and refresh rate setting on your server Connect the monitor directly into the server you are having trouble with to see if the problem still appears I am getting a black screen on my monitor Check that all video cables are inserted properly Check that the keyboard cable is connected and inserted properly between the server the appropriate port on the KVM Switch Move the mouse and see if it is ...

Страница 42: ... The mouse is not detected at boot up Check the cables and make sure that they are inserted correctly The server boots up but the mouse does not work Make sure the mouse is plugged in properly Make sure the mouse works when directly plugged into the server Rebooting may be necessary when trying this Try a different mouse When I switch from one port to another mouse movement is completely erratic M...

Страница 43: ...indows operating system should automatically install the drivers Some of the keys on my keyboard are not functioning properly when I use a Mac server If you are using a PC keyboard on a Mac system a few of the option keys on your PC keyboard may be reversed All major keys will function as labeled Refer to the Sun Combo and Mac Key Mapping section in this User Manual Apple startup keys such as C to...

Страница 44: ...e KVM switches that are connected one to another in a series A KVM switch daisy chain uses common settings to allow seamless complex interactions between multiple consoles for control over many servers HID Human Interface Device the USB device class that includes keyboards and mice KVM Literally Keyboard Video Mouse this term refers to technology that allows two or more computers to be controlled ...

Страница 45: ... B digital apparatus complies with Canadian ICES 003 Cet appareil numérique de la classe B est conforme á la norme NMB 003 du Canada Belkin International Inc Limited 3 Year Product Warranty What this warranty covers Belkin International Inc Belkin warrants to the original purchaser of this Belkin product that the product shall be free of defects in design assembly material or workmanship What the ...

Страница 46: ...t to repair such equipment The cost if any of shipping the equipment to and from such repair facility and of such estimate shall be borne solely by the purchaser Damaged equipment must remain available for inspection until the claim is finalized Whenever claims are settled Belkin reserves the right to be subrogated under any existing insurance policies the purchaser may have How state law relates ...

Страница 47: ...45 Information section 1 2 3 4 5 6 7 8 45 ...

Страница 48: ...Belkin Ltd Express Business Park Shipton Way Rushden NN10 6GL United Kingdom 44 0 1933 35 2000 44 0 1933 31 2000 fax Belkin B V Boeing Avenue 333 1119 PH Schiphol Rijk The Netherlands 31 0 20 654 7300 31 0 20 654 7349 fax Belkin GmbH Hanebergstraße 2 80637 Munich Germany 49 0 89 143405 0 49 0 89 143405 100 fax Belkin SAS 5 Rue du Petit Robinson 3ème étage 78350 Jouy en Josas France 33 0 1 34 58 14...

Страница 49: ...UK FR DE NL ES IT Switch KVM PRO3 OmniView Manuel de lutilisateur F1DA104Zea F1DA108Zea F1DA116Zea ...

Страница 50: ...dement de plusieurs switchs KVM PRO3 par montage en série 20 Mise en route des systèmes 25 4 Utilisation du switch KVM PRO3 26 Sélection dun serveur ou dun BANK à laide des raccourcis clavier26 Sélection dun serveur à laide des sélecteurs de port à accès direct 28 Sélection dun BANK à laide des boutons de défilement 28 Mode AutoScan 29 Affichage à lécran OSD 30 Commandes avec raccourcis clavier 34...

Страница 51: ...vent facilement être montés en série ce qui vous permet de contrôler jusquà 256 serveurs PS 2 et ou USB à partir dune seule console Le switch KVM PRO3 bénéficie également de la garantie Belkin de 3 ans Vous trouverez dans ce manuel des informations sur votre nouveau switch KVM PRO3 de son installation à son utilisation en passant par le dépannage dans le cas peu probable où vous rencontreriez un p...

Страница 52: ...t de définir des noms dutilisateur et des mots de passe pour empêcher les utilisateurs non autorisés daccéder au menu sur écran et au switch KVM Port dédié pour montage en série Vous pouvez monter jusquà 16 switchs KVM en série grâce aux ports dédiés pour ainsi étendre votre configuration KVM et accompagner la croissance de votre environnement réseau Affichage à lécran Le menu sur écran simplifie ...

Страница 53: ...veur nest connecté à ce port Afficheur à 7 segments Si plusieurs switchs KVM PRO3 sont montés en série lafficheur DEL à 7 segments sert d indicateur rapide pour le BANK sélectionné Mise à niveau Flash La fonction de mise à niveau du micrologiciel par mémoire Flash vous permet dinstaller le micrologiciel le plus récent sur votre switch KVM PRO3 Ceci lui permet de toujours rester compatible avec les...

Страница 54: ...atériel requis Câbles Le raccordement du switch KVM PRO3 à un serveur nécessite un kit de microcâblage double port Belkin Kits de microcâblage double port de Belkin F1D9400 XX connecteurs PS 2 F1D9401 XX connecteurs USB ...

Страница 55: ...5 1 2 3 4 5 6 7 8 section 5 Présentation Câble de montage en série PRO3 de Belkin F1D108 CBL Remarque Les références et la disponibilité des produits peuvent varier F1D108 CBL ...

Страница 56: ... et versions ultérieures Red Hat Linux 8 x et versions ultérieures Novell NetWare 5 x Mac OS X et versions ultérieures avec prise en charge USB SunTM SolarisTM 8 x et versions ultérieures Claviers Compatible PS 2 Compatible USB Prise en charge des claviers 101 102 et 104 touches Souris Souris compatibles USB ou PS 2 avec adaptateur PS 2 avec 2 3 4 ou 5 boutons Souris sans fil ou optique PS 2 ou US...

Страница 57: ...trations de lappareil Face avant du switch KVM PRO3 F1DA108Zea Bouton AutoScan Témoin didentification du port sélectionné Témoin à 7 segments didentification du BANK sélectionné Sélecteur de port à accès direct Boutons de défilement manuel des BANK ...

Страница 58: ...itch KVM PRO3 Sortie de montage en série Commutateur DIP de sélection de BANK Fiche pour alimentation CC SCSI 50 dual host ports Port de mise à niveau Flashet commutateur DIP Console VGA ports souris clavier PS 2 ports souris clavier USB Entrée de montage en série ...

Страница 59: ...ale Jusquà 1920 x 1440 75 Hz Entrée clavier PS 2 miniDIN6 USB Type A Entrée souris PS 2 miniDIN6 USB Type A Port moniteur VGA HDDB15 femelle Ports CPU SCSI 50 Ports de montage en série DB25 femelle Port de mise à niveau Flash RJ11 Sélecteurs de port à accès direct 4 8 et 16 respectivement pour les modèles à 4 8 et 16 ports Température de fonctionnement 0 40 C Température de stockage 20 60 C Humidi...

Страница 60: ...e switch KVM PRO3 et les serveurs branchés Pour les serveurs USB La transmission des signaux USB entre le switch KVM PRO3 et le serveur est possible jusquà 4 5 mètres Au delà les risques de dégradation du signal USB augmentent ce qui peut entraîner une défaillance de lappareil Remarque Le Module dextension CAT5 OmniView de Belkin F1D084 permet de rallonger la portée de votre console clavier souris...

Страница 61: ...switch KVM PRO3 avec les extrémités des rails ou de placer le switch de façon à ce quil dépasse à lavant des rails Procédez comme suit pour obtenir facilement le réglage souhaité Étape 1 Déterminez la profondeur à laquelle vous désirez installer le switch PRO3 KVM dans le bâti Choisissez les orifices correspondants sur les fixations Étape 2 Fixez le support de montage sur le côté du switch KVM PRO...

Страница 62: ...vous pouvez procéder au branchement de la console Installation des supports en option F1DA104Zea Le switch KVM PRO3 à 4 ports peut être installé dans un bâti de serveur de 19 pouces à laide du Kit de montage en baie OmniView F1D005 disponible en option Étape 1 Fixez le support de montage en baie sur le switch KVM PRO3 à 4 ports à laide des vis cruciformes fournies reportez vous à lillustration ci ...

Страница 63: ... Le switch KVM PRO3 est maintenant solidement fixé au bâti et vous pouvez procéder au branchement de la console Remarque pour les propriétaires dun produit PRO3 Belkin de 1re génération F1DA104Tea F1DA108Tea et F1DA116Tea Linstallation du switch KVM PRO3 a changé Veuillez suivre scrupuleusement les consignes de ce manuel pour garantir une installation adéquate Dans le cas contraire vous risquez de...

Страница 64: ...SB vous devez également brancher une souris USB sur la console Étape 1 Branchez le câble du moniteur VGA au port femelle HDDB15 à larrière du switch KVM PRO3 dans la partie Console reportez vous à lillustration ci dessous Étape 2 Branchez le câble du clavier PS 2 ou USB sur le port clavier à larrière du switch KVM PRO3 dans la partie Console reportez vous à lillustration ci dessous ...

Страница 65: ...riques dentrées PS 2 pour le branchement à la console Lutilisation dune combinaison de périphériques dentrée USB et PS 2 entraînera un retard de 2 secondes entre lutilisation des deux périphériques Étape 4 Branchez ladaptateur secteur à la prise CC marquée 12VDC 1A à larrière du switch KVM PRO3 Utilisez uniquement ladaptateur secteur fourni avec lappareil reportez vous à lillustration ci dessous V...

Страница 66: ...st éteint Étape 2 À laide du Kit de microcâblage double port pour PS 2 de Belkin F1D9400 XX branchez le connecteur VGA au port moniteur de votre serveur reportez vous à lillustration ci dessous Étape 3 Branchez la souris et le clavier PS 2 aux ports clavier et souris du serveur reportez vous à lillustration ci dessous ...

Страница 67: ... Branchez le Kit de microcâblage double port pour PS 2 de Belkin aux ports hôtes du switch KVM PRO3 reportez vous à lillustration ci dessous Étape 5 Allumez le serveur Étape 6 Répétez les étapes 1 à 5 pour chaque serveur PS 2 supplémentaire à connecter ...

Страница 68: ...serveur est allumé Étape 2 À laide du Kit de microcâblage double port pour USB de Belkin F1D9401 XX branchez le connecteur VGA au port moniteur de votre serveur reportez vous à lillustration ci dessous Étape 3 Branchez le connecteur USB sur un port USB libre du serveur reportez vous à lillustration ci dessous ...

Страница 69: ... Étape 5 Répétez les étapes 1 à 4 pour chaque serveur USB supplémentaire à connecter Remarque Il est recommandé de brancher le Kit de microcâblage USB double port de Belkin directement sur un port USB libre du serveur Remarque Lorsquun Kit de câblage USB est branché à un serveur Sun le Module dinterface serveur émule les touches Sun à laide de combinaisons de touches appelées Touches combo Consult...

Страница 70: ...K 01 à 15 correspondent aux switchs secondaires Remarque Votre switch KVM PRO3 propose une rétrocompatibilité avec les switchs KVM PRO3 OmniView de Belkin munis dun câblage standard F1DA104Tea F1DA108Tea F1DA116Tea Dans une configuration en chaîne le switch KVM PRO3 à microcâblage F1DA104Zea F1DA108Zea F1DA116Zea doit être désigné en tant que switch KVM principal reportez vous à lillustration ci d...

Страница 71: ...é Activé Éteint Activé Activé BANK 2 SECONDAIRE Activé Activé Éteint Éteint Activé Activé BANK 3 SECONDAIRE Activé Activé Activé Activé Éteint Activé BANK 4 SECONDAIRE Activé Activé Éteint Activé Éteint Activé BANK 5 SECONDAIRE Activé Activé Activé Éteint Éteint Activé BANK 6 SECONDAIRE Activé Activé Éteint Éteint Éteint Activé BANK 7 SECONDAIRE Activé Activé Activé Activé Activé Éteint BANK 8 SEC...

Страница 72: ...tape 2 Installez le switch principal et tous les switchs secondaires à lemplacement de votre choix Étape 3 Branchez le moniteur le clavier et la souris de la console sur les ports de console du switch principal BANK 00 Consultez la section Raccordement de la console au switch KVM PRO3 à la page 14 cable 1 cable 2 cable 3 Primary unit BANK 00 Secondary unit BANK 01 Secondary unit BANK 02 Secondary ...

Страница 73: ...s branchez une extrémité du câble de connexion en chaîne F1D108 CBL au port Daisy Chain In du premier switch KVM secondaire et lautre extrémité au port Daisy Chain Out du switch KVM secondaire suivant par exemple BANK 01 Étape 4 Répétez létape 3 pour chaque switch KVM PRO3 supplémentaire à monter en série Remarque Votre switch KVM PRO3 propose une rétrocompatibilité avec les switchs KVM PRO3 OmniV...

Страница 74: ...es switchs KVM PRO3 ne saffichent pas dans lordre correct réinitialisez le switch KVM principal BANK 00 en appuyant simultanément sur les boutons BANK et BANK Vous pouvez également réinitialiser le switch KVM principal afin de détecter les switchs KVM secondaires que vous venez dajouter Si lordre des numéros est toujours incorrect vérifiez que les adresses BANK sont correctement attribuées à chaqu...

Страница 75: ... souris et un clavier sur chaque port et permet au serveur de démarrer normalement Le serveur connecté au port 1 saffiche sur le moniteur Vérifiez si le clavier le moniteur et la souris fonctionnent normalement Vérifiez tous les ports occupés afin de vous assurer que tous les serveurs sont connectés et répondent correctement Si vous rencontrez une erreur vérifiez les branchements des câbles du ser...

Страница 76: ...Vous pouvez passer au port suivant ou précédent en utilisant des séquences simples sur le clavier à laide de la touche Arrêt défil et de la touche fléchée Haut ou Bas Pour envoyer vos commandes au Switch KVM PRO3 vous devez appuyer deux fois sur la touche Arrêt défil dans un intervalle de deux secondes Le switch KVM PRO3 émet un bip pour confirmer qu il entre en mode raccourci clavier Ensuite appu...

Страница 77: ... configuration en série vous pouvez passer directement au port de nimporte quel BANK en appuyant sur Arrêt défil Arrêt défil adresse du BANK et numéro de port Par exemple si vous appuyez sur Arrêt défil Arrêt défil 03 05 le serveur du BANK 03 port 5 devient actif Remarque Vous disposez denviron cinq secondes pour effectuer la séquence Voir la page 33 pour savoir comment modifier la touche damorce ...

Страница 78: ... dun switch KVM PRO3 à lautre parmi ceux montés en série Si ces deux boutons sont enfoncés simultanément le switch KVM PRO3 est réinitialisé Le bouton BANK permet de passer au BANK suivant Par exemple lorsque vous êtes sur le switch principal BANK 00 et que vous souhaitez vérifier les serveurs en BANK 02 appuyez sur le bouton BANK pour passer en BANK 02 Par défaut le premier serveur actif est affi...

Страница 79: ...u de la clavier et souris ne sont pas transmises au serveur actif La fonction AutoScan doit être annulée pour reprendre le contrôle du serveur Pour activer la fonction AutoScan appuyez sur le bouton AutoScan sur le switch KVM PRO3 Vous pouvez aussi lactiver sur votre clavier en appuyant sur Arrêt défil Arrêt défil A Pour désactiver la fonction AutoScan appuyez sur lun des boutons de la face avant ...

Страница 80: ...t naffecte en rien le fonctionnement du serveur du système dexploitation ou des logiciels Page principale du menu sur écran La page principale du menu affiche le BANK sélectionné et les serveurs branchés à ce BANK Si votre configuration se compose dun seul switch KVM PRO3 le menu affiche BANK 00 Le symbole indique que le serveur branché est sous tension Commandes clavier du menu sur écran Naviguer...

Страница 81: ...NK appuyez sur Pg préc ou Pg suiv pour sélectionner le BANK précédent ou le BANK suivant Page principale du menu Les options suivantes du Menu principal sont uniquement accessibles par ladministrateur Le Menu principal permet de 01 Choisir la langue du menu sur écran 02 Modifier les noms assignés aux différents ports 03 Rechercher un port par son nom 04 Définir des noms dutilisateur et des mots de...

Страница 82: ...de 10 caractères Pour nommer le port utilisez les touches fléchées pour déplacer la sélection sur le port de serveur de votre choix et appuyez sur Entrée pour valider et saisir le nom du port Appuyez à nouveau sur Entrée pour enregistrer le nom User Settings Paramètres utilisateur Ce menu permet de définir un administrateur nom dutilisateur et des mots de passe pour empêcher les utilisateurs non a...

Страница 83: ...clavier Neuf choix de touche sont disponibles Arrêt défil Verr num Verr Maj Ctrl Gauche Ctrl Droit Alt Gauche Alt Droit Win Gauche Win Droit La touche par défaut pour tous les raccourcis clavier est Arrêt défil voir Commandes avec raccourcis clavier à la page suivante Pour choisir une autre touche damorce des raccourcis clavier utilisez les touches fléchées pour sélectionner le champ Hot Key appuy...

Страница 84: ... 16 port Configuration en chaîne Le troisième et le quatrième chiffres correspondent au numéro Pg préc BANK précédent Pg suiv BANK suivant B Activer ou désactiver le bip en mode AutoScan S Activer ou désactiver la protection du menu sur écran P Désactiver lécran de la console et demander la saisie dun nom dutilisateur et dun mot de passe si la protection est activée A Activation de la fonction Aut...

Страница 85: ...ous reporter au tableau ci dessous Windows Clavier USB Clavier USB Clavier USB Clavier USB Mac Verr Maj Alt gauche Stop Arrêter Verr Maj Ctrl gauche Props Propriétés Verr Maj Maj gauche Application Compose Composer Verr Maj 1 Mute Silence Verr Maj 2 Volume bas Verr Maj 3 Volume haut Verr Maj F3 Find Rechercher Verr Maj F1 Front Avant Verr Maj F2 Open Ouvrir Verr Maj F4 Again Encore Verr Maj F5 Und...

Страница 86: ... du switch Avertissement Il est vivement recommandé de mettre à jour le micrologiciel uniquement si vous rencontrez des problèmes de souris et de clavier avec le switch KVM PRO3 En effet la reconfiguration du logiciel risque dentraîner des problèmes de fonctionnement imprévus Si vous avez besoin daide veuillez contacter lassistance technique de Belkin Les éléments suivants sont nécessaires pour me...

Страница 87: ...oujours de la version la plus récente du micrologiciel et bénéficie ainsi des dernières fonctions et améliorations Reportez vous à la section Mise à jour du micrologiciel de ce manuel Q Est ce que le switch KVM PRO3 prend en charge les souris Microsoft IntelliMouse R Le switch KVM PRO3 prend en charge les souris USB et PS 2 de Microsoft Logitech Kensington etc et Belkin Veuillez contacter le servi...

Страница 88: ... Q Puis je utiliser le switch KVM PRO3 pour permuter uniquement les signaux vidéo R Non le switch KVM PRO3 doit être branché aux ports vidéo et clavier souris des serveurs Pour fonctionner le switch KVM PRO3 doit détecter lalimentation sur les ports PS 2 et USB des serveurs Q Puis je utiliser le switch KVM PRO3 avec un serveur Sun équipé dun port USB R Oui le switch KVM PRO3 peut fonctionner avec ...

Страница 89: ... la carte vidéo utilisée prend bien en charge la résolution et le taux de rafraîchissement définis sur le serveur Branchez le moniteur directement sur le serveur qui pose problème et vérifiez si le problème persiste Jobtiens un écran noir Vérifiez que tous les câbles vidéo sont correctement branchés Assurez vous que le câble du clavier est connecté et quil est correctement branché sur le serveur e...

Страница 90: ... nest pas détectée au démarrage Vérifiez les câbles et assurez vous quils sont correctement insérés Le serveur démarre mais la souris ne fonctionne pas Assurez vous que la souris est correctement branchée Assurez vous que la souris fonctionne lorsquelle est directement branchée sur le serveur Il peut être nécessaire de redémarrer le serveur pour effectuer cette vérification Essayez une autre souri...

Страница 91: ...ouches du clavier ne fonctionnent pas correctement lorsque jutilise un serveur Mac Étant donné que vous utilisez un clavier pour PC sur un ordinateur Mac il se peut que certaines touches doptions du clavier PC soient inversées Les touches principales fonctionnent selon linscription quelles portent Reportez vous à la section Touches combo Sun et touches Mac de ce manuel Les touches de démarrage App...

Страница 92: ...mer la carte vidéo dun ordinateur sur ses propriétés comme la résolution maximale et la profondeur des couleurs pour garantir que lutilisateur dispose doptions de configuration valides pour laffichage Montage en série Configuration de multiples Switchs KVM reliés entre eux en série Une chaîne de switchs utilise des paramètres communs pour permettre facilement des interactions complexes entre les d...

Страница 93: ...e switch KVM Port Récepteur dinterface sur un serveur au moyen duquel vous pouvez connecter un périphérique ou brancher un câble de périphérique Switch KVM principal Le switch KVM branché à la console et défini sur ladresse de BANK 00 Switch KVM secondaire Nimporte quel switch KVM connecté en chaîne sur le switch KVM principal et défini sur ladresse de BANK 01 15 et auquel aucune console nest bran...

Страница 94: ...lies with Canadian ICES 003 Cet appareil numérique de la classe B est conforme à la norme NMB 003 du Canada Garantie limitée de 3 ans du produit de Belkin International Inc Couverture offerte par la garantie Belkin International Inc Belkin garantit à lacheteur initial de ce produit Belkin que le produit est exempt de défauts de conception de montage de matériau et de fabrication Période de couvert...

Страница 95: ...entre le domicile de lacheteur et ledit service de réparation ainsi que les frais détablissement du dit devis sont entièrement à la charge de lacheteur Léquipement endommagé doit demeurer disponible pour inspection jusquà ce que la réclamation soit finalisée Lorsqu un règlement intervient Belkin se réserve le droit dun recours en subrogation sous toute autre police dassurance détenue par lacheteur...

Страница 96: ...1100 1 310 898 1111 Fax Belkin Ltd Express Business Park Shipton Way Rushden NN10 6GL Royaume Uni 44 0 1933 35 2000 44 0 1933 31 2000 Fax Belkin B V Boeing Avenue 333 1119 PH Schiphol Rijk Pays Bas 31 0 20 654 7300 31 0 20 654 7349 Fax Belkin GmbH Hanebergstraße 2 80637 Munich Allemagne 49 0 89 143405 0 49 0 89 143405 100 Fax Belkin SAS 5 rue du Petit Robinson 3ème étage 78350 Jouy en Josas France...

Страница 97: ...OmniView PRO3 KVM Switch Benutzerhandbuch F1DA104Zea F1DA108Zea F1DA116Zea UK FR DE NL ES IT ...

Страница 98: ... an die Server 16 Verbinden mehrerer PRO3 KVM Switches Kaskadierung 20 Hochfahren der Computer 25 4 Verwenden des PRO3 KVM Switch 26 Auswählen eines Servers oder einer BANK mit Tastaturbefehlen Hotkeys 26 Auswählen eines Servers über Direktwahlschalter 28 Auswählen einer BANK über Umschalttasten 28 AutoScan Modus 29 Bildschirm Menüsystem OSD 30 Tastaturbefehle 34 Sun Combo and Mac Funktionstastenb...

Страница 99: ... Upgrade Durch Kaskadierung der PRO3 KVM Switches können Sie bis zu 256 PS 2 USB und Sun Server über eine einzige PS 2 Konsole steuern Zudem gewährt Belkin auf den PRO3 KVM Switch fünf Jahre Garantie Dieses Handbuch beschreibt Ihren PRO3 KVM Switch detailliert von der Installation über die Bedienung bis zur Fehlerbehebung sollte einmal ein Problem auftreten Einfache kurze Installationsanweisungen ...

Страница 100: ...chtung von Benutzernamen und Kennwörtern zum Schutz gegen unerwünschten Zugriff auf das OSD und den Switch Dedizierter Kaskadierungsanschluss Bis zu 16 KVM Switches können über dedizierte Ports kaskadiert werden so dass Sie Ihre KVM Konfiguration einfach erweitern können wenn Ihre Serverumgebung dies erfordert Bildschirm Menüsystem OSD Das Bildschirm Menüsystem vereinfacht die Serververwaltung da ...

Страница 101: ...nden Schnittstelle verbunden ist Siebenteilige LED Anzeige Beim Kaskadieren von mehreren Switches zeigt die siebenteilige LED Anzeige auf einen Blick welche BANK ausgewählt ist Flash Aktualisierung Die Firmware mit Flash Aktualisierung sorgt dafür dass Sie für Ihren Switch stets die aktuellste Firmware installieren können Dadurch bleibt der KVM Switch mit Geräten und Servern kompatibel die künftig...

Страница 102: ...ht Systemvoraussetzungen Kabel Der Anschluss des KVM Switch an einen Server erfordert einen Dual Port Mikrokabelsatz von Belkin Belkin Dual Port Mikrokabelsätze F1D9400 xx PS 2 Ausführung F1D9401 xx USB Ausführung ...

Страница 103: ...5 1 2 3 4 5 6 7 8 Kapitel 5 Übersicht Belkin PRO3 Kaskadierungskabel F1D108 CBL Hinweis Produktbezeichnungen und Verfügbarkeit können variieren F1D108 CBL ...

Страница 104: ...2003 oder VistaTM Microsoft DOS 5 x und höher Red Hat Linux 8 x und höher Novell NetWare 5 x Mac OS X und höher mit USB Unterstützung SunTM SolarisTM 8 x und höher Tastaturen PS 2 kompatibel USB kompatibel Unterstützt Tastaturen mit 101 102 104 Tasten Mäuse PS 2 und USB kompatible Mäuse mit PS 2 Adapter mit 2 3 4 oder 5 Tasten USB und PS 2 kompatible Funk und optische Mäuse Bildschirme CRT LCD mit...

Страница 105: ... 3 4 5 6 7 8 Kapitel 7 Übersicht Bestandteile KVM Switch Vorderseite F1DA108Zea AutoScan Taste LED für Port Erkennung 7 teilige LED zur Anzeige der gewählten BANK Direktwahltaste Manuelle BANK Auswahltasten ...

Страница 106: ...ckseite Kaskadierung aus DIP Schalter für BANK Auswahl Anschluss für Netzteil SCSI 50 dual host ports Schnittstelle für Flash Aktualisierungund DIP Auswahlschalter Konsole VGA PS 2 Maus Tastatur Ports USB Maus Tastatur Ports Kaskadierung ein ...

Страница 107: ...0 75 Hz Tastatureingang PS 2 miniDIN6 USB Type A Mauseingang PS 2 miniDIN6 USB Type A Bildschirmanschluss VGA HDDB15 Buchse CPU Schnittstellen SCSI 50 Kaskadierungsanschlüsse DB25 Buchse Anschluss für Flash Upgrade RJ11 Direktwahlschalter 4 8 bzw 16 bei 4 8 bzw 16 Port Modellen Betriebstemperatur 0 40 C Lagertemperatur 20 60 C 4 140 F Relative Luftfeuchtigkeit 0 bis 80 nicht kondensierend Garantie...

Страница 108: ...ir für die Verbindung zwischen dem Switch und den Servern Kabel von höchstens 7 6 m Für USB Server USB Signale können zwischen KVM Gerät und Computer bis zu 4 5 m weit übertragen werden Bei längeren Übertragungswegen wird ein Signalausfall wahrscheinlich der zu einem Absturz des Geräts führen kann Hinweis Mit der OmniView CAT5 Erweiterung F1D084 von Belkin kann eine Entfernung von bis zu 91 m zur ...

Страница 109: ...nen dass er entweder bündig zu den Schienen abschließt oder über die Vorderseite der Schienen herausragt Mit den folgenden einfachen Schritten erzielen Sie die gewünschte Einstellung Schritt 1 Überlegen Sie sich wie weit der PRO3 KVM Switch über das Rack hinausragen soll Wählen Sie die entsprechende Bohrungsanordnung für die Halterungen aus Schritt 2 Befestigen Sie die Halterung mit dem beigefügte...

Страница 110: ...M Switch ist jetzt sicher am Rack befestigt Sie können Ihn an die Konsole anschließen Halterungsinstallation F1DA104Zea optional Der PRO3 4 Port KVM Switch kann wahlweise mit einem OmniView Rack Einbausatz F1D005 in ein in ein 19 Zoll Serverrack eingebaut werden Schritt 1 Befestigen Sie die Halterung mit dem beigefügten Kreuzschlitzschraubendreher seitlich am Switch Siehe Abbildung unten Schritt 2...

Страница 111: ...erung Der KVM Switch ist jetzt sicher am Rack befestigt Sie können Ihn an die Konsole anschließen Hinweis für Benutzer von Geräten aus der PRO3 Serie Generation 1 von Belkin F1DA104Tea F1DA108Tea F1DA116Tea Die Installation des PRO3 Switch wurde geändert Bitte folgen Sie genau den Anweisungen in diesem Benutzerhandbuch damit eine ordnungsgemäße Installation gewährleistet wird Bei einer anderen Vor...

Страница 112: ...verwenden müssen Sie auch eine USB Maus an die Konsole anschließen Schritt 1 Schließen Sie das VGA Bildschirmkabel an die HDDB15 Buchse im Konsolenteil Konsole an der Rückseite des KVM Switch an Siehe Abbildung unten Schritt 2 Verbinden Sie die PS 2 bzw USB Tastatur mit der entsprechenden Schnittstelle an der Rückseite des Switch Bereich Console Siehe Abbildung unten ...

Страница 113: ...er nur USB Geräte oder nur PS 2 Geräte Eine Kombination aus USB und PS 2 Geräten hat eine 2 sekündige Verzögerung zwischen den Geräten zur Folge Schritt 4 Schließen Sie das Netzteil an die Netzbuchse mit der Aufschrift 12VDC 1A an die sich auf der Rückseite des KVM Switch befindet Benutzen Sie nur das im Lieferumfang enthaltene Netzteil Siehe Abbildung unten Der Switch ist nun installiert und Sie ...

Страница 114: ...erver abgeschaltet ist Schritt 2 Verwenden Sie den Dual Port Mikrokabelsatz für PS 2 von Belkin F1D9400 XX und schließen Sie den VGA Stecker an den Monitor Port des Servers an Siehe Abbildung unten Schritt 3 Schließen Sie die PS 2 Maus und Tastatur an die Maus und Tastaturanschlüsse des Servers an Siehe Abbildung unten ...

Страница 115: ...Verbinden Sie den Dual Port Mikrokabelsatz für PS 2 von Belkin mit den entsprechenden Host Ports am Switch Siehe Abbildung unten Schritt 5 Fahren Sie den Server hoch Schritt 6 Wiederholen Sie Schritt 1 bis 5 für jeden weiteren anzuschließenden PS 2 Server ...

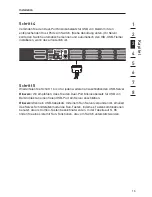
Страница 116: ...ss der Server abgeschaltet ist Schritt 2 Verwenden Sie den Dual Port Mikrokabelsatz für USB von Belkin F1D9401 XX und schließen Sie den VGA Stecker an den Monitor Port des Servers an Siehe Abbildung unten Schritt 3 Schließen Sie den USB Stecker an eine freie USB Schnittstelle am Server an Siehe Abbildung unten ...

Страница 117: ...tt 5 Wiederholen Sie Schritt 1 bis 4 für jeden weiteren anzuschließenden USB Server Hinweis Wir empfehlen dass Sie den Dual Port Mikrokabelsatz für USB von Belkin direkt an einen freien USB Port am Server anschließen Hinweis Wenn ein USB Kabelsatz mit einem Sun Server verbunden ist emuliert das Server Schnittstellenmodul die Sun Tasten indem es Tastenkombinationen benutzt die als Combo Tasten beze...

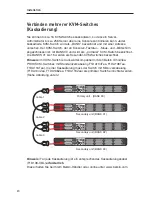
Страница 118: ... 15 werden als Sekundär KVM Switches bezeichnet Hinweis Ihr KVM Switch ist rückwärtskompatibel mit den Belkin OmniView PRO3 KVM Switches mit Standardverkabelung F1DA104Tea F1DA108Tea F1DA116Tea In einer Kaskadierung muss der Switch mit Mikroverkabelung F1DA104Zea F1DA108Zea F1DA116Zea als primärer Switch einrichtet werden Siehe Abbildung unten Hinweis Für jede Kaskadierung ist ein entsprechendes K...

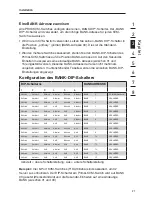
Страница 119: ...Aktiviert Aktiviert Aktiviert AUS Aktiviert Aktiviert BANK 2 SEKUNDÄR Aktiviert Aktiviert AUS AUS Aktiviert Aktiviert BANK 3 SEKUNDÄR Aktiviert Aktiviert Aktiviert Aktiviert AUS Aktiviert BANK 4 SEKUNDÄR Aktiviert Aktiviert AUS Aktiviert AUS Aktiviert BANK 5 SEKUNDÄR Aktiviert Aktiviert Aktiviert AUS AUS Aktiviert BANK 6 SEKUNDÄR Aktiviert Aktiviert AUS AUS AUS Aktiviert BANK 7 SEKUNDÄR Aktiviert ...

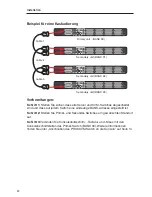
Страница 120: ... ist Schritt 2 Stellen Sie Primär und Sekundär Switches am gewünschten Standort auf Schritt 3 Verbinden Sie Konsolenbildschirm Tastatur und Maus mit den Konsolenschnittstellen des Primär Switch BANK 00 Weitere Informationen finden Sie unter Anschließen des PRO3 KVM Switch an die Konsole auf Seite 14 cable 1 cable 2 cable 3 Primary unit BANK 00 Secondary unit BANK 01 Secondary unit BANK 02 Secondar...

Страница 121: ...inzufügen wollen schließen Sie ein Ende des Kaskadierungskabels an den Kaskadierungsanschluss Daisy Chain OUT und das andere Ende an den Kaskadierungsanschluss Daisy Chain IN des nächsten Sekundär KVM Switches an z B BANK 02 Schritt 4 Wiederholen Sie Schritt 3 für weitere KVM Switches die Sie miteinander kaskadieren möchten Hinweis Ihr KVM Switch ist rückwärtskompatibel mit den Belkin OmniView PRO...

Страница 122: ... die BANK Adresse stehen Hinweis Wenn die KVM Switches falsch nummeriert sind setzen Sie den Primär KVM Switch BANK 00 zurück indem Sie gleichzeitig die Tasten BANK und BANK drücken Durch das Zurücksetzen des Primär KVM Switch werden auch hinzugefügte Sekundär KVM Switches erkannt Werden die KVM Switches noch immer nicht korrekt nummeriert überprüfen Sie ob auf allen KVM Switches die richtige BANK...

Страница 123: ...eine Maus und ermöglicht dem Server einen normalen Systemstart Der Server der mit Port 1 verbunden ist wird auf dem Bildschirm angezeigt Überprüfen Sie ob Tastatur Bildschirm und Maus normal funktionieren Überprüfen Sie alle belegten Schnittstellen um sicher zu stellen dass alle Server angeschlossen sind und ordnungsgemäß reagieren Wenn Sie einen Fehler bemerken überprüfen Sie die Kabelverbindunge...

Страница 124: ...s Schalten Sie durch einfache Tastenfolgen aus der Taste Rollen und den Tasten Pfeil nach oben bzw Pfeil nach unten zur nächsten bzw vorherigen Schnittstelle um Um Befehle an das KVM Gerät zu senden müssen Sie die Rollen Taste innerhalb von zwei Sekunden zweimal drücken Der Switch gibt einen Signalton aus und bestätigt damit den Hotkey Modus Drücken Sie anschließend auf die Taste Pfeil nach oben D...

Страница 125: ... Sie direkt zu einer Schnittstelle an einer beliebigen BANK umschalten indem Sie die Tastenfolge Rollen Rollen die Bankadresse und die Schnittstellennummer drücken Wenn Sie zum Beispiel Rollen Rollen 03 05 drücken schaltet der Switch zum Server an Schnittstelle 5 von BANK 03 um Hinweis Sie müssen jede Befehlstastenfolge innerhalb von ca fünf Sekunden abschließen Auf Seite 33 finden Sie weitere Anw...

Страница 126: ...Sie zwischen den kaskadierten KVM Switches umschalten Wenn Sie beide Tasten gleichzeitig drücken wird der Switch zurückgesetzt Mit der Taste BANK gelangen Sie zur nächsten BANK Beispiel Sie befinden sich am Primär Umschalter BANK 00 und möchten die Computer an BANK 02 überprüfen Mit der Taste BANK gelangen Sie zu BANK 02 Standardmäßig wird der erste aktive Server am Konsolenbildschirm angezeigt Mi...

Страница 127: ...nsole werden nicht an den Server im Fokus übertragen Um die Kontrolle über den Server wieder zu übernehmen müssen Sie den AutoScan Modus beenden Drücken Sie die AutoScan Taste auf dem Switch um die AutoScan Funktion zu aktivieren Sie können die AutoScan Funktion auch auf Ihrer Tastatur aktivieren indem Sie Rollen Rollen A drücken Drücken Sie eine Taste auf dem Bedienfeld oder auf der Tastatur um d...

Страница 128: ...as Betriebssystem oder die Softwarefunktionalität aus Hauptbildschirm Das Hauptmenü zeigt die derzeit gewählte BANK und die angeschlossenen Server an die an diese BANK angeschlossen sind Wenn Sie mit nur einem Switch in Ihrer Konfiguration arbeiten wird auf dem Bildschirmmenü BANK 00 angezeigt Ein Zeichen zeigt an dass der angeschlossene Server hochgefahren ist Bildschirmmenü Tastaturbefehle Schal...

Страница 129: ...r Auswahl einer anderen BANK drücken Sie die Taste Bild auf oder Bild ab um die nächste bzw die vorherige BANK auszuwählen Hauptmenüseite Die folgenden Hauptmenü Optionen stehen nur dem Administrator zur Verfügung Die Hauptmenü Seite bietet folgende Möglichkeiten 01 Einstellung der Sprache für das Bildschirmmenü 02 Bearbeitung und Benennung einzelner Ports 03 Port Suche nach Namen 04 Zuteilung von...

Страница 130: ...rt einen Namen mit maximal 10 Zeichen zuordnen Zur Benennung des Ports müssen Sie die Pfeiltasten zur Navigation verwenden Wählen Sie den gewünschten Port aus und drücken Sie die Eingabetaste um den Port zu benennen Drücken Sie die Eingabetaste um die Eingabe zu speichern Benutzereinstellung Ermöglicht die Einrichtung von Administratoren Benutzernamen und Kennwörtern zum Schutz gegen unerwünschten...

Страница 131: ...taste Strg links Strg rechts Alt links Alt rechts Win links Win rechts Die Standardtaste für alle Tastaturbefehle ist Rollen s Tastaturbefehle auf der nächsten Seite Wenn Sie eine andere Taste festlegen wollen um Tastaturbefehle auszuführen verwenden Sie die Pfeiltasten um zum Feld Hot Key Hotkey zu navigieren Drücken Sie die Leertaste bis die gewünschte Taste gefunden wird und drücken Sie dann di...

Страница 132: ...BANK 01 02 16 Port Kaskadierung Dritte und vierte Ziffer bezeichnet Anzahl PgUP Vorherige BANK Bild runter Nächste BANK B An Ausschalt Ton im AutoScan Modus S Bildschirmmenü Sicherheit aktivieren deaktivieren P Konsolen Bildschirm wird ausgeschaltet und Benutzername und Kennwort muss eingegeben werden wenn Sicherheit aktiviert ist A Administrator aktiviert AutoScan Löschen Administrator setzt das ...

Страница 133: ...ac USB Tastatur Feststelltaste Caps Lock L_Alt Stopp Feststelltaste Caps Lock L_Strg Props Eigenschaften Feststelltaste Caps Lock L_ Umschalttaste Anwendung Compose Bilden Feststelltaste Caps Lock 1 Mute Stummschaltung Feststelltaste Caps Lock 2 Leiser Feststelltaste Caps Lock 3 Lauter Feststelltaste Caps Lock F3 Find Finden Feststelltaste Caps Lock F1 Vorderseite Feststelltaste Caps Lock F2 Offen...

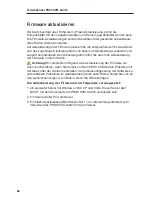
Страница 134: ...g der Firmware in Ihrem Switch Achtung Wir empfehlen dringend eine Aktualisierung der Firmware nur dann durchzuführen wenn Sie derzeit an Ihrem PRO3 KVM Switch Probleme mit der Maus oder der Tastatur feststellen da die Neukonfigurierung der Software zu unterwarteten Problemen im Gerätebetrieb führen kann Bitte wenden Sie sich an den technischen Support von Belkin wenn Sie Hilfe benötigen Zur Aktua...

Страница 135: ...verlassen dass Ihr KVM Switch stets dem neuesten Stand des Marktes entspricht und die aktuellen Funktionen und Verbesserungen enthält Beachten Sie dazu den Abschnitt Firmware aktualisieren in diesem Handbuch F Unterstützt der Switch die Microsoft IntelliMouse A Das Gerät unterstützt u a Mäuse von Microsoft Logitech Kensington und Belkin Sollte es zu Kompatibilitätsproblemen kommen wenden Sie sich ...

Страница 136: ...halten von Bildschirmsignalen verwenden A Nein Der Switch muss sowohl an die Grafik als auch an die Tastatur und Mausschnittstellen Ihres Servers angeschlossen werden Der Switch benötigt die Stromversorgung der PS 2 und USB Ports auf Ihrem Computer um ordnungsgemäß funktionieren zu können F Kann ich den Switch an meinem USB fähigen SUN Servern einsetzen A Ja der Switch ist mit allen USB fähigen Se...

Страница 137: ...Aktualisierungsrate unterstützt die auf Ihrem Computer eingestellt wurde Schließen Sie den Bildschirm direkt an den Server an und überprüfen Sie ob das Problem weiterhin auftritt Der Bildschirm bleibt dunkel Überprüfen Sie ob alle Bildschirmkabel ordnungsgemäß angeschlossen wurden Überprüfen Sie ob das Tastaturkabel korrekt am Server und an der entsprechenden KVM Schnittstelle angeschlossen ist Be...

Страница 138: ...stemstart nicht erkannt Überprüfen Sie die Kabel und stellen Sie sicher dass sie richtig angeschlossen sind Der Server fährt ganz normal hoch aber die Maus funktioniert nicht Überprüfen Sie ob die Maus richtig angeschlossen ist Überprüfen Sie ob die Maus funktioniert wenn Sie sie direkt an einen Server anschließen Hierzu müssen Sie möglicherweise einen Neustart durchführen Probieren Sie eine ander...

Страница 139: ...ten vom Windows Betriebssystem soweit vorhanden automatisch installiert werden Einige Tasten auf der Tastatur funktionieren nicht korrekt wenn ich mit einem Macintosh Server arbeite Da Sie eine PC Tastatur für einen Mac verwenden sind einige Optionstasten auf der Tastatur vertauscht Alle Haupttasten funktionieren der Beschriftung entsprechend Beachten Sie den Abschnitt Sun Combo and Mac Funktionst...

Страница 140: ...e in einer Reihe zusammengeschlossen sind Eine KVM Switch Kaskadierung ermöglicht die reibungslose komplexe Interaktion zwischen mehreren Konsolen zur Kontrolle vieler Server HID Human Interface Device sind Eingabegeräte der USB Geräteklasse zu der Tastaturen und Mäuse gehören KVM Wörtlich Keyboard Video Mouse Tastatur Bildschirm Maus bezeichnet dieser Begriff eine Technologie mit der einer oder v...

Страница 141: ...r Fachgrundnorm Störfestigkeit EN55024 sowie LVP EN61000 3 2 und EN61000 3 3 stehen ICES Erklärung Dieses Digitalgerät der Klasse B entspricht der kanadischen Richtlinie ICES 003 Cet appareil numérique de la classe B est conforme á la norme NMB 003 du Canada Drei Jahre beschränkte Herstellergarantie von Belkin International Inc Garantieleistung Belkin International Inc Belkin garantiert dem ursprü...

Страница 142: ...das beschädigte Belkin Produkt zu überprüfen Alle Kosten die beim Versand des Belkin Produkts an Belkin zum Zweck der Überprüfung entstehen sind vollständig durch den Käufer zu tragen Wenn Belkin nach eigenem Ermessen entscheidet dass es nicht angebracht ist das beschädigte Gerät an die Belkin zu schicken kann Belkin nach eigenem Ermessen eine Reparaturstelle damit beauftragen das Gerät zu überprü...

Страница 143: ...T AUSSCHLIESSLICH ENTGANGENES GESCHÄFT ODER PROFITE DIE IHNEN DURCH DEN VERKAUF ODER DIE BENUTZUNG VON EINEM BELKIN PRODUKT ENTGANGEN SIND AUCH WENN SIE AUF DIE MÖGLICHKEIT SOLCHER SCHÄDEN AUFMERKSAM GEMACHT WORDEN SIND Diese Garantie räumt Ihnen spezifische Rechte ein die von Land zu Land unterschiedlich ausgestaltet sein können Da in manchen Ländern der Ausschluss oder die Beschränkung der Haftu...

Страница 144: ...Ltd Express Business Park Shipton Way Rushden NN10 6GL Großbritannien 44 0 1933 35 2000 44 0 1933 31 2000 Fax Belkin B V Boeing Avenue 333 1119 PH Schiphol Rijk Niederlande 31 0 20 654 7300 31 0 20 654 7349 Fax Belkin GmbH Hanebergstraße 2 80637 München Deutschland 49 0 89 143405 0 49 0 89 143405 100 Fax Belkin SAS 5 Rue du Petit Robinson 3ème étage 78350 Jouy en Josas Frankreich 33 0 1 34 58 14 0...

Страница 145: ...OmniView PRO3 KVM switch Handleiding F1DA104Zea F1DA108Zea F1DA116Zea UK FR DE NL ES IT ...

Страница 146: ...n 16 Meerdere PRO3 KVM switches aansluiten in serie koppelen 20 De systemen inschakelen 25 4 De PRO3 KVM switch gebruiken 26 Een server of een BANK met sneltoetscommandos selecteren 26 Een server met rechtstreekse poortkeuzeknoppen selecteren 28 Een BANK met scroll knoppen selecteren 28 AutoScan modus 29 On Screen Display OSD 30 Sneltoetscommandos op het toetsenbord 34 Sun Combo en Mac toetsen toe...

Страница 147: ...s tot 256 PS 2 en of USB servers vanaf één console te beheren Bovendien wordt de PRO3 KVM switch geleverd met liefst drie jaar garantie van Belkin Deze handleiding geeft u alle informatie over uw nieuwe PRO3 KVM switch te beginnen met de installatie en de bediening tot en met het oplossen van problemen in het onwaarschijnlijke geval dat deze zich voordoen Zie voor een snelle en gemakkelijke instal...

Страница 148: ...even om te voorkomen dat gebruikers zonder bevoegdheid het beeldschermmenu en de KVM switch openen Speciale daisychainpoort U kunt tot 16 KVM switches onderling via speciale poorten in serie koppelen zodat u bij een groeiende serveromgeving uw KVM configuratie eenvoudig kunt uitbreiden On Screen Display OSD Met het beeldschermmenu On Screen Display kunt u aan elke aangesloten server in uw systeem ...

Страница 149: ...nde poort geen server is aangesloten Zevendelig led display Wanneer u meerdere PRO3 KVM switches onderling doorverbindt kunt u aan het zevendelig led display snel zien welke BANK is geselecteerd Flash upgrade Met via flash upgrades bij te werken firmware kunt u de nieuwste firmware op uw PRO3 KVM switch installeren Zo kunt u ervoor zorgen dat uw KVM switch compatibel blijft met de nieuwste apparat...

Страница 150: ...t Vereiste apparatuur Kabels Voor het aansluiten van de PRO3 KVM switch op een server hebt u dual port KVM kabels van Belkin nodig Belkin dual port KVM kabelsets F1D9400 XX PS 2 uitvoering F1D9401 XX USB uitvoering ...

Страница 151: ...5 1 2 3 4 5 6 7 8 hoofdstuk 5 Overzicht Belkin PRO3 daisychainkabel F1D108 CBL Let op Artikelnummers en beschikbaarheid kunnen variëren F1D108 CBL ...

Страница 152: ...oft DOS 5 x en hoger Red Hat Linux 8 x en hoger Novell NetWare 5 x Mac OS X en hoger met USB ondersteuning SunTM SolarisTM 8 x en hoger Toetsenborden Compatibel met PS 2 Compatibel met USB Ondersteunt toetsenborden met 101 102 104 toetsen Muizen Met PS 2 en USB compatibele muizen met PS 2 adapter en voorzien van 2 3 4 of 5 knoppen Met PS 2 en USB compatibele draadloze en optische muizen Monitoren ...

Страница 153: ...M switch in beeld Vooraanzicht van de PRO3 KVM switch F1DA108Zea AutoScan toets Statuslampje voor identificatie van de geselecteerde poort Zevendelig LED display voor herkenning van de geselecteerde BANK Poortkeuzetoets Handbediende BANK scroll toetsen ...

Страница 154: ...n de PRO3 KVM switch Uitgang daisychain DIP schakelaar voor keuze van BANKen Aansluiting gelijkstroomvoeding SCSI 50 dual host ports Flash upgrade poorten DIP keuzeschakelaar Console VGA PS 2 muis toetsenbordpoorten USB muis toetsenbordpoorten Ingang daisychain ...

Страница 155: ...ot 1920x1440 bij 75 Hz Toetsenbordingang PS 2 miniDIN6 USB type A Muisingang PS 2 miniDIN6 USB type A Monitorpoort VGA HDDB15 female CPU poorten SCSI 50 Daisychainpoorten DB25 female Flash upgrade poort RJ11 Rechtstreekse poortkeuzeknoppen 4 8 en 16 respectievelijk voor 4 8 en 16 poorts uitvoeringen Bedrijfstemperatuur 0 40 C Bewaartemperatuur 20 60 C Vochtigheidsgraad 0 80 relatief niet condenser...

Страница 156: ...Daarom adviseren wij de lengte van de kabels tussen de PRO3 KVM switch en de aangesloten servers te beperken tot 7 6 m of korter Voor USB servers Voor USB signalen mag de verbindingskabel tussen de PRO3 KVM switch en de servers niet langer zijn dan 4 5 m Bij een grotere kabellengte kunnen storingen in het USB signaal optreden waardoor het systeem defect kan raken Let op Met de CAT5 extender van Be...

Страница 157: ...ardoor u de frontplaat van de PRO3 KVM switch gelijk met de raileinden kunt monteren of de PRO3 KVM switch voorbij de kop van de rails kunt plaatsen Ga als volgt te werk om de gewenste stand in te stellen Stap 1 Bepaalhoe ver u de PRO3 KVM switch uit het rek wilt laten steken Kies een passende gat en beugel uitsparing Stap 2 Zet de beugel met de bijgeleverde kruiskopschroeven vast op de zijkant va...

Страница 158: ...M switch is nu stevig in de beugels bevestigd Nu kunt u de console aansluiten Een optionele beugel installeren F1DA104Zea Met behulp van een afzonderlijk leverbare OmniView rekmontageset artikelnummer F1D005 kunt u de PRO3 4 poorts KVM switch in een 19 inch rek monteren Stap 1 Bevestig de rekmontagebeugel met de meegeleverde kruiskopschroeven op de PRO3 4 poorts KVM switch Zie onderstaande afbeeld...

Страница 159: ...n daisychaining De PRO3 KVM switch is nu stevig in de beugels bevestigd Nu kunt u de console aansluiten Opmerking voor bezitters van een Belkin PRO3 van serie Generation 1 F1DA104Tea F1DA108Tea en F1DA116Tea De installatieprocedure van de PRO3 KVM switch is gewijzigd Volg daarom de aanwijzingen in deze installatiehandleiding stipt op om zeker te zijn van een correcte installatie Als u zich hieraan...

Страница 160: ...ruikt moet u ook een USB muis op de console aansluiten Stap 1 Sluit de VGA monitorkabel aan op de female HBBB15 poort aan de achterzijde van de PRO3 KVM switch in het consolegedeelte Zie onderstaande afbeelding Stap 2 Sluit de PS 2 of USB toetsenbordkabel aan op de toetsenbordpoort aan de achterzijde van de PRO3 KVM switch in het consolegedeelte Zie onderstaande afbeelding ...

Страница 161: ...oerapparaten Het gebruik van een combinatie van USB en PS 2 invoerapparaten veroorzaakt een vertraging van twee seconden tussen elke bedieningshandeling bij deze invoerapparaten Stap 4 Sluit de netvoedingsadapter aan op de ingang voor gelijkstroomvoeding aangeduid met 12VDC 1A aan de achterzijde van de PRO3 KVM switch Gebruik uitsluitend de netvoedingsadapter die bij de apparatuur is geleverd Zie ...

Страница 162: ...uitgeschakeld is Stap 2 Sluit de VGA connector met Belkin dual port KVM kabels voor PS 2 F1D9400 XX aan op de monitorpoort van de server Zie onderstaande afbeelding Stap 3 Sluit de stekkers van de PS 2 muis en het PS 2 toetsenbord aan op de muis en toetsenbordpoorten van de server Zie onderstaande afbeelding ...

Страница 163: ...g Stap 4 Sluit de Belkin dual port KVM kabels voor PS 2 aan op de gewenste hostpoorten van de PRO3 KVM switch Zie onderstaande afbeelding Stap 5 Schakel de server in Stap 6 Herhaal stap 1 t m 5 voor elke extra PS 2 server die u wilt aansluiten ...

Страница 164: ...org ervoor dat de server is ingeschakeld Stap 2 Sluit de VGA connector met Belkin dual port KVM kabels voor USB F1D9401 XX aan op de monitorpoort van de server Zie onderstaande afbeelding Stap 3 Sluit de USB stekker aan op een vrije USB poort van de server Zie onderstaande afbeelding ...

Страница 165: ...Herhaal stap 1 t m 4 voor elke extra USB server die u wilt aansluiten Let op Wij adviseren u de Belkin dual port KVM kabels voor USB rechtstreeks op een vrije USB poort van de server aan te sluiten Let op Als u een USB kabelset op een Sun server aansluit emuleert de serverinterfacemodule de Sun toetsen door middel van een reeks toetscombinaties die bekend zijn als Combo Keys combinatietoetsen Zie ...

Страница 166: ...et 15 worden secundaire KVM switches genoemd Let op De PRO3 KVM switch is backward compatibel met OmniView PRO3 KVM switches van Belkin met standaardbekabeling F1DA104Tea F1DA108Tea en F1DA116Tea In een daisychainconfiguratie moet de PRO3 KVM switch met micro kabeltechnologie F1DA104Zea F1DA108Zea en F1DA116Zea worden aangeduid als de primaire KVM switch Zie onderstaande afbeelding Let op Een dais...

Страница 167: ...KELD INGESCHAKELD BANK 4 SECUNDAIR INGESCHAKELD INGESCHAKELD UITGESCHAKELD INGESCHAKELD UITGESCHAKELD INGESCHAKELD BANK 5 SECUNDAIR INGESCHAKELD INGESCHAKELD INGESCHAKELD UITGESCHAKELD UITGESCHAKELD INGESCHAKELD BANK 6 SECUNDAIR INGESCHAKELD INGESCHAKELD UITGESCHAKELD UITGESCHAKELD UITGESCHAKELD INGESCHAKELD BANK 7 SECUNDAIR INGESCHAKELD INGESCHAKELD INGESCHAKELD INGESCHAKELD INGESCHAKELD UITGESCH...

Страница 168: ... adres hebt toegewezen Stap 2 Zet alle primaire en secundaire KVM switches op de gewenste plaats Stap 3 Sluit de monitor het toetsenbord en de muis van de console aan op de consolepoorten van de primaire switch BANK 00 Zie De console op de PRO3 KVM switch aansluiten op pagina 14 cable 1 cable 2 cable 3 Primary unit BANK 00 Secondary unit BANK 01 Secondary unit BANK 02 Secondary unit BANK 03 ...

Страница 169: ...einde van de daisychainkabel F1D108 CBL aan op de Daisy Chain In poort van de eerste secundaire KVM switch en het andere uiteinde op de Daisy Chain Out poort van de volgende secundaire KVM switch bijvoorbeeld BANK 01 Stap 4 Herhaal stap 3 bij alle extra PRO3 KVM switches die u onderling in serie als daisychain wilt doorverbinden Let op De PRO3 KVM switch is backward compatibel met OmniView PRO3 KV...

Страница 170: ...VM switches de console niet herkennen stel dan de primaire KVM switch BANK 00 opnieuw in door gelijktijdig de knoppen BANK en BANK in te drukken U kunt de primaire KVM switch ook resetten om nieuw toegevoegde secundaire KVM switches op te sporen Als de KVM switches de console nog steeds niet herkennen controleer dan of u aan alle switches een correct BANK adres hebt toegewezen en of alle daisychai...

Страница 171: ...en een toetsenbord en stelt de server in staat normaal op te starten De op poort 1 aangesloten server wordt op de monitor weergegeven Controleer of het toetsenbord de monitor en de muis normaal functioneren Controleer alle gebruikte poorten om er zeker van te zijn dat alle servers zijn aangesloten en correct reageren Als u een fout tegenkomt controleer dan de kabelverbindingen van de betreffende s...

Страница 172: ...mbinaties naar de volgende of de vorige poort overschakelen door eerst de toets ScrollLock en daarna de pijltoetsen Omhoog of Omlaag in te drukken Om sneltoetscommandos naar de PRO3 KVM switch te sturen drukt u binnen twee seconden twee maal op de ScrollLock toets De PRO3 KVM switch geeft nu een piepsignaal als bevestiging dat de sneltoetsmodus ingeschakeld is Als u nu op de pijltoets Omhoog drukt...

Страница 173: ...oppelde KVM switchconfiguraties kunt u met de toetsencombinatie ScrollLock ScrollLock BANK adres en poortnummer rechtstreeks naar elke poort op elke BANK overschakelen Als u bijvoorbeeld de combinatie ScrollLock ScrollLock 03 05 gebruikt activeert u de server op BANK 03 poort 5 Let op Voor het ingeven van een sneltoetscombinatie hebt u ongeveer vijf seconden de tijd Zie pagina 33 voor meer informa...

Страница 174: ...t u overschakelen tussen de in serie gekoppelde PRO3 KVM switches Als u de beide knoppen tegelijk indrukt wordt de PRO3 KVM switch gereset Via de knop BANK komt u bij de volgende BANK Wanneer u zich op de primaire switch BANK 00 bevindt en de servers op BANK 02 wilt controleren dan drukt u op de knop BANK om naar BANK 02 te gaan Standaard wordt de eerste actieve server op de consolemonitor weergeg...

Страница 175: ...en niet naar de gedefinieerde server worden doorgeleid U moet AutoScan annuleren om de besturing van de server weer over te nemen Om de AutoScan functie te activeren drukt u AutoScan toets van de PRO3 KVM switch in U kunt AutoScan ook met het toetsenbord activeren door achtereenvolgens op de toetsen Scroll Lock Scroll Lock en A te drukken Om de AutoScan functie uit te schakelen drukt u op een will...

Страница 176: ... op de werking van de server het besturingssysteem of de software OSD hoofdpagina Het hoofdmenu van het OSD beeldschermmenu toont de thans geselecteerde BANK en de op deze BANK aangesloten servers Als u slechts één PRO3 KVM switch in uw configuratie gebruikt geeft het OSD menu BANK 00 weer Een teken geeft aan dat de aangesloten server is ingeschakeld OSD toetsenbordcommandos Naar verschillende ser...

Страница 177: ...electeren drukt u op de toets Page Up of Page Down voor de volgende of de vorige BANK Hoofdmenupagina De volgende opties in het hoofdmenu zijn alleen voor de systeembeheerder beschikbaar De pagina met het hoofdmenu geeft u de volgende mogelijkheden 01 De taal instellen van het OSD menu 02 De benaming van de afzonderlijke poorten bewerken 03 Op naam naar poorten zoeken 04 Gebruikersnamen en wachtwo...

Страница 178: ...vigeert u met de pijltoetsen naar de gewenste serverpoort Vervolgens drukt u op Enter om de gekozen naam aan de poort toe te kennen Druk nogmaals op Enter om de gekozen naam op te slaan Gebruikersinstelling Met deze optie kunt u een systeembeheerders gebruikersnaam en wachtwoorden opgeven om te voorkomen dat gebruikers zonder toegangsrechten het OSD beeldschermmenu en de PRO3 KVM switch openen Zo ...

Страница 179: ...Lock Caps Lock Linkse Ctrl toets Rechtse Ctrl toets Linkse Alt toets Rechtse Alt toets Linkse Win toets Rechtse Win toets De standaardtoets voor alle sneltoetscommandos is Scroll Lock zie Sneltoetscommandos op het toetsenbord op de volgende pagina Om een andere toets voor het initiëren van sneltoetscommandos aan te wijzen navigeert u met de pijltoetsen naar het veld Hot Key Sneltoetsen en drukt u ...

Страница 180: ... 02 16 poort Daisychain Het derde en vierde cijfer geven het nummer aan PgUP Vorige BANK PgDown Volgende BANK B Geluidssignaal in AutoScan modus uitgeschakeld S Beveiliging OSD menu inschakelen uitschakelen P Schakelt beeldscherm van console Uit en vraagt naar gebruikersnaam en wachtwoord als de beveiliging is ingeschakeld A Systeembeheerder activeert AutoScan Verwijderen Systeembeheerder zet het ...

Страница 181: ...Zie de onderstaande tabel Windows USB toetsenbord Sun Micro USB toetsenbord Mac USB toetsenbord CapsLock en linker Alt toets Stoppen CapsLock en linker Ctrl toets Properties Eigenschappen CapsLock en linker Shift toets toepassingen Compose Samenstellen CapsLock en 1 Stilschakelen CapsLock en 2 Volume lager CapsLock en 3 Volume hoger CapsLock en F3 Find Zoeken CapsLock en F1 Voorkant CapsLock en F2...

Страница 182: ...are op de PRO3 KVM switch Waarschuwing Wij adviseren u de firmware alléén bij te werken als u problemen ondervindt met de muis en het toetsenbord Het opnieuw configureren van software kan namelijk tot onverwachte besturingsproblemen leiden Als u vragen hebt neem dan contact op met de afdeling Technische Ondersteuning van Belkin Voor het bijwerken van de firmware hebt u het volgende nodig 1 Een afz...

Страница 183: ...altijd met de meest recente firmwareversie met de nieuwste functies en verbeteringen werken Zie het hoofdstuk Firmware bijwerken in deze handleiding V Ondersteunt de PRO3 KVM switch Microsoft IntelliMouse A De PRO3 KVM switch ondersteunt ondermeer USB en PS 2 muizen van Microsoft Logitech Kensington en Belkin Als u vragen hebt over compatibiliteit kunt u contact opnemen met de afdeling Technische ...

Страница 184: ... PRO3 KVM switch gebruiken om alleen videosignalen te schakelen A Nee u moet de PRO3 KVM switch zowel op de videopoorten aansluiten als op de toetsenbord muispoorten van de servers Om te kunnen functioneren moet de PRO3 KVM switch de voeding van de PS 2 en de USB poorten van de servers detecteren V Kan ik de PRO3 KVM switch op een SUN server gebruiken die USB ondersteunt A Ja de PRO3 KVM switch we...

Страница 185: ...gsfrequentie van de server ondersteunt Sluit de monitor rechtstreeks aan op de server die problemen geeft om te kijken of het probleem blijft bestaan Op mijn monitor krijg ik een zwart scherm Controleer of alle videokabels goed zijn aangesloten Controleer of de toetsenbordkabel is aangesloten en op de juiste punten tussen de server en de betreffende poort op de PRO3 KVM switch is vastgezet Verplaa...

Страница 186: ...oleer de kabels en zorg ervoor dat ze in de juiste poorten zijn bevestigd De server start wel op maar de muis werkt niet Controleer of de muis correct is aangesloten Controleer of de muis werkt als u hem rechtstreeks op de server aansluit Het is mogelijk dat u hierbij de server opnieuw moet opstarten Probeer een andere muis Als ik van de ene poort naar de andere overschakel zijn de muisbewegingen ...

Страница 187: ...et Windows besturingssysteem installeert deze stuurprogrammas automatisch Sommige toetsen van mijn toetsenbord werken niet goed als ik een Mac server gebruik Omdat u een pc toetsenbord met een Mac server gebruikt kunnen een paar facultatieve toetsen van uw pc toetsenbord zijn verwisseld De voornaamste toetsen werken als aangegeven Zie het hoofdstuk Sun Combo en Mac toetsen toewijzen in deze handle...

Страница 188: ...lgemeen gebruikelijke instellingen om naadloze complexe interacties tussen meerdere consoles mogelijk te maken voor de besturing van een groot aantal servers HID Human Interface Device de klasse van USB apparaten waartoe ook toetsenborden en muizen behoren KVM Deze term letterlijk Keyboard Video Mouse verwijst naar een technologie die het mogelijk maakt twee of meer computers of servers met één to...

Страница 189: ... emissienorm EN55022 en aan de immuniteitsnormen EN55024 LVP EN61000 3 2 en EN61000 3 3 ICES Dit digitale apparaat van klasse B voldoet aan de Canadese normen van ICES 003 Cet appareil numérique de la classe B est conforme à la norme NMB 003 du Canada Drie jaar beperkte productgarantie van Belkin International Inc Deze garantie dekt het volgende Belkin International Inc Belkin garandeert de oorspr...

Страница 190: ...t recht voor het defecte Belkin product te onderzoeken De kosten voor verzending van het Belkin product naar Belkin International Inc komen volledig voor rekening van de koper Als Belkin naar eigen bevinding tot de conclusie komt dat het onpraktisch is de beschadigde apparatuur naar Belkin te verzenden kan Belkin naar eigen goeddunken een deskundige reparatie inrichting aanwijzen en deze opdragen ...

Страница 191: ...IGE SCHADE ZOALS ONDERMEER SCHADE TEN GEVOLGE VAN GEDERFDE WINST EN OF GEMISTE OPBRENGSTEN VOORTKOMEND UIT DE VERKOOP OF HET GEBRUIK VAN BELKIN PRODUCTEN ZELFS ALS DE BETROKKENE VAN DE MOGELIJKHEID VAN ZULKE SCHADE TEVOREN OP DE HOOGTE WAS GESTELD Deze garantie verleent u specifieke wettelijke rechten en wellicht hebt u andere rechten die van staat tot staat kunnen verschillen In sommige staten en...

Страница 192: ...1100 1 310 898 1111 fax Belkin Ltd Express Business Park Shipton Way Rushden NN10 6GL Verenigd Koninkrijk 44 0 1933 35 2000 44 0 1933 31 2000 fax Belkin B V Boeing Avenue 333 1119 PH Schiphol Rijk Nederland 31 0 20 654 7300 31 0 20 654 7349 fax Belkin GmbH Hanebergstraße 2 80637 München Duitsland 49 0 89 143405 0 49 0 89 143405 100 fax Belkin SAS 5 rue du Petit Robinson 3ème étage 78350 Jouy en Jo...

Страница 193: ...Conmutador KVM PRO3 OmniView Manual del usuario F1DA104Zea F1DA108Zea F1DA116Zea UK FR DE NL ES IT ...

Страница 194: ...6 Conexión de múltiples conmutadores KVM PRO3 encadenamiento en margarita 20 Encendido de los sistemas 25 4 Utilización del conmutador KVM PRO3 26 Selección de un servidor o BANK mediante teclas de acceso directo 26 Selección de un servidor mediante los selectores de puertos de acceso directo 28 Selección de un BANK mediante los botones de desplazamiento 28 Búsqueda automática Modo AutoScan 29 Men...

Страница 195: ...s en margarita permitiendo así gestionar hasta 256 servidores de tipo USB desde una única consola El conmutador PRO3 viene acompañado de una incomparable garantía de tres años de Belkin El presente manual de usuario le ofrece los detalles acerca de su nuevo conmutador KVM PRO3 desde la instalación y el funcionamiento hasta la resolución de problemas para el improbable caso de que se presenten difi...

Страница 196: ...ecificar los nombres de usuario y las contraseñas para evitar que usuarios no autorizados accedan a la pantalla OSD y al conmutador KVM Puertos dedicados al encadenamiento de margarita Pueden encadenarse en margarita hasta 16 conmutadores KVM con facilidad mediante los puertos dedicados por lo que puede ampliar la configuración KVM fácilmente según vaya creciendo el entorno del servidor Menú en pa...

Страница 197: ...eando significa que ningún servidor se encuentra conectado a este puerto Pantalla LED de 7 segmentos Cuando se conectan en margarita múltiples conmutadores KVM PRO3 la pantalla LED de siete segmentos funciona como indicador rápido del BANK seleccionado Actualización por flash El firmware actualizable por flash le permite instalar el último firmware en su conmutador KVM PRO3 Así permitirá a su conm...

Страница 198: ...itos del equipo Cables Para conectar el conmutador KVM PRO3 a un servidor se requiere un puerto doble de Belkin Kit de micro cableado Kits de microcableado de puerto doble de Belkin F1D9400 XX estilo PS 2 F1D9401 XX estilo USB ...

Страница 199: ...5 1 2 3 4 5 6 7 8 sección 5 Generalidades Cable para cadena margarita PRO3 de Belkin F1D108 CBL Nota Los números de artículo y la disponibilidad están sujetos a posibles cambios F1D108 CBL ...

Страница 200: ...osoft DOS 5 x y versiones superiores Red Hat Linux 8 x y versiones superiores Novell NetWare 5 x Mac OS X y superior con soporte de USB SunTM SolarisTM 8 x y versiones superiores Teclados Compatible con PS 2 Compatible con USB Compatible con teclados de 101 102 104 teclas Ratones Ratón compatible con PS 2 y USB con un adaptador PS 2 con 2 3 4 ó 5 botones Ratones ópticos e inalámbricos compatibles ...

Страница 201: ...ores de la unidad Vista frontal del conmutador KVM PRO3 F1DA108Zea Botón AutoScan LED para identificación de los puertos LED de 7 segmentos para la identificación del BANK seleccionado Selector de puerto de acceso directo Botones de rueda para la selección manual BANK ...

Страница 202: ...KVM PRO3 Salida de encadenamiento en margarita Selección de Bank Conmutador DIP Toma de alimentación CC SCSI 50 dual host ports Puerto para actualización por flashy conmutador DIP Consola VGA puertos para ratón teclado PS 2 puertos para ratón teclado USB Entrada de encadenamiento en margarita ...

Страница 203: ...te VGA Resolución máx Hasta 1920 x 1440 a 75 Hz Entrada de teclado PS 2 miniDIN6 USB Tipo A Entrada de ratón PS 2 miniDIN6 USB Tipo A Puerto de monitor VGA hembra HDDB15 Puertos para CPU SCSI 50 Puertos para cadena margarita DB25 hembra Puerto para actualización por flash RJ11 Selectores directos de puertos 4 8 y 16 respectivamente para los modelos de 4 8 y 16 puertos Temperatura de funcionamiento...

Страница 204: ...n recomienda que la longitud de los cables entre el conmutador KVM PRO3 y los servidores conectados no supere los 7 6 metros Para servidores USB Las señales USB se pueden transmitir a una distancia de hasta 4 5 m entre el conmutador KVM PRO3 y el servidor Más allá de esa longitud la probabilidad de un fallo en la señal USB aumenta y puede que cause el fallo del dispositivo Nota Puede utilizar el m...

Страница 205: ...al del conmutador KVM PRO3a la altura de los carriles o dejar que el conmutador KVM PRO3 sobresalga del bastidor Siga estos sencillos pasos para conseguir la posición que prefiera Paso 1 Determine cuánto debe sobresalir el conmutador PRO3 KVM del bastidor Seleccione los orificios y el tipo de montaje que desea llevar a cabo Paso 2 Coloque los engarces a ambos lados del conmutador KVM PRO3 Utilice ...

Страница 206: ...a en el bastidor y está listo para conectar la consola Instalación opcional de los engarces F1DA104Zea El conmutador KVM PRO3 de 4 puertos se puede instalar en un bastidor para servidores de 19 pulgadas Para ello deberá utlizar un kit de montaje en bastidor OmniView F1D005 Paso 1 Coloque el engarce en el conmutador KVM PRO3 de 4 puertos Utilice para ello los tornillos Phillips suministrados Consul...

Страница 207: ... presente manual del usuario Ahora su conmutador KVM PRO3 está montado de manera segura en el bastidor y está listo para conectar la consola Advertencia para los propietarios de la Serie PRO3 de Belkin F1DA104Tea F1DA108Tea and F1DA116Tea La instalación del conmutador KVM PRO3 se ha modificado Por favor siga atentamente este manual de instalación para asegurar una instalación correcta En caso de n...

Страница 208: ...mbién debe conectar el ratón USB a la consola Paso 1 Conecte el cable VGA del monitor al puerto HDDB15 hembra ubicado en la parte posterior del conmutador KVM PRO3 en la sección Consola Consulte el siguiente diagrama Paso 2 Conecte el cable del teclado PS 2 o USB al puerto para teclado ubicado en la parte posterior del conmutador KVM PRO3 en la sección Consola Consulte el siguiente diagrama ...

Страница 209: ...consola La combinación de dispositivos de entrada USB o PS 2 resultará en un retraso de 2 segundos entre el funcionameinto de cada dispositivo de entrada Paso 4 Conecte el adaptador de alimentación a la toma de alimentación CC que lleva la etiqueta 12VDC 1A ubicada en la parte posterior del conmutador KVM PRO3 Utilice únicamente el adaptador de alimentación que ha sido suministrado con la unidad C...

Страница 210: ...esté apagado Paso 2 Mediante el kit de microcableado de puerto doble de Belkin para PS 2 F1D9400 XX conecte el conector VGA al puerto monitor de su servidor Consulte el siguiente diagrama Paso 3 Conecte los conectores PS 2 de teclado y ratón a los puertos para teclado y ratón del servidor Consulte el siguiente diagrama ...

Страница 211: ...kit de microcableado de puerto doble de Belkin para PS 2 a los puertos deseados del host en el conmutador KVM PRO3 Consulte el siguiente diagrama Paso 5 Encienda su servidor Paso 6 Repita los pasos del 1 al 5 para cada servidor PS 2 adicional que desee conectar ...

Страница 212: ...servidor esté encendido Paso 2 Mediante el kit de microcableado de puerto doble de Belkin para USB F1D9401 XX conecte el conector VGA al puerto monitor de su servidor Consulte el siguiente diagrama Paso 3 Conecte el conector USB a uno de los puertos USB disponibles del servidor Consulte el siguiente diagrama ...

Страница 213: ...io Paso 5 Repita los pasos del 1 al 4 para cada servidor USB adicional que desee conectar Nota Le recomendamos que conecte el kit USB de microcableado de puerto doble de Belkin directamente al puerto USB de su servidor Nota Cuando un kit de cableado USB se conecta a un servidor Sun el módulo de interfaz de servidores emula las teclas de Sun utilizando una serie de combinaciones de teclas denominad...

Страница 214: ... denominan conmutadores KVM secundarios Nota Su conmutador KVM PRO3 es compatible con versiones anteriores de los conmutadores KVM PRO3 OmniView de Belkin con cableado estándar F1DA104Tea F1DA108Tea F1DA116Tea En una configuración de encadenamiento en margarita el conmutador KVM PRO3 F1DA104Zea F1DA108Zea F1DA116Zea debe designarse como el conmutador KVM primario Utilice como referencia el siguien...

Страница 215: ...NDIDO APAGADO APAGADO ENCENDIDO ENCENDIDO BANK 3 SECUNDARIO ENCENDIDO ENCENDIDO ENCENDIDO ENCENDIDO APAGADO ENCENDIDO BANK 4 SECUNDARIO ENCENDIDO ENCENDIDO APAGADO ENCENDIDO APAGADO ENCENDIDO BANK 5 SECUNDARIO ENCENDIDO ENCENDIDO ENCENDIDO APAGADO APAGADO ENCENDIDO BANK 6 SECUNDARIO ENCENDIDO ENCENDIDO APAGADO APAGADO APAGADO ENCENDIDO BANK 7 SECUNDARIO ENCENDIDO ENCENDIDO ENCENDIDO ENCENDIDO ENCE...

Страница 216: ...cción de BANK Paso 2 Coloque todos los conmutadores KVM primarios y secundarios en la ubicación que desee Paso 3 Conecte el teclado el monitor y el ratón de la consola a los puertos de consola del conmutador primario BANK 00 Consulte la sección Conexión de la consola al conmutador KVM PRO3 que se encuentra en la página 14 cable 1 cable 2 cable 3 Primary unit BANK 00 Secondary unit BANK 01 Secondar...

Страница 217: ...ecundarias conecte un extremo del cable para cadena en margarita F1D108 CBL al puerto Daisy Chain In del primer conmutador KVM secundario y el otro extremo al puerto Daisy Chain Out del siguiente conmutador KVM secundario por ejemplo BANK 01 Paso 4 Repita el paso 3 para encadenar en margarita los conmutadores KVM PRO3 que desee Nota Su conmutador KVM PRO3 es compatible con versiones anteriores de ...

Страница 218: ...irección correcta reinicie el conmutador KVM primario BANK 00 presionando al mismo tiempo los botones BANK y BANK También podrá reiniciar el conmutador KVM primario para detectar los conmutadores KVM secundarios que han sido añadidos a la configuración Si los conmutadores KVM aún no enumeran su dirección de BANK correspondiente compruebe que todos los dispositivos KVM presenten la dirección de BAN...

Страница 219: ...teclado en cada puerto y permitirá a su servidor encenderse normalmente El servidor que está conectado al puerto 1 será mostrado en el monitor Verifique que el teclado monitor y ratón estén funcionando normalmente Compruebe todos los puertos ocupados para verificar que todos los servidores conectados estén respondiendo correctamente Si detecta un error compruebe las conexiones de los cables del se...

Страница 220: ... Puede seleccionar el puerto siguiente o anterior a través de una simple combinación de teclas Para ello presione la tecla Bloq Despl y simultáneamente la tecla de flecha Arriba o Abajo Para enviar órdenes al conmutador KVM PRO3 pulse dos veces la tecla Scroll Lock en un plazo de dos segundos El conmutador KVM PRO3 emitirá un pitido confirmando que se encuentra en el modo de acceso rápido A contin...

Страница 221: ...a puede conmutar directamente a cualquier puerto de cualquier BANK presionando Bloq Despl Bloq Despl la dirección BANK y el número de puerto Por ejemplo si presiona Bloq Despl Bloq Despl 03 05 el servidor en BANK 03 puerto 5 será el servidor activo Nota Dispondrá de aproximadamente cinco segundos para completar cada secuencia de acceso directo Consulte la página 33 para obtener instrucciones acerc...

Страница 222: ...K del conmutador KVM primario podrá cambiar entre los conmutadores KVM PRO3 encadenados en margarita Si presiona ambos botones simultáneamente el conmutador KVM PRO3 se reiniciará El botón BANK le llevará al BANK siguiente Por ejemplo cuando se encuentre en el conmutador primario BANK 00 y desee controlar los servidores de BANK 02 pulse el botón BANK y así pasará a BANK 02 Por defecto el primer se...

Страница 223: ...en modo de Solo visualización Lo que significa que la entrada a la consola teclado y ratón no se transmitirá al servidor deseado Cancele AutoScan para volver a obtener el control del servidor Para activar la función AutoScan pulse el botón AutoScan del conmutador KVM PRO3 También podrá activar la función AutoScan mediante su teclado Para ello pulse Bloq Despl Bloq Despl A Para desactivar AutoScan ...

Страница 224: ...uesta es generada por el conmutador KVM PRO3 y no afecta el funcionamiento de su servidor sistema operativo o software alguno Página OSD principal El menú principal OSD muestra el BANK seleccionado actualmente así como los servidores conectados a dicho BANK Si sólo tiene un conmutador KVM PRO3 en su configuración el menú OSD mostrará BANK 00 El símbolo indica que el servidor conectado está encendi...

Страница 225: ...n BANK diferente presione la tecla Av Pág o Re Pág Así podrá seleccionar el BANK siguiente o anterior Página del menú principal Las siguientes opciones del Menú principal sólo están disponibles para el administrador La página del Menú principal le permite 01 Determinar el idioma de la OSD 02 Editar el nombre de los puertos 03 Buscar el puerto por su nombre 04 Asignar los nombres de usuario y las c...

Страница 226: ...a 10 caracteres Para poner nombre a un puerto utilice las teclas de flecha para navegar hasta el puerto del servidor deseado y presione Intro para seleccionar y poner nombre al puerto Pulse de nuevo Intro para guardar el ajuste Ajustes del usuario Esta opción le permite especificar los nombres de usuario administrador y las contraseñas para evitar que usuarios no autorizados accedan a la pantalla ...

Страница 227: ...spl Bloq Núm Bloq Mayús Izq Crtl Dcha Ctrl Izq Alt Dcha Alt Izq Win Dcha Win La tecla por defecto para todos los comandos directos de teclado es Bloq Despl Vea los comandos de acceso rápido que figuran a continuación Para designar una tecla distinta para iniciar las teclas de acceso directo utilice las flechas para navegar hasta el campo Tecla de acceso directo y pulse Intro para seleccionar y gua...

Страница 228: ... y segundo dígito determinan el puerto BANK 01 02 16 Cadena en margarita El tercer y cuarto dígito determina el número PgUP BANK previo PgDown BANK siguiente B Encienda apague el sonido en el modo AutoScan S Activar desactivar la seguridad OSD P Apaga la pantalla de la consola y solicita el nombre del usuario y la contraseña si la seguridad está activada A El administrador activa el AutoScan Borra...

Страница 229: ... teclas del Mac están asignadas Consulte la tabla siguiente Windows Teclado USB Sun Micro Teclado USB Mac Teclado USB Bloq Mayús y L_Alt Stop Bloq Mayús y L_Ctrl Props Bloq Mayús y L_Shift aplicación Componer Bloq Mayús y 1 Mute Bloq Mayús y 2 Bajar volumen Bloq Mayús y 3 Subir volumen Bloq Mayús y F3 Encontrar Bloq Mayús y F1 Frontal Bloq Mayús y F2 Abrir Bloq Mayús y F4 De nuevo Bloq Mayús y F5 ...

Страница 230: ... Atención Recomendamos encarecidamente que actualice su firmware únicamente si tiene dificultades con su ratón o teclado al utilizar el conmutador KVM PRO3 ya que la reconfiguración del software podría causar problemas de funcionamiento inesperados Póngase en contacto con el soporte técnico de Belkin si requiere ayuda Para actualizar el firmware necesitará los siguientes elementos 1 Un servidor in...

Страница 231: ...or Internet su conmutador KVM PRO3 tendrá siempre la versión más actual del mercado con las últimas funciones y mejoras Vea la sección Actualización del firmware de este manual del usuario P El conmutador KVM PRO3 es compatible con Microsoft IntelliMouse R El conmutador KVM PRO3 es compatible con ratones USB y PS 2 de Microsoft Logitech Kensington etc y Belkin Póngase en contacto con el servicio d...

Страница 232: ...P Puedo emplear el conmutador KVM PRO3 para conmutar exclusivamente señales de vídeo R No el conmutador KVM PRO3 debe estar conectado también a los puertos de teclado ratón de sus servidores El conmutador KVM PRO3 detecta la alimentación de los puertos PS 2 y USB de los servidores para funcionar P Puedo utilizar el conmutador PRO3 KVM de mi servidor Sun que admite USB R Sí el conmutador KVM PRO3 f...

Страница 233: ...porte el ajuste de resolución y de velocidad de actualización de su servidor Conecte el monitor directamente en el servidor con el que esté teniendo problemas para ver si el problema persiste Aparece una pantalla negra en el monitor Compruebe que todos los cables de vídeo estén conectados correctamente Compruebe que el cable del teclado esté conectado e insertado correctamente entre el servidor y ...

Страница 234: ...ratón no es detectado durante el arranque Compruebe los cables y asegúrese de que están insertados correctamente El servidor arranca bien pero el ratón no funciona Asegúrese de que el ratón esté conectado correctamente Asegúrese de que el ratón funciona cuando está directamente conectado al servidor Es posible que sea necesario reiniciar el ordenador para comprobarlo Pruebe con un ratón diferente ...

Страница 235: ...ws deberá instalar los controladores automáticamente Algunas de las teclas de mi teclado no funcionan correctamente cuando utilizo un servidor Mac Si está utilizando un teclado de PC en un sistema Mac algunas de las teclas de funciones de su teclado para PC pueden estar cambiadas Todas las teclas principales funcionarán como corresponde Remítase a la sección Asignación de teclas para Sun Combo y M...

Страница 236: ...os en serie unos con otros Una cadena margarita de conmutadores KVM emplea ajustes comunes para permitir interacciones complejas y perfectas entre múltiples consolas para el control de varios servidores HID Human Interface Device Dispositivo de interfaz humana la clase de dispositivos USB que incluye teclados y ratones KVM Literalmente KVM Keyboard Video Mouse es un término que se refiere a la tec...

Страница 237: ...e la clase B cumple con la norma canadiense ICES 003 Cet appareil numérique de la classe B est conforme á la norme NMB 003 du Canada Garantía del producto de 3 años de Belkin International Inc La cobertura de la presente garantía Belkin International Inc Belkin otorga una garantía al comprador original según la cual el producto Belkin no tendrá defectos en cuanto a diseño montaje materiales o mano...

Страница 238: ... compró el producto d Copia de la factura original 2 El servicio de atención al cliente de Belkin le informará sobre cómo enviar el recibo y el producto Belkin y sobre cómo proceder con su reclamación Belkin se reserva el derecho de revisar el producto Belkin dañado Todos los gastos de envío del producto Belkin a Belkin para su inspección correrán a cargo del comprador exclusivamente Si Belkin det...

Страница 239: ...s implícitas por lo que puede que las anteriores limitaciones no le afecten EN NINGÚN CASO BELKIN SERÁ RESPONSABLE DE LOS DAÑOS IMPREVISTOS ESPECIALES DIRECTOS INDIRECTOS CONSECUENTES O MÚLTIPLES INCLUYENDO ENTRE OTROS LA PÉRDIDA DE NEGOCIO O BENEFICIOS QUE PUEDA SURGIR DE LA VENTA O EL EMPLEO DE CUALQUIER PRODUCTO BELKIN INCLUSO SI BELKIN HA SIDO INFORMADA DE LA POSIBILIDAD DE DICHOS DAÑOS Esta g...

Страница 240: ... 898 1111 fax Belkin Ltd Express Business Park Shipton Way Rushden NN10 6GL Reino Unido 44 0 1933 35 2000 44 0 1933 31 2000 fax Belkin B V Boeing Avenue 333 1119 PH Schiphol Rijk Países Bajos 31 0 20 654 7300 31 0 20 654 7349 fax Belkin GmbH Hanebergstraße 2 80637 Múnich Alemania 49 0 89 143405 0 49 0 89 143405 100 fax Belkin SAS 5 Rue du Petit Robinson 3ème étage 78350 Jouy en Josas Francia 33 0 ...

Страница 241: ...PRO3 OmniView Switch KVM Manuale duso F1DA104Zea F1DA108Zea F1DA116Zea UK FR DE NL ES IT ...

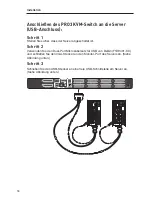
Страница 242: ...legamento di diversi switch KVM PRO3 in configurazione daisy chain 20 Avvio dei sistemi 25 4 Utilizzo dello Switch KVM PRO3 26 Selezione di un server o di un BANCO mediante i tasti di scelta rapida 26 Selezione di un server utilizzando i selettori di porta ad accesso diretto 28 Selezione di un BANCO utilizzando i pulsanti di scorrimento 28 Modalità di scansione automatica 29 On Screen Display OSD ...

Страница 243: ...loro in configurazione a cascata per arrivare a gestire fino a 256 server PS 2 USB da ununica console Inoltre gli Switch KVM PRO3 comprendono un garanzia di 3 anni Belkin In questo Manuale Utente potete trovare tutte le informazioni relative a questo nuovo Switch KVM PRO3 dallinstallazione al funzionamento e alla risoluzione dei problemi nella remota eventualità dellinsorgere di unanomalia Per ese...

Страница 244: ...tente e le password per impedire ad eventuali utenti non autorizzati di accedere al menu OSD e lo Switch KVM Porte dedicate per collegamenti in cascata È possibile collegare fino a 16 swich KVM in configurazione daisy chain sfruttando le apposite porte dedicate e potendo quindi ampliare facilmente la propria configurazione KVM rimanendo al passo con la crescita del proprio ambiente lavorativo On S...

Страница 245: ...d indicare lassenza di server collegati alla porta 7 Display LED Se è stata predisposta una configurazione in cascata tra diversi switch KVM PRO3 insieme il LED a sette segmenti serve ad indicare rapidamente il BANCO selezionato Aggiornamento immediato Con il firmware ad aggiornamento flash è possibile installare rapidamente la versione più recente nello Switch KVM PRO3 In questo modo lo switch KV...

Страница 246: ...e generale Requisiti dellapparecchiatura Cavi Per collegare lo Switch KVM PRO3 a un server è necessario un kit di microcavi a doppia porta Belkin Kit di microcavi a doppia porta Belkin F1D9400 XX PS 2 F1D9401 XX USB ...

Страница 247: ...5 1 2 3 4 5 6 7 8 sezione 5 Descrizione generale Belkin Cavo per collegamento in cascata PRO3 Belkin F1D108 CBL Nota i codici prodotto e la disponibilità sono soggetti a variazioni F1D108 CBL ...

Страница 248: ...VistaTM Microsoft DOS 5 x e successive Red Hat Linux 8 x e successive Novell NetWare 5 x Mac OS X e superiore con supporto USB SunTM SolarisTM 8 x e superiore Tastiere Compatibile con PS 2 Compatibilità USB Compatibile con tastiere a 101 102 104 Mouse Compatibili con mouse USB e PS 2 con adattatore PS 2 con 2 3 4 o 5 tasti Mouse wireless e ottici compatibili con USB e PS 2 Monitor CRT LCD con supp...

Страница 249: ...ualizzazione dellunità Vista anteriore dello switch KVM PRO3 F1DA108Zea Pulsante AutoScan LED per lidentificazione delle porte selezionate LED a 7 segmenti per identificare il BANCO selezionato Selettori porta ad accesso diretto Pulsanti di scorrimento manuale BANCO ...

Страница 250: ...PRO3 Configurazione daisy chain in uscita Selezione di BANCO Switch DIP Presa di alimentazione CC SCSI 50 dual host ports Porta di aggiornamento immediatoe selezione dello Switch DIP Console Porte mouse tastiera console PS 2 e VGAPorte mouse tastiera console USB Configurazione daisy chain in entrata ...

Страница 251: ...zione massima Fino a 1920x1440 75 Hz Ingresso tastiera PS 2 miniDIN6 USB Tipo A Ingresso mouse PS 2 miniDIN6 USB Tipo A Porta monitor HDDB15 femmina VGA Porte CPU SCSI 50 Porte per il collegamento in cascata femmina DB25 Porta di aggiornamento rapido RJ11 Selettori porta diretta 4 8 e 16 rispettivamente per i modelli a 4 8 e 16 porte Temperatura di funzionamento 0 40 C Temperatura di immagazziname...

Страница 252: ... motivo Belkin consiglia che la lunghezza dei cavi tra lo switch KVM PRO3 e i server collegati non superiori ai 7 6 metri Per i server USB I segnali USB possono essere trasmessi fino a 4 6 m tra lo switch KVM e il CPU Oltre questa distanza è possibile che si verifichi un indebolimento del segnale USB che potrebbe causare un malfunzionamento del dispositivo Nota LExtender CAT5 OmniView F1D084 Belki...

Страница 253: ...o a livello con le estremità delle guide o di estendere lo Switch KVM PRO3 oltre lestremità anteriore delle guide Seguire i passaggi riportati di seguito per ottenere la regolazione desiderata Fase 1 Decidere quanto si vuole che lo Switch KVM PRO3 fuoriesca dal rack Scegliere uno schema di foratura delle staffe Fase 2 Attaccare la staffa di montaggio su ogni lato dello switch KVM PRO3 servendosi d...

Страница 254: ...o saldamente nella staffa e si è pronti a collegare la console Installazione delle staffe opzionali F1DA104Zea Lo Switch KVM PRO3 a 4 porte si può installare su un rack per server da 19 pollici utilizzando il kit opzionale montaggio su rack OmniView F1D005 Fase 1 Attaccare la staffa di montaggio su ogni lato dello switch KVM PRO3 a quattro porte servendosi delle viti Philips incluse vedere lo sche...

Страница 255: ...a cascata in questo Manuale Utente Lo Switch KVM PRO3 ora è montato correttamente sul rack e si può collegare alla console Nota per i possessori della serie Belkin PRO3 di prima generazione F1DA104Tea F1DA108Tea and F1DA116Tea La procedura di installazione dello switch KVM PRO3 è cambiata Per una corretta installazione seguire attentamente le istruzioni in questo manuale Procedendo in maniera dive...

Страница 256: ...a USB è necessario collegare anche il mouse USB alla console Fase 1 Collegare il cavo VGA del monitor alla porta femmina HDDB15 sul retro dello Switch KVM PRO 2 nella sezione Console vedere lo schema riportato di seguito Fase 2 Collegare il cavo PS 2 o USB della tastiera alla porta per tastiera sul retro dello Switch KVM PRO3 per PMI nella sezione Console vedere lo schema riportato di seguito ...

Страница 257: ...r collegarsi alla console Se si utlizzano periferiche di ingresso USB e PS 2 si potrà riscontrare un ritardo di due secondi nelle operazioni di ogni dispositivo in entrata Fase 4 Collegare ladattatore di corrente alla presa CC 12VDC 1A situata sul pannello posteriore dello Switch KVM PRO3 Utilizzare esclusivamente ladattatore fornito con lunità vedere lo schema riportato di seguito Lo Switch KVM P...

Страница 258: ...2 Utilizzando il kit di microcavi a doppia porta di Belkin per PS 2 F1D9400 XX collegare il connettore VGA alla presa per il monitor prevista sul server vedere lo schema riportato di seguito Fase 3 Collegare i connettori del mouse e della tastiera PS 2 alle rispettive porte presenti sul server vedere lo schema riportato di seguito ...

Страница 259: ...are il kit di microcavi a doppia porta PS 2 Belkin alle porte host desiderate presenti nello Switch KVM PRO3 vedere lo schema riportato di seguito Fase 5 Accendere il server Fase 6 Ripetere le fasi da 1 a 5 per ogni altro server PS 2 che si desidera collegare ...

Страница 260: ...a acceso Fase 2 Utilizzando il kit di microcavi a doppia porta di Belkin per PS 2 F1D9400 XX collegare il connettore VGA alla presa per il monitor prevista sul server vedere lo schema riportato di seguito Fase 3 Collegare il connettore USB ad una porta USB disponibile del server vedere lo schema riportato di seguito ...

Страница 261: ... necessari Fase 5 Ripetere le fasi tra 1 e 4 per ogni altro server USB che si desidera collegare Nota E consigliabile fissare una estremità del kit di microcavi a doppia porta Belkin a una porta USB diposnibile del server Nota Quando il kit di microcavi a doppia porta Belkin è collegato ad un server Sun il modulo di interfaccia server emula i tasti Sun utilizzando una serie di combinazioni chiamat...

Страница 262: ...witch KVM secondari Nota Lo Switch KVM PRO3 è compatibile con le versioni precedenti degli Switch KVM OmniView PRO3 Belkin con cablaggio standard F1DA104Tea F1DA108Tea F1DA116Tea Nella configurazione daisy chain lo Switch KVM PRO3 con tecnologia a micro cavi F1DA104Zea F1DA108Zea F1DA116Zea deve essere designato come Switch KVM primario Vedere lo schema in basso Nota Per collegare in cascata ciasc...

Страница 263: ...O ATTIVO BANCO 3 SECONDARIO ATTIVO ATTIVO ATTIVO ATTIVO DISATTIVATO ATTIVO BANCO 4 SECONDARIO ATTIVO ATTIVO DISATTIVATO ATTIVO DISATTIVATO ATTIVO BANCO 5 SECONDARIO ATTIVO ATTIVO ATTIVO DISATTIVATO DISATTIVATO ATTIVO BANCO 6 SECONDARIO ATTIVO ATTIVO DISATTIVATO DISATTIVATO DISATTIVATO ATTIVO BANCO 7 SECONDARIO ATTIVO ATTIVO ATTIVO ATTIVO ATTIVO DISATTIVATO BANCO 8 SECONDARIO ATTIVO ATTIVO DISATTIV...

Страница 264: ...un indirizzo BANCO unico Fase 2 Collocare tutti gli switch KVM primari o secondari nella posizione desiderata Fase 3 Collegare la console monitor tastiera e mouse alle porte della console dello switch primario BANCO 00 Vedere la sezione Collegamento della console allo Switch KVM PRO3 a pagina 14 cable 1 cable 2 cable 3 Primary unit BANK 00 Secondary unit BANK 01 Secondary unit BANK 02 Secondary un...

Страница 265: ...mità del cavo per il collegamento in cascata alla porta Daisy Chain In del primo switch KVM secondario e laltra estremità alla porta Daisy Chain Output dello switch KVM secondario successivo ad esempio BANCO 01 Fase 4 Ripetere la fase 3 per eventuali altri switch KVM PRO3 supplementari se si vuole creare un collegamento in cascata Nota Lo Switch KVM PRO3 è compatibile con le versioni precedenti de...

Страница 266: ... gli switch PRO3 PS 2 non vengono elencati correttamente resettare lo switch master BANCO 00 premendo contemporaneamente i pulsanti BANK e BANK Lo switch KVM primario si può resettare anche per rilevare eventuali nuovi switch KVM appena aggiunti Se gli switch KVM continuano a non essere enumerati correttamente accertarsi che a tutti gli switch KVM sia stato assegnato lindirizzo di BANCO corretto e...

Страница 267: ...a tastiera per ciascuna porta e consente al server di eseguire uninizializzazione normale Il server collegato alla porta 1 sarà visualizzato sul monitor Accertarsi che tastiera monitor e mouse funzionino correttamente Controllare tutte le porte occupate per verificare che tutti i server siano collegati e rispondano correttamente Se si riscontrasse un errore controllare i cavi collegati al server i...

Страница 268: ...asti di scelta rapida Per passare alla porta precedente o successiva con le semplici sequenze di tasti utilizzare il tasto Scroll Lock seguito dai tasti freccia Su e Giù Per trasmettere i comandi allo Switch KVM PRO3 premere il tasto Scroll Lock per due volte in un intervallo di due secondi Lo switch emetterà un segnale acustico per confermare lavvenuta selezione della modalità di scelta rapida Qu...

Страница 269: ...e a cascata degli switch si può passare direttamente ad una porta qualsiasi di un BANCO qualsiasi premendo Bloc Scorr Bloc Scorr lindirizzo BANCO e il numero della porta Ad esempio se si preme Bloc Scorr Bloc Scorr e 03 05 si attiva il server sul BANCO 03 e si attiva la porta 5 Nota Si hanno a disposizione circa cinque secondi per completare ciascuna sequenza di scelta rapida Vedere a pagina 33 le...

Страница 270: ...itch KVM collegati a catena Premendo entrambi i pulsanti contemporaneamente si eseguirà il reset dello Switch KVM PRO3 Il pulsante BANK consente di passare al BANCO successivo Ad esempio se ci si trova sullo switch primario BANCO 00 e si desidera controllare i server sul BANCO 02 premendo il pulsante BANK si passerà al BANCO 02 Come impostazione predefinita il primo server attivo sarà visualizzato...

Страница 271: ...i valori immessi dalla console tastiera e mouse non vengono trasmessi al server selezionato Cancellare la funzione AutoScan per riprendere il controllo del server Per attivare la funzione AutoScan premere il pulsante AutoScan sullo switch KVM PRO3 Si può anche attivare la funzione AutoScan dalla tastiera premendo Bloc Scorr Bloc Scorr A Per disattivare la funzione AutoScan premere un pulsante qual...

Страница 272: ...risce con il funzionamento del server del sistema operativo o del software Pagina principale del menu OSD Il menu OSD principale visualizza il BANCO attualmente selezionato e i server collegati a tale BANCO Se nella propria configurazione è stato previsto un unico switch KVM PRO3 il menu OSD visualizza BANK 00 Un simbolo serve ad indicare che il server collegato è alimentato Comandi della tastiera...

Страница 273: ...l tasto Page Up o Page Down per selezionare il BANCO successivo o il BANCO precedente Pagina principale del menu Soltanto dallutente amministratore ha accesso alle seguenti opzioni del Menu principale La pagina del menu principale consente di 01 Impostare la lingua per lOSD 02 Modificare i nomi delle singole porte 03 Ricercare una porta attraverso il nome 04 Assegnare nomi utenti e password 05 Acc...

Страница 274: ...mpostare il nome di una porta fino a 10 caratteri Per stabilire una lingua diversa utilizzare i tasti freccia per passare al campo della lingua desiderata quindi premere Enter Invio per salvare la voce Premere Enter Invio nuovamente per salvare la voce Impostazioni dellutente Questa funzione consente di abilitare una password amministrazione per impedire ad eventuali utenti non autorizzati di acce...

Страница 275: ...ro Ctrl destro Alt sinistro Alt destro Win sinistro Win destro Il tasto predefinito per tutti i comandi di selezione rapida è Bloc Scorr vedere la sezione Comandi di selezione rapida tramite la tastiera di seguito Per stabilire un tasto diverso per lavvio dei comandi di selezione rapida utilizzare i tasti freccia per passare al campo Hot Key quindi premere Enter Invio per salvare la voce AutoScan ...

Страница 276: ...o il BANCO 01 02 16 porte Configurazione in cascata La terza e la quarta indicano il numero Pag su BANCO precedente Pag giù BANCO successivo B Attivare disattivare il segnale mentre si trova in modalità AutoScan S Attiva Disattiva protezione OSD P Disattivare il monitor della console richiedere nome utente e password una volta attivata la protezione A Lamministratore attiva AutoScan Delete LAmmini...

Страница 277: ...Tasti Combo La mappatura avviene anche su alcune tasti Mac Vedere la tabella in basso Windows Tastiera USB Sun Micro Tastiera USB Mac Tastiera USB Caps Lock e L_Alt Interrompi Caps Lock e L_Alt Props Caps Lock e L_Shift Applicazione Componi Caps Lock e 1 Muto Caps Lock e 2 Volume Giù Caps Lock e 3 Volume Su Caps Lock e F3 Trova Caps Lock e F1 Fronte Caps Lock e F2 Apri Caps Lock e F4 Ancora Caps L...

Страница 278: ...za Si consiglia vivamente di aggiornare il proprio firmware soltanto se si rilevano problemi di mouse e tastiera legati allo Switch KVM PRO3 in quanto la riconfigurazione del software potrebbe comportare alcuni problemi funzionali inaspettati Per ricevere assistenza contattare il servizio di assistenza tecnica Belkin Prima di iniziare laggiornamento del firmware è necessario disporre dei seguenti ...

Страница 279: ...ia sempre aggiornato con la più recente versione a livello di funzioni e potenziamenti disponibile sul mercato Vedere la sezione Aggiornamento del firmware di questo manuale utente Q Lo switch KVM PRO3 supporta Microsoft IntelliMouse A Lo Switch KVM PRO3 supporta i mouse Microsoft Logitech PS 2 USB Kensington ecc e Belkin Qualora si presentino problemi di compatibilità contattare il servizio di as...

Страница 280: ...Q Posso usare lo switch KVM PRO3 per commutare solo segnali video A No gli Switch KVM PRO3 devono essere collegati ad entrambe le porte video e tastiera mouse dei server Per funzionare lo Switch KVM PRO3 rileva lalimentazione dalle porte PS 2 e USB presenti sul server Q Posso utilizzare lo Switch KVM PRO3 sul mio server Sun che supporta lo standard USB A Sì lo Switch KVM PRO3 funziona con ogni ser...

Страница 281: ... Collegare il monitor direttamente al server con il quale si stanno sperimentando gli inconvenienti per vedere se il problema persiste Sul mio monitor appare una schermata nera Accertarsi che tutti i cavi video siano inseriti correttamente Controllare che il cavo della tastiera sia collegato correttamente tra il server e la porta corretta dello Switch KVM Muovere il mouse e controllare se occorre ...

Страница 282: ...ilevato allavvio Controllare i cavi ed accertarsi che siano inseriti correttamente Il server si avvia ma il mouse non funziona Accertarsi che il mouse sia collegato correttamente Accertarsi che il mouse funzioni quando viene collegato direttamente al server Per eseguire questa prova potrebbe essere necessario riavviare il sistema Provare un altro mouse Quando effettuo la commutazione delle porte s...

Страница 283: ...tallare questi driver in maniera automatica Quando uso un server Mac alcuni tasti della tastiera non funzionano Se si stesse utilizzando una tastiera per PC su un sistema Mac alcuni tasti opzionali della tastiera PC potrebbero venire invertiti Tuttavia le funzioni dei tasti principali saranno indicate su di essi Vedere la sezione mappatura dei tasti Mac Combo per server Sun nel manuale duso I tast...

Страница 284: ...nformare la scheda video di un computer rispetto alle sue proprietà tra le quali la risoluzione massima e lintensità dei colori per garantire che allutente vengano offerte delle valide opzioni di configurazione del display Collegamento a catena Una configurazione realizzata con diversi switch KVM collegati tra loro in serie Una struttura composta da diversi switch KVM collegati in cascata utilizza...

Страница 285: ...h KVM Porta Una presa di interfaccia su un server attraverso la quale si può collegare un dispositivo o il cavo di un dispositivo Switch KVM primario Lo switch KVM collegato alla console e impostato sul BANCO con indirizzo 00 Switch KVM secondario Qualsiasi switch KVM collegato in cascata allo switch KVM primario e impostato sullindirizzo di BANCO 01 15 e al quale non è collegata nessuna console ...

Страница 286: ...d canadese ICES 003 Cet appareil numérique de la classe B est conforme á la norme NMB 003 du Canada Garanzia limitata di 3 anni sul prodotto Belkin International Inc Oggetto della garanzia Belkin International Inc Belkin garantisce allacquirente di questo prodotto Belkin che tale prodotto è esente da difetti di progettazione montaggio materiale e lavorazione Periodo di copertura della garanzia Bel...

Страница 287: ...ellapparecchio dopo lispezione Eventuali apparecchi danneggiati dovranno essere mantenuti disponibili per eventuali verifiche fino alla risoluzione della richiesta di indennizzo Al raggiungimento dellaccordo Belkin si riserva il diritto di essere surrogato da eventuali polizze assicurative dellacquirente Cosa stabilisce la legge riguardo alla garanzia LA PRESENTE GARANZIA COSTITUISCE LUNICA GARANZ...

Страница 288: ... Belkin Ltd Express Business Park Shipton Way Rushden NN10 6GL Regno Unito 44 0 1933 35 2000 44 0 1933 31 2000 fax Belkin B V Boeing Avenue 333 1119 PH Schiphol Rijk Paesi Bassi 31 0 20 654 7300 31 0 20 654 7349 fax Belkin GmbH Hanebergstraße 2 80637 Monaco di Baviera Germania 49 0 89 143405 0 49 0 89 143405 100 fax Belkin SAS 5 Rue du Petit Robinson 3ème étage 78350 Jouy en Josas Francia 33 0 1 3...

Отзывы: