


Before you light the barbecue
Perform the following checks
•
Make sure all gas connections are tight and leak tested
•
Ensure the cooking surfaces are clean and hygienic
•
Check the control knobs are in the off position
•
Check that the gas supply is turned on
•
Ensure the hood of the barbecue and the lid of the side
burner are up. If you do not, gases can build up inside
the hood and create a dangerous situation
•
Make sure long handles do not hang over the edge of
the barbecue. Injury can result if they are accidentally
knocked
Grease tray
Neatly line the grease tray with a couple of sheets of
aluminium foil to aid in clean up. Cut the foil to shape and
make sure that the foil sits on the bottom of the tray.
Fill the tray with a 6mm (1/4”) layer of dry sand or other non-
combustible absorbent material to absorb grease. Change
the foil and absorbent material regularly to reduce the
likelihood of a grease tray fire.
Lighting the barbecue
The same procedure is used to light the main burners as
well as the side burner:
1.
Push in and hold the control knob down while turning
slowly in an anti-clockwise direction until the starter
mechanism engages at the two o’clock position. At this
time the gas will start to flow.
2.
Hold the control knob in while continuing to turn the
knob toward the High or twelve o’clock position
3.
The starter mechanism will click and the main burner
will now light. Continue turning the knob slowly until it
rests in the twelve o’clock position
If the burner is alight, release the knob
The requirement to press the knob in before turning
is a safety feature that prevents the knobs from being
accidentally turned on.
If the burner does not light
Keep the control knob pushed in and turn the control knob
in a clockwise direction to return to the OFF position. Wait
5 minutes for the gas to disperse and then repeat steps
1-3. If you cannot light the burners, call your retailer before
proceeding.
Manual lighting
Press and turn the left hand control knob anti-clockwise to
the High position, then use a long match to light the left hand
burner immediately through the gap between the front of the
grease tray and the barbecue body.
HIGH
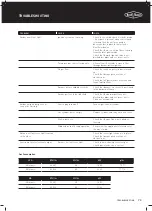
GAS SPECIFICATIONS AND MOBILE RESTRAINT
66
INSTALLATION WARNINGS
Содержание 7000 Series
Страница 5: ...5 BMF7645SA PRODUCT DIMENSIONS DIMENSIONS 1602 708 1284 ...
Страница 7: ...7 BMF7655SA PRODUCT DIMENSIONS DIMENSIONS 1758 708 1284 ...
Страница 9: ...9 BMG7642SA PRODUCT DIMENSIONS DIMENSIONS 1602 685 1284 ...
Страница 11: ...11 BMG7652SA PRODUCT DIMENSIONS DIMENSIONS 1758 685 1284 ...
Страница 15: ...15 ASSEMBLING THE BARBECUE 4 18 19 3 ...
Страница 16: ...16 19 15 ASSEMBLING THE BARBECUE 5 6 11 BMF7645SA BMF7655SA ASSEMBLY ...
Страница 17: ...17 ASSEMBLING THE BARBECUE 7 8 11 ...
Страница 18: ...18 ASSEMBLING THE BARBECUE 17 9 10 BMF7645SA BMF7655SA ASSEMBLY ...
Страница 19: ...19 ASSEMBLING THE BARBECUE 11 12 13 16 ...
Страница 20: ...20 ASSEMBLING THE BARBECUE 11 13 14 23 BMF7645SA BMF7655SA ASSEMBLY ...
Страница 21: ...21 ASSEMBLING THE BARBECUE 15 16 20 22 21 ...
Страница 26: ...26 ASSEMBLING THE BARBECUE 25 26 BMF7645SA BMF7655SA ASSEMBLY ...
Страница 27: ...27 ASSEMBLING THE BARBECUE 27 28 6 7 ...
Страница 28: ...28 ASSEMBLING THE BARBECUE 29 30 BMF7645SA BMF7655SA ASSEMBLY ...
Страница 31: ...31 ASSEMBLING THE BARBECUE 35 36 1 Locate the warming rack Sliding locked Sliding unlocked ...
Страница 32: ...32 ASSEMBLING THE BARBECUE 10 37 38 9 BMF7645SA BMF7655SA ASSEMBLY ...
Страница 33: ...33 ASSEMBLING THE BARBECUE 39 40 8 Spanner 19mm Spanner 22mm ...
Страница 39: ...39 ASSEMBLING THE BARBECUE 5 Assemble the back trolley panels with M6 head screws x7 11 11 ...
Страница 40: ...40 ASSEMBLING THE BARBECUE 6 7 13 13 BMG7642SA BMG7652SA ASSEMBLY ...
Страница 41: ...41 ASSEMBLING THE BARBECUE 17 16 8 9 Assemble the trolley top panel with M6 head screws x8 ...
Страница 43: ...43 ASSEMBLING THE BARBECUE 14 12 13 ...
Страница 44: ...44 ASSEMBLING THE BARBECUE 14 15 BMG7642SA BMG7652SA ASSEMBLY ...
Страница 45: ...45 ASSEMBLING THE BARBECUE 7 6 16 17 Align side burner gas pipe through the hole pull wire through the hole ...
Страница 46: ...46 ASSEMBLING THE BARBECUE 18 19 BMG7642SA BMG7652SA ASSEMBLY ...
Страница 47: ...47 ASSEMBLING THE BARBECUE 4 20 21 ...
Страница 48: ...48 ASSEMBLING THE BARBECUE 22 23 2 3 1 Drip hole should be at front side BMG7642SA BMG7652SA ASSEMBLY ...
Страница 49: ...49 ASSEMBLING THE BARBECUE 10 24 25 ...
Страница 51: ...51 ASSEMBLING THE BARBECUE 28 29 Push down ON to brake Push down OFF to move ...
Страница 57: ...57 NATURAL GAS INSTALLATION 9 10 Disassemble the side burner and change the injector for the NG version ...
Страница 74: ...74 NOTES NOTES NOTES ...