1.
Sample Prep
a.
Prepare samples in the TC hood and bring to bench in ependorf or conical tubes.
b.
Make the necessary dilutions to keep your cell concentration within the correct
range.
2.
At the lab bench, add 600
µ
L of solution to sample cup.
Exact volume does NOT
matter as the instrument sucks up entire solution and only uses 500
µ
L.
3.
Place sample cup in next available carousel position.
4.
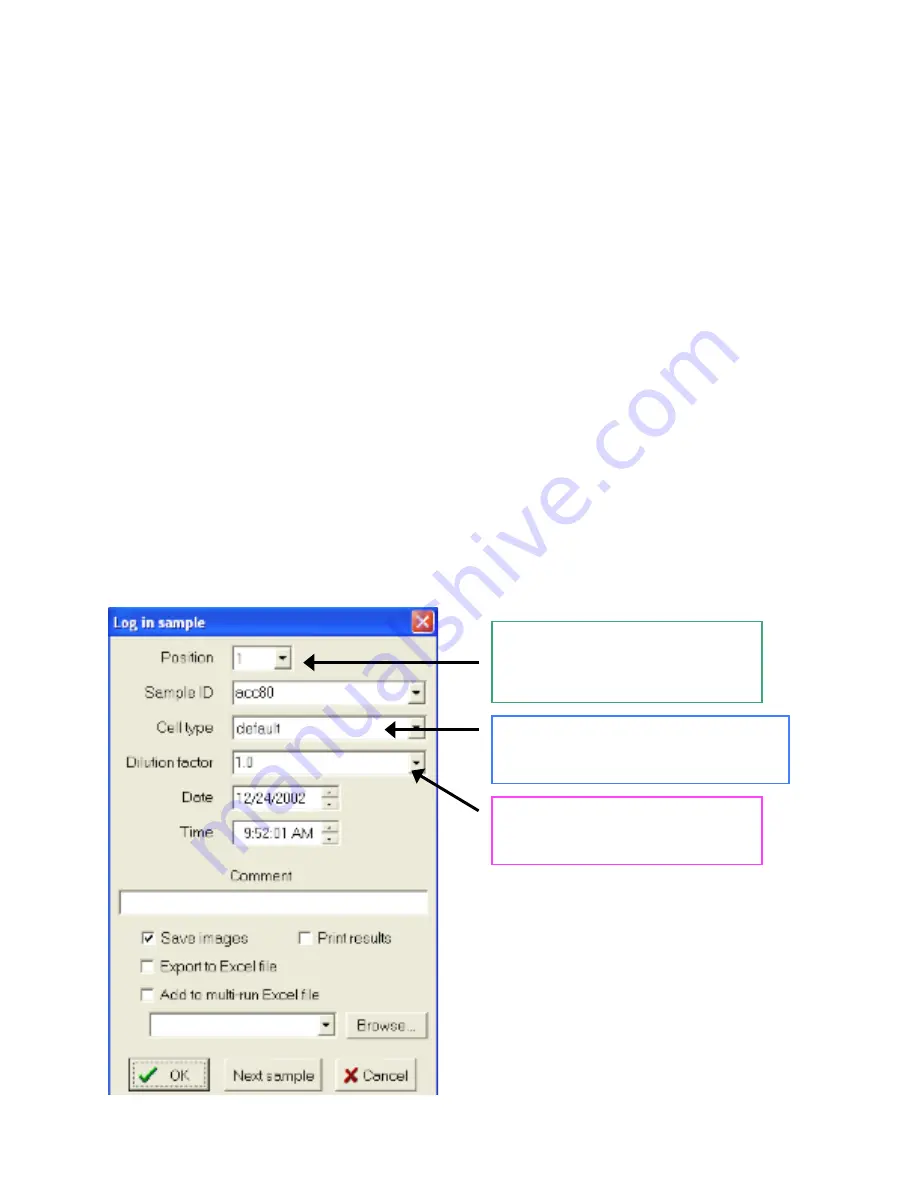
Log in sample on the computer by clicking on the
Log in sample
button: (log in window
shown below)
a.
Select cup position on carousel
b.
Enter your
Sample ID
(the software is smart and will increment for you with
multiple samples)
c.
Choose a
Cell type
(*first time choose default)
d.
Select a dilution factor
e.
Click
OK
or
Next sample
to enter additional sample data (*once you start the
queue you can continue to enter samples, so it saves time to start the queue first)
5.
From the navigation menu, choose
Autosampler queue
to see your samples in the queue.
From this screen, you can also edit/remove samples in the queue while a run is in
progress.
6.
Click on
Start queue
to begin sample analysis. Once the run begins, your sample will
disappear from the queue and you will only see it on the main screen. The bottom of the
screen will tell you exactly what the instrument is doing (i.e. mixing trypan blue, loading
flow cell, etc) and right side displays the run data (i.e. image #, % viable, cell count).
Indicates which position in the carousel
you are putting your sample in. NOTE:
the current three positions at the back of
the carousel do NOT appear in the menu
Each user will be able to set their preferences
for the default setting. Also, we will create
new cell types for common lab cell lines.
The dilution factor will automatically be
added into the result calculation by the
instrument. Choices are 1.0 to 20.0


