background image

Commissioning and configuration

EPP6228-0022

49

Version: 1.3

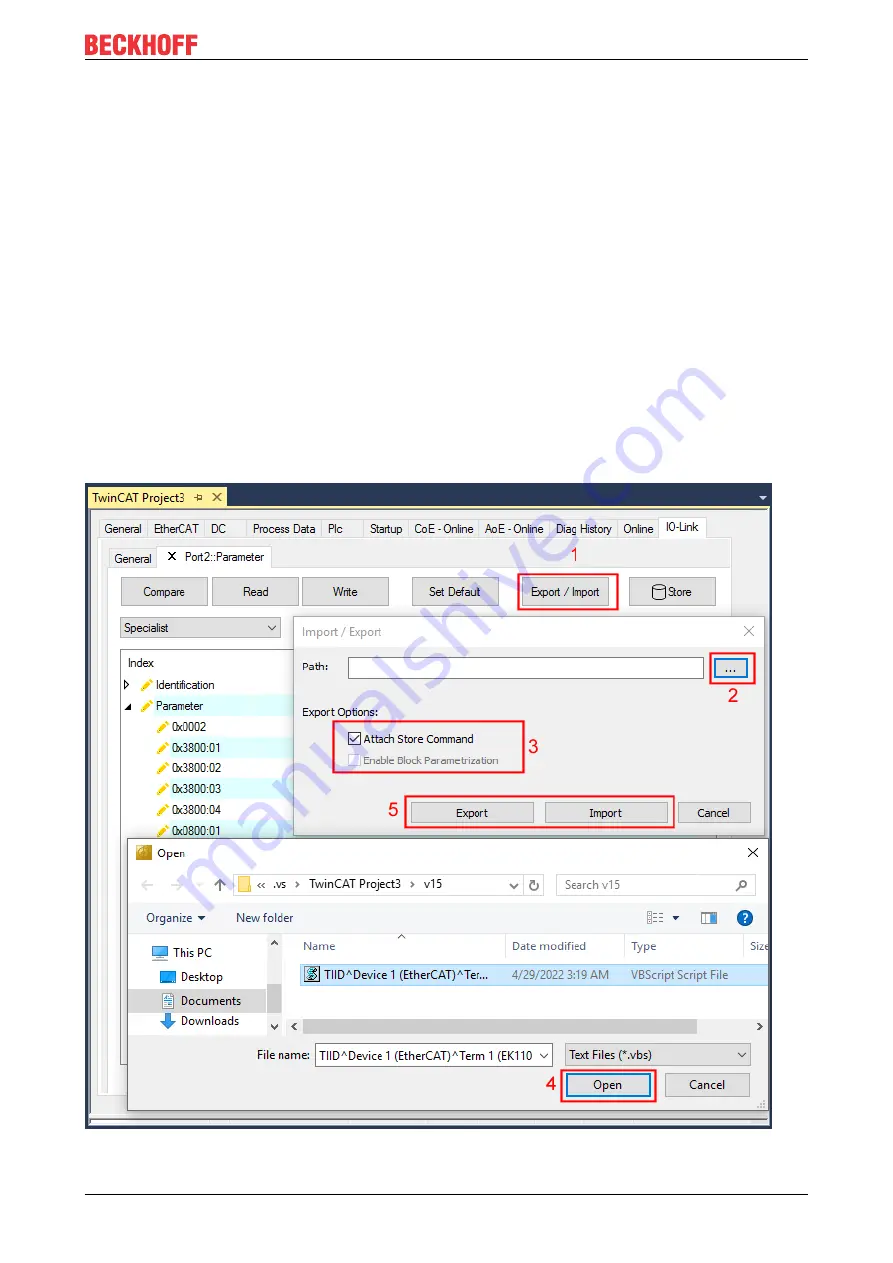
“Export / Import” button

The set parameter values can be exported as a .vbs file and restored later via Import.

1. Press the “Export / Import” button (see the diagram below (1)).

ð

The Import / Export dialog is opened

2. Specify the path under which you want to export or import the .vbs file, see fig. (2) below and confirm

with the “Open”


button, see fig. (4) below.

3. In addition, the export options “Attach Store Command” and “Enable Block Parametrization” can be

selected as shown in fig. (3) below.

ð

“Attach Store Command”: The parameters are loaded into the parameter server after the script has
written all values.

ð

“Enable Block Parametrization”: Block parameterization is enabled. For some sensors, writing is only
possible when block parameterization is enabled.

4. Press the “Export” or “Import” button

ð

The parameters are adopted from the imported file. The change of parameters is marked with a
pencil symbol.

5. Write the new parameter values to the sensor via “Write” button.

ð

The data is written to the device (offline configuration is possible). The successful writing process is
confirmed via a storing symbol in front of the index.

Fig. 31: Parameterization IO-Link device - Export / Import

Содержание EPP6228-0022

Страница 1: ...Documentation EN EPP6228 0022 IO Link master 2022 08 25 Version 1 3...

Страница 2: ......

Страница 3: ...2 Fixing 18 5 2 Functional earth FE 18 5 3 Cabling 19 5 3 1 EtherCAT P 20 5 3 2 IO Link 24 5 4 UL Requirements 26 5 5 Disposal 27 6 Commissioning and configuration 28 6 1 Integrating into a TwinCAT pr...

Страница 4: ...bytes 63 7 2 ADS Error Codes 65 7 3 Further error diagnosis 68 8 Appendix 69 8 1 General operating conditions 69 8 2 Accessories 70 8 3 Version identification of EtherCAT devices 71 8 3 1 General not...

Страница 5: ...products that have already been supplied may be made on the basis of the data diagrams and descriptions in this documentation Trademarks Beckhoff TwinCAT TwinCAT BSD TC BSD EtherCAT EtherCAT G EtherCA...

Страница 6: ...trained specialists in control automation and drive engineering who are familiar with the applicable national standards Description of instructions In this documentation the following instructions are...

Страница 7: ...ped further Modules having earlier production statuses cannot have the same properties as modules with the latest status However existing properties are retained and are not changed so that older modu...

Страница 8: ...d from each other and can therefore be switched individually The nominal supply voltage for both is 24 VDC EtherCAT P uses the same cable structure as EtherCAT a 4 core Ethernet cable with M8 connecto...

Страница 9: ...ised via the EtherCAT master IO Link is designed as an intelligent link between the fieldbus level and the sensor so that parameterisation information can be exchanged bidirectionally via the IO Link...

Страница 10: ...s COM2 38 4 kbit s COM3 230 4 kbit s Device power supply 24 VDC from the control voltage US max 1 4 A per port short circuit proof max 3 0 A in total Digital input pin 2 characteristic Type 3 accordin...

Страница 11: ...e Shocks 1000 shocks in each direction in 3 axes 35 g 11 ms 3 3 Scope of supply Make sure that the following components are included in the scope of delivery 1 x EPP6228 0022 EtherCAT P Box 2x protect...

Страница 12: ...ts State Ch3 Module 5 1 Module 11 Digital Inputs Pin2 Ch3 4 Module 2 DeviceState Inputs State Ch4 Module 6 1 Module 11 Digital Inputs Pin2 Ch4 5 Module 2 DeviceState Inputs State Ch5 Module 7 1 Module...

Страница 13: ...ction data and the communication protocol are standardized and summarized in the IO Link Spec 4 1 IO Link system layout An IO Link system consists of an IO Link master and one or more IO Link devices...

Страница 14: ...P6228 0022 14 Version 1 3 CAUTION Risk of device damage The IO Link devices must be supplied from the 24 V power supply of the IO Link master provided for this purpose Otherwise damage to the IO Link...

Страница 15: ...16 starting with the fastest baud rate COM3 230 kbaud A successful connection has been established when the slave responds to the wake up pulse First of all the master reads the basic parameters Vend...

Страница 16: ...then the IO Link master loads the parameters from the IO Link device into the parameter server when starting for the first time Data from other IO Link devices that are already configured VendorID an...

Страница 17: ...ng is not true to scale Housing features Housing material PA6 polyamide Sealing compound polyurethane Mounting two mounting holes 4 5 mm for M4 Metal parts brass nickel plated Contacts CuZn gold plate...

Страница 18: ...connectors against dirt during the assembly Mount the module with two M4 screws in the centrally located mounting holes 5 2 Functional earth FE The mounting holes also serve as connections for the fun...

Страница 19: ...cabling EPP6228 0022 19 Version 1 3 5 3 Cabling Tightening torques for plug connectors Screw connectors tight with a torque wrench e g ZB8801 from Beckhoff Connector diameter Tightening torque M8 0 4...

Страница 20: ...uirements 26 EtherCAT P transmits two supply voltages Control voltage US The following sub functions are supplied from the control voltage US the fieldbus the processor logic typically the inputs and...

Страница 21: ...ocket for EtherCAT P supply OUT right M8 socket for downstream connection of EtherCAT P The metal threads of the M8 EtherCAT P sockets are internally linked to the FE connection via high impedance RC...

Страница 22: ...r EtherCAT L A Link Act A green LED labeled L A or Link Act is located next to each EtherCAT EtherCAT P socket The LED indicates the communication state of the respective socket LED Meaning off no con...

Страница 23: ...pply unit must also be taken into account Planning tool for EtherCAT P You can plan cable lengths voltages and currents of your EtherCAT P system using TwinCAT 3 The requirement for this is TwinCAT 3...

Страница 24: ...are implemented as M12 sockets 1 2 3 4 5 Fig 7 M12 socket Contact Function Description Core color 1 1 L Supply voltage US1 brown 2 DI Digital input white 3 L GND blue 4 C Q IO Link data cable black 5...

Страница 25: ...w 1 red illuminated flashes sporadically green Possibilities IO Link connection attempt No IO Link device connected Incorrect IO Link device connected IO Link device defective flashing green IO Link c...

Страница 26: ...4 Amp or by a 24 VDC power source that has to satisfy NEC class 2 A NEC class 2 power supply shall not be connected in series or parallel with another class 2 power source CAUTION CAUTION To meet the...

Страница 27: ...cts marked with a crossed out wheeled bin shall not be discarded with the normal waste stream The device is considered as waste electrical and electronic equipment The national regulations for the dis...

Страница 28: ...g and configuration EPP6228 0022 28 Version 1 3 6 Commissioning and configuration 6 1 Integrating into a TwinCAT project The procedure for integration in a TwinCAT project is described in these Quick...

Страница 29: ...the IO Link master see chapter Integrating into a TwinCAT project 28 in the TwinCAT System Manager an additional tab called IO Link is created fig IO Link tab A detailed description can be found in c...

Страница 30: ...been added in the Solution Explorer under the I O entry 1 Double click on the IO Link master A device editor for the IO Link master opens 2 Click on the IO Link tab The IO Link configuration tool ope...

Страница 31: ...ton Import Devicedescription 32 A or button IODD Finder 32 B 2 Select the device in the Catalog field and assign it to a port 34 3 Automatic scanning of the IO Link ports online via button Scan device...

Страница 32: ...the xml file of the desired sensor 3 After pressing the Open button the imported files are stored in the following folder for TwinCAT 2 x TwinCAT IO IOLink for TwinCAT 3 x TwinCAT 3 X Config IO IOLink...

Страница 33: ...ollowing folder for TwinCAT 2 x TwinCAT IO IOLink for TwinCAT 3 x TwinCAT 3 X Config IO IOLink 5 When moving the mouse pointer over the IO Link sensor device a green icon now indicates see the followi...

Страница 34: ...n 2 Activate the IO link configuration 41 so that changes become effective The IO Link devices are displayed and the process data are created If an error is found when integrating the IO Link device e...

Страница 35: ...ponding IO Link device must be connected to the IO Link port for this The connected devices are automatically detected configured and a search is performed for the associated IODD Finding connected IO...

Страница 36: ...IO Link devices are now entered in the General display The Port2 Details field displays information about the connected device Additionally the tabs Settings 37 and Parameter 38 can be opened Fig 18 D...

Страница 37: ...Version 1 3 Show settings of the device 3 Right click on port2 to display more details in dialog Settings 4 If necessary change the settings as described in chapter Settings of the IO Link devices 42...

Страница 38: ...r tab via double click on Port2 or richt click on Port2 and select Parameter in the menu The Parameters of of the respective IO link device are listed 6 Parameterize the device as described in chapter...

Страница 39: ...the port to open the context menu see the figure below B and select Create Device 4 In the Create Device dialog an IO Link device with the basic communication parameters can be created The mandatory...

Страница 40: ...ted proceed as follows 1 Right click on the port to open the context menu and select Delete Fig 22 Remove the device from port2 2 Activate the IO link configuration 41 so that changes become effective...

Страница 41: ...guration Changes in the IO Link configuration tool only become effective when you activate the IO Link configuration There are two ways to activate the IO Link configuration Click on the Reload Device...

Страница 42: ...s To find the basic settings of the devices for each port proceed as follows 1 right click on the port to open the context menu and select Settings A new tab Portx Settings opens where the settings de...

Страница 43: ...e Selection of the mode in which the IO Link port is to be operated Communication Default mode for IO Link devices StdDigIn StdDigOut Mode for non IO Link devices automatically selected if the port is...

Страница 44: ...he port and select Parameter The Parameter tab is opened The device parameters are listed in the tab The buttons Compare 45 Read Write 47 Set Default 48 Export Import 49 and Store 50 are located at th...

Страница 45: ...data The match is confirmed by a green tick in front of the index Matching values are displayed in the Value field see index 0x0018 Application Specific Tag Fig 26 Display of matching data in the Par...

Страница 46: ...Commissioning and configuration EPP6228 0022 46 Version 1 3 Fig 28 Compare configuration and sensor data...

Страница 47: ...with a green tick in front of the index Write button The default values from the IODD file are always preset 1 Enter the desired value under Value 2 Press the Enter key The values are accepted 3 Pres...

Страница 48: ...t Default button 1 Press the Set Default button All parameter values are set to the default settings Write default values to the sensor Note that the default values must also be written to the device...

Страница 49: ...d as shown in fig 3 below Attach Store Command The parameters are loaded into the parameter server after the script has written all values Enable Block Parametrization Block parameterization is enable...

Страница 50: ...g 0x08n0 Settings and 0x3800 Range Settings The success of storing process is marked with the storing symbol If the IO Link device is exchanged for a similar module the device can be restored The stor...

Страница 51: ...IO Link specification Command hex Command dec Name of the command Definition 0x01 1 ParamUploadStart Start Parameter Upload 0x02 2 ParamUploadEnd Stop Parameter Upload 0x03 3 ParamDownloadStart Start...

Страница 52: ...Commissioning and configuration EPP6228 0022 52 Version 1 3 Fig 35 Store parameters...

Страница 53: ...then double click Standard Command in the right hand field 2 Select the desired value from the list of different options and Device Reset Restarts the IO Link device Application Reset No function Res...

Страница 54: ...nd stored here 1 Click Application Specific Tag in the parameter list then double click Application Specific Tag in the right hand field 2 Enter application specific information and confirm with the E...

Страница 55: ...slave in relation to the PLC TwinCAT master The system communication is illustrated in Fig Illustration of the system communication of an EtherCAT master Fig 38 Illustration of the system communicatio...

Страница 56: ...ceState Inputs Device Index 0xF101 0D Device Diag Index 0xF101 10 Device State 0x1A04 4 0 DeviceState Inputs Index 0xF100 01 State Ch1 Index 0xF100 02 State Ch2 Index 0xF100 03 State Ch3 Index 0xF100...

Страница 57: ...ig in Bit only in the std IO Mode 0x_8 Process Data Invalid Bit 0x1_ Watchdog detected 0x2_ internal Error 0x3_ invalid Device ID 0x4_ invalid Vendor ID 0x5_ invalid IO Link Version 0x6_ invalid Frame...

Страница 58: ...ctuator manufacturer For clarification just a few of the possible indices are listed here Please take a look at the relevant chapter Object description and parameterization Index Name 0010 Vendor Name...

Страница 59: ...ports for the master are allocated via the port number The port numbers are allocated in ascending order from 0x1000 I e IO Link Port1 corresponds to PortNo 0x1000 and IO Link Portn corresponds to Po...

Страница 60: ...messages can be taken from the vendor documentation The IO Link device can be directly allocated on the basis of the port number The events occurring can be managed using the various buttons Update Hi...

Страница 61: ...Restore default parameters PDO Double click on SubIndex 001 to enter the Set Value dialog Enter the value 1684107116 in field Dec or the value 0x64616F6C in field Hex and confirm with OK All backup ob...

Страница 62: ...missioning and configuration EPP6228 0022 62 Version 1 3 6 8 Decommissioning WARNING Risk of electric shock Bring the bus system into a safe de energized state before starting disassembly of the devic...

Страница 63: ...g out 0x_3 Port in communication OP 0x_4 Port in communication COMSTOP dig in Bit only in std IO Mode 0x_5 not defined 0x_6 not defined 0x_7 not defined 0x_8 Process Data Invalid Bit Combinations are...

Страница 64: ...diagnosis messages If diagnosis messages occur simultaneously the value is output as a sum in the status byte of the relevant channel Often 0x03 Port in communication OP and 0x08 Process Data Invalid...

Страница 65: ...ated in the event of an error during ADS access to an IO Link device The possible error codes are listed in tables C 1 and C 2 Example of an AdsReturnCode AdsReturnCode 0x80110700 80 Device Applicatio...

Страница 66: ...LIM This ErrorType shall be used for a write service to a pa rameter below its specified value range Parameter length overrun 0x80 0x33 VAL_LENOVRRUN This ErrorType shall be used when the content of a...

Страница 67: ...tive AL Error single shot 0x5800 0x11 0x00 I SERVICE_TIMEOUT If the Master received an Event with the EventQualifier and the EventCode 0x5800 a negative service response indicating a service timeout i...

Страница 68: ...rts is mapped as a status byte in the DeviceState Inputs process data object See chapter Status of the IO Link ports 63 Nominal actual comparison of the parameter objects The indices 0x90n0 Info data...

Страница 69: ...otection Definition 0 Non protected 1 Protected against water drops 2 Protected against water drops when enclosure tilted up to 15 3 Protected against spraying water Water sprayed at an angle up to 60...

Страница 70: ...on ZS5000 0012 Protective cap for M8 sockets P coded IP67 50 pieces ZS5000 0020 Protective cap for M12 sockets IP67 50 pcs ZS5100 0000 Inscription labels unprinted 4 strips of 10 ZS5000 xxxx Printed i...

Страница 71: ...entifier in the case of 0000 usually abbreviated to EL3314 0016 is the EtherCAT revision The order identifier is made up of family key EL EP CU ES KL CX etc type 3314 version 0000 The revision 0016 sh...

Страница 72: ...06 production year 2006 3A firmware version 3A 02 hardware version 02 Exceptions can occur in the IP67 area where the following syntax can be used see respective device documentation Syntax D ww yy x...

Страница 73: ...ct it can be found in the following places on the packaging unit directly on the product if space suffices on the packaging unit and the product The BIC is machine readable and contains information th...

Страница 74: ...of composite information from positions 1 to 4 and with the above given example value on position 6 The data identifiers are highlighted in bold font 1P072222SBTNk4p562d71KEL1809 Q1 51S678294 Accordi...

Страница 75: ...roduced into the Beckhoff I O production terminals box modules from 2020 widespread implementation is expected in 2021 The user can electronically access the eBIC if existent as follows With all Ether...

Страница 76: ...or specific content is stored with the help of a category according to ETG 2010 ID 03 indicates to all EtherCAT masters that they must not overwrite these data in case of an update or restore the data...

Страница 77: ...s there Beckhoff Support Support offers you comprehensive technical assistance helping you not only with the application of individual Beckhoff products but also with other wide ranging services suppo...

Страница 78: ......

Страница 79: ...Beckhoff Automation GmbH Co KG H lshorstweg 20 33415 Verl Germany Phone 49 5246 9630 info beckhoff com www beckhoff com More Information www beckhoff com epp6228 0022...

Отзывы: