Installation and Maintenance Manual: RLVAC
Published February 2022
39
Ensure all personnel are clear of the belt and all guards are reinstalled before applying
air pressure to the takeup cylinder. The belt and takeup mechanism may move rapidly
as pressure is applied.
Do not apply air to the takeup cylinder or attempt to set regulator pressure until the belt
is installed and joined. The takeup will move to the end of its travel and will need to be
manually reset before the belt can be installed.
3. Once pressure is applied, visually inspect the takeup chains for even loading. Both chains should
be taut. If one chain span is taut and the other is loose, lock out the drive and adjust the chain
tensioning screws on the cylinder yoke until both chain spans are evenly tensioned.
Air pressure must be removed from the takeup cylinder before adjusting. The lockable
disconnect valve provided with the takeup regulator will release all stored pressure
when it is locked out. If another means of lockout is used, verify that all stored pressure
is released and there is no residual belt tension before disconnecting the takeup
chains.
4. The pneumatic takeup is self-adjusting for belt stretch and varying load conditions. Once the
pressure is set and the chains are tensioned evenly, no further adjustment is necessary.
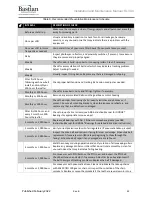
Table 5: Pneumatic Takeup Pressure Settings
PRESSURE
LACED BELT
HOT SPLICED BELT
Minimum Pressure (psi)
18.5
52
Target Pressure (psi)
20
54
Maximum Pressure (psi)
20.5
57
5. Once the conveyor is running, check belt tracking through the drive. If adjustments are
necessary, it is recommended to adjust the tracking bracket on the non-motor side only for easier
access.
Do not run the drive motor without the correct pressure applied to the takeup cylinder.
Loss of pressure will cause a loss of belt tension, and the resulting slippage can
damage the belt facing if not immediately corrected. It is recommended to have a
pressure sensor monitoring the air system so the PLC can automatically shut down the
drive motor if air pressure is lost.
6. If the belt is not centered when it enters at the drive pulley, it will be necessary to fix the belt
tracking upstream, typically at the infeed tail.
7. If the belt is entering the drive pulley centered, but is tracking off at the takeup pulley, then adjust
the drive snub roller.
8. If the belt is tracking off where it exits the drive, then adjust the non-crowned (lower) routing roller.
The crowned (upper) routing roller should be set square to the drive frame.
5.12.3 Belt Tracking Principles
Only qualified and experienced individuals should perform belt tracking procedures,
which must be performed while the conveyor is running. Verify E-stop functionality
before beginning a belt tracking procedure.


